Handleiding
Je bekijkt pagina 5 van 12
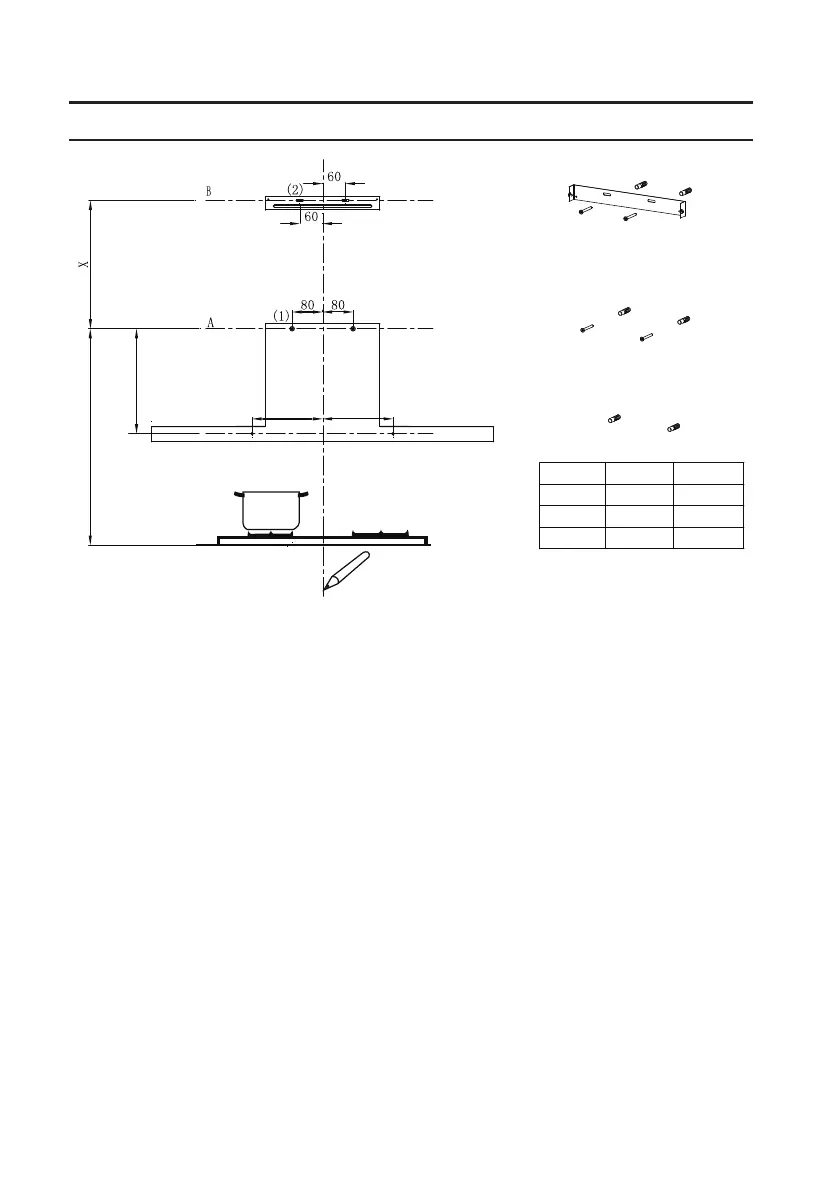
INSTALLATION
As a first step, proceed with the following drawings:
A vertical line up to the ceiling or up to the upper limit, at the center of the area in which the hood
is to be fitted.
A horizontal line A at 790– 890 mm above the cooker top.
A horizontal line B at a X mm above the horizontal line A.
A horizontal line C at a 115mm below the horizontal line A .
Mark Points:
Mark a point (1) on the horizontal line A, 80 mm to the vertical reference line.
Repeat this operation on the other side , checking that the two marks are leveled.
Mark a point (2) on the horizontal line B, 60 mm to the vertical reference line.
Repeat this operation on the other side, checking that the two marks are on the same
horizontal line.
Mark a point (3) on the horizontal line C, 150 mm to the vertical reference line . Repeat
this operation on the other side , checking that the two marks are leveled.
Fix the brackets :
Drill holes at the marked points with a ɸ10 mm drill bit.
Insert the Wall Plugs 11 into the holes.
Fix a Chimney fixing bracket 21 with 2 screws 10 (5 x 50) at the horizontal line B.
WALL DRILLING AND BRACKET FIXING
150
150
C
(3)
Option
Chimney
X
1
400X390
305-650
2
500X490
405-850
Vertical reference line
115
2 3 4
6 7 8
9 10 11
790-890
Screw 2 screws 10 (5 x 50) to Wall Plugs 11 at the horizontal line A; approximately the four fifth
length of the screws 10 (5 x 50) was screwed into the Wall Plugs 11, used for hook the hood.
5
Bekijk gratis de handleiding van Midea 60M17SS, stel vragen en lees de antwoorden op veelvoorkomende problemen, of gebruik onze assistent om sneller informatie in de handleiding te vinden of uitleg te krijgen over specifieke functies.
Productinformatie
| Merk | Midea |
| Model | 60M17SS |
| Categorie | Afzuigkap |
| Taal | Nederlands |
| Grootte | 1043 MB |


