Lincoln Electric CHAMELEON 3V0 handleiding
Handleiding
Je bekijkt pagina 2 van 22
5
8
3
10
7
2
1
5
4
6
9
GB
Adjusting WELDING LEGEND (CHAMELEON 3V0)
helmet for a comfortable fi t
1. Headgear Top - Adjusts headgear for proper depth on the head to ensure correct balance and
stability.
2. Headgear tightness - To adjust, push in the adjusting knob located on the back of the headgear
and turn left or right to desired tightness. Note: if adjustment is limited, it may be necessary to
remove the comfort cushion.
3. Distance adjustment - Adjusts the distance between the face and the lens. To adjust, loosen both
outside tension knobs and press inward to free from adjustment slots. Move forward or back to
desired position and retighten. (Both sides must be equally positioned for proper vision.)
4. Angle adjustment - Four pins on the right side of the headband top provide adjustment for the
forward tilt of the helmet. To adjust, loosen the right outside tension adjustment knob then lift
on the control arm tab and move it to the desired position. Retighten tension adjustment knob.
Replacement of the Front and Inside Lens Covers
Warning! Never use the auto-darkening lens without the inside and outside lens covers properly
installed. Welding spatter will damage the auto-darkening lens and void the warranty.
1. Outside/Inside - to remove either lens cover, fi rst remove the auto-darkening lens assembly. To
remove the lens assembly, push down on the bottom retaining arms and push the retaining clips
toward the outside of the helmet. Then, just lift up on the assembly and pull free of the helmet.
Next, remove the outside lens cover by pushing into the helmet. Remove the rubber lens gasket
and install on the new lens cover. (When reinstalling the lens cover, make certain that smooth
surface on the lens gasket faces forward in the helmet.) Reinstall the lens assembly by reversing
the above procedure.
2. Inside - To replace the inside lens cover, remove the auto-darkening lens assembly from the lens
frame by pushing up on the top two retaining tabs while gently pushing the lens free. Remove the
lens cover by sliding it ou of either side. Replace with the new cover lens and reinstall the assembly
in the helmet by reversing the above procedure.
Cleaning
The helmet requires little maintenance. However, for best performance we recommend cleaning
after use. Using a soft cloth dampened with a mild soap and water solution, wipe the cover lenses
clean. Allow to air dry. Occasionally, the fi lter lens and sensors should be cleaned by gently wiping
with a soft, dry cloth. (Never use solvents or abrasive cleaning detergents. Do not immerse the lens
assembly in water).
Troubleshooting
Symptom Solution
Not On - auto-lens will not darken Check batteries and verify they are in good condition
momentarily when turned on. and installed properly. Also, check battery surfaces and
contacts and clean if necessary. Check battery for
proper contact and gently adjust contact points if
necessary. This is particularly important if the helmet
has been dropped.
Not switching - auto-lens stays light Stop welding immediately: Make sure the auto-lens
and will not darken when welding. power is turned ON. If power is on, review the sensitivity
recommendations and adjust sensitivity. Clean lens
cover and sensors of any obstructions. Make sure the
sensors are facing the arc; angles of 45° or more may
not allow the arc light to reach the sensors.
Not Switching - auto-lens stays dark Fine-tune the sensitivity setting by making small
after the weld arc is extinguished, adjustments to the control by turning it toward the “min”
or the auto-lens stays dark when setting. In extreme light conditions, it may be necessary
no arc is present. to reduce the surrounding light levels.
Sections of the auto-lens are not going Stop welding immediately: The auto-lens may be
dark, distinct lines separate the light cracked which can be caused by the impact of dropping
and dark areas. the helmet. Weld spatter on the auto lens may also
cause cracking. (The lens needs to be replaced; most
cracked lenses are not covered by warranty).
Switching or Flickering - the auto-lens Review the sensitivity setting recommendations and
darkens then lightens while the welding increase the sensitivity if possible. Be sure the arc
arc is present. sensors are not being blocked from direct access to the
arc light. Check the lens cover for dirt and spatter that
may be blocking the arc sensors.
Inconsistent or lighter auto-lens shading Refferred to as an angle of view effect, auto darkening
In the dark-state, noticiable on the outside lenses have an optimum viewing angle. The optimum
edges and corners. viewing angle is perpendicular or 90° to the surface of
the auto-lens. When that angle of view varies in the
dark-state, welders may notice slightly lighter areas at
the outside edges and the corners of the lens. This is
normal and does not represent any health or safety
hazard. This effect may also be more noticeable in
applications where magnifying lenses are used.
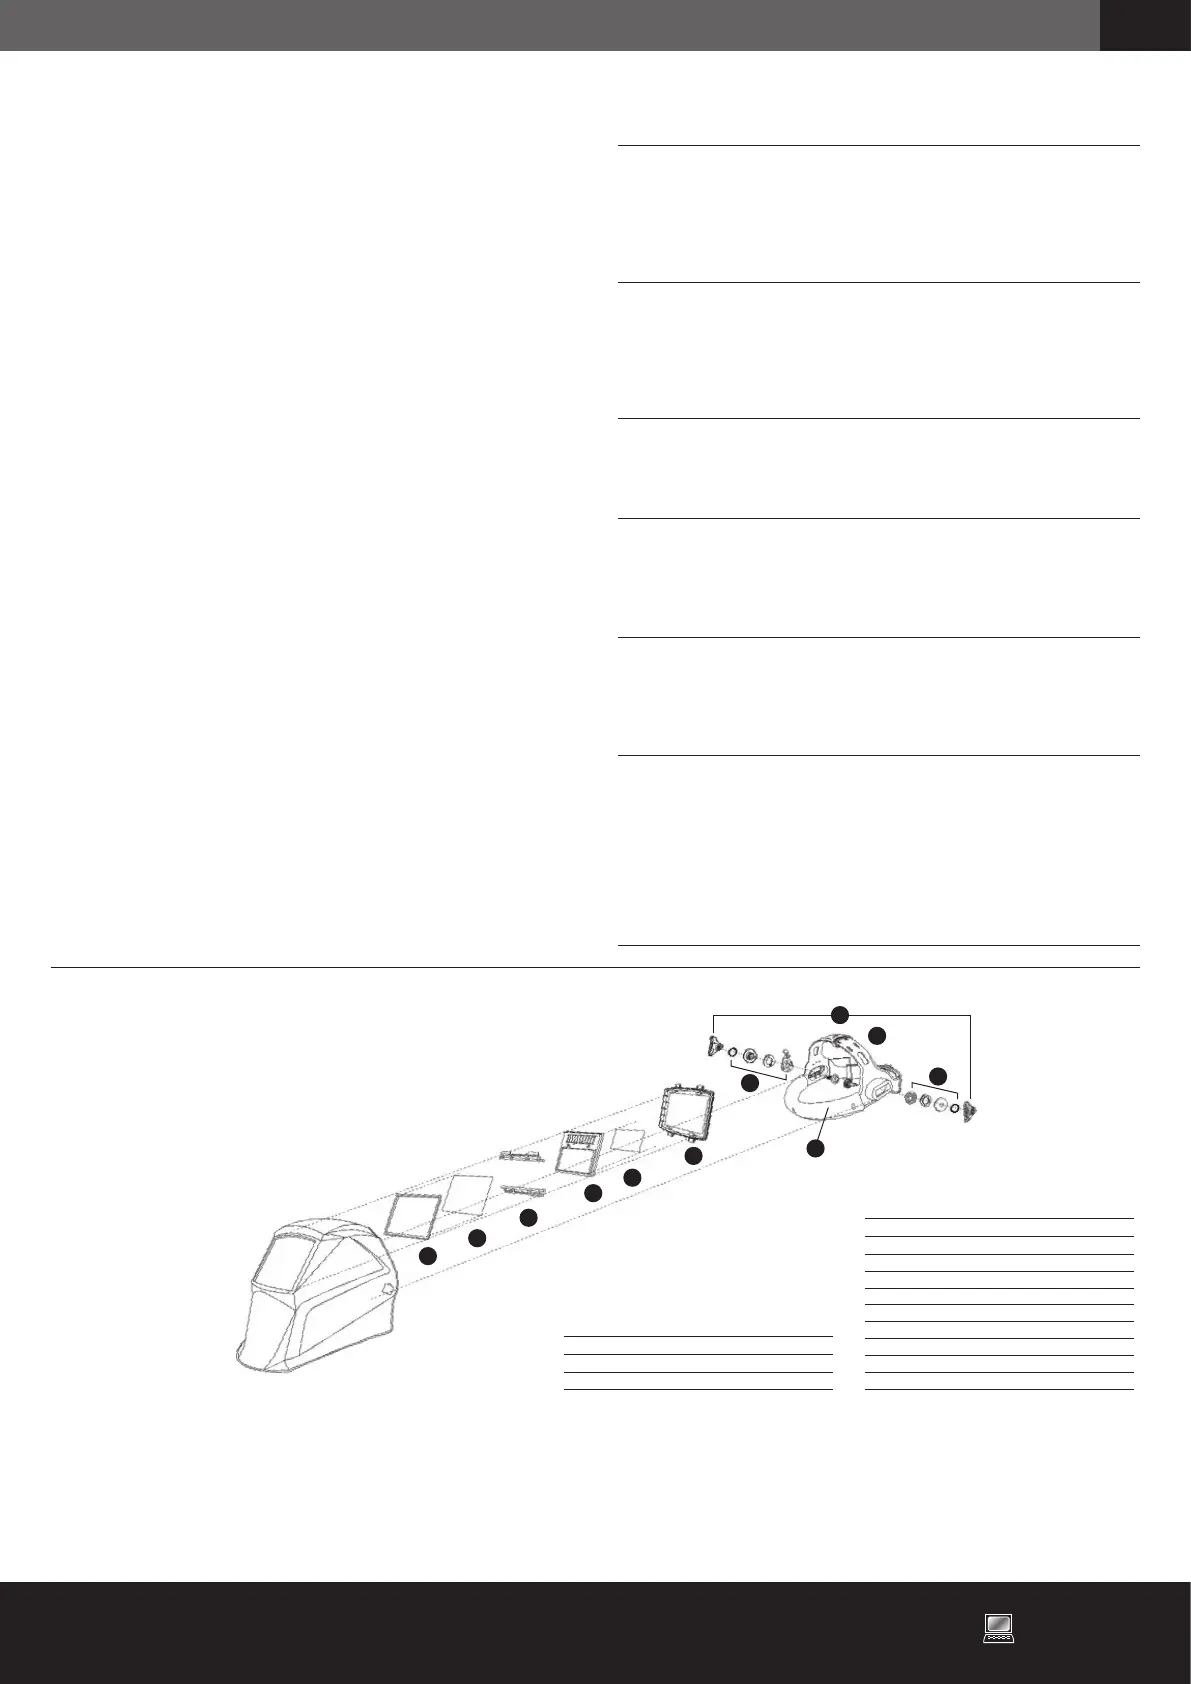
Description Cat. N°
1 - Gasket front cover lens W000261985
2 - Front cover lens W000261983
3 - Inside cover lens W000335163
4 - Headgear W000261986
5 - Headgear adjusting kit W000261987
6 - Sweatband W000261999
7 - Cartridge holder hook W000261990
8 - Cartridge holder W000261989
9 - Comfort cushion W000261991
WELDING LEGEND
(CHAMELEON 3V0)
parts list
Complete welding helmet set:
- Helmet
- Shade cartridge
- Front cover plate & inside cover plate
- Potentiometer adjustment knob
- Headband or helmet band assembly
- Sweatband
- Comfort cushion
- Cartridge spring holder
- 2 spare front cover plates
- 1 spare inside cover plate
- User instructions
WELDING LEGEND (CHAMELEON 3V0) Checklist
Check the quality of your welding helmet carefully and make sure that all
the relevant parts are supplied. If any parts are missing, please contact your
distributor.
Description Cat. N°
WELDING LEGEND (CHAMELEON 3V0)
W403548
10 - Cell W000377928
www.weldline.eu
Distributed by LINCOLN ELECTRIC IBERIA, S.L.
Carretera Laureo Miró 396-398, 08980, Sant Feliu de Llobregat, Barcelona (Spain) - Phone: Sant Feliu de Llobregat: 93 685 96 00
Manufactured by OTOSWING CO., LTD., 234-12 Kasan-Dong Kuemchun-Ku Seoul Korea
Bekijk gratis de handleiding van Lincoln Electric CHAMELEON 3V0, stel vragen en lees de antwoorden op veelvoorkomende problemen, of gebruik onze assistent om sneller informatie in de handleiding te vinden of uitleg te krijgen over specifieke functies.
Productinformatie
| Merk | Lincoln Electric |
| Model | CHAMELEON 3V0 |
| Categorie | Niet gecategoriseerd |
| Taal | Nederlands |
| Grootte | 8977 MB |


