Handleiding
Je bekijkt pagina 23 van 52
23INSTALLATION
ENGLISH
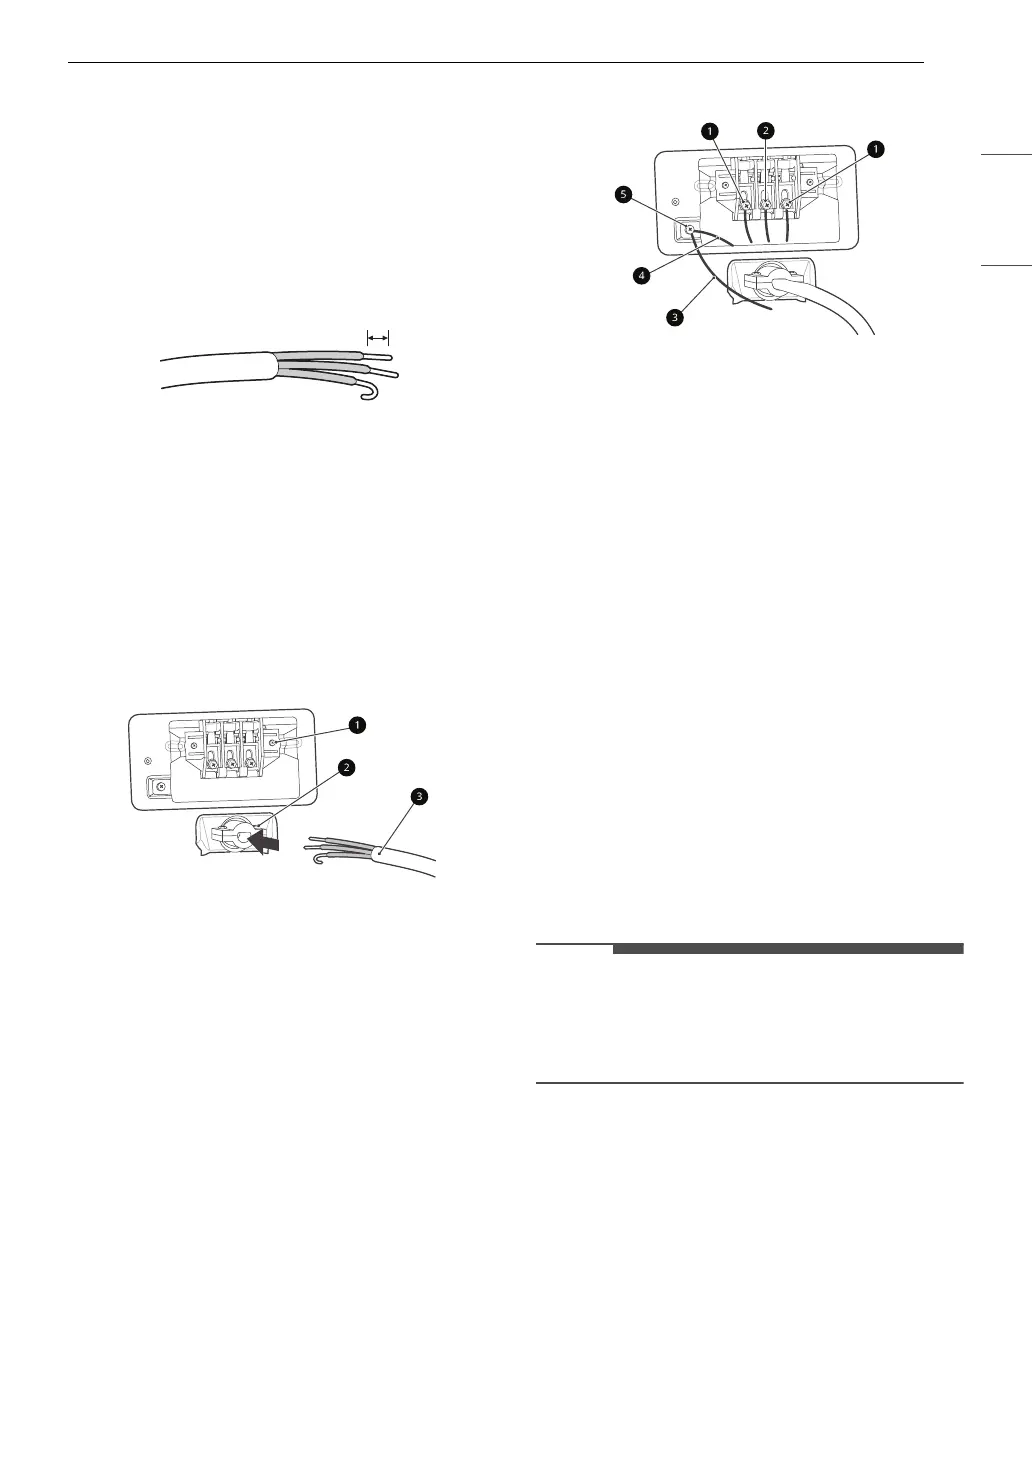
1 Remove 3.5 inches (8.9 cm) of the outer
covering from the wire. Strip 1 inch (2.5 cm)
insulation from each wire. Bend the ends of
the three wires into a hook shape.
2 Remove the terminal block access cover on
the upper back of the appliance.
3 Install UL-listed strain relief into the power
cord through-hole.
4 Thread the 3-wire, #10 AWG minimum copper
conductor power cable prepared in step 1
through the strain relief.
a Terminal block
b UL-listed strain relief
c UL-listed 3-wire power cord
5 Attach the two hot leads (black and red) of the
power cord to the outer terminal block
screws.
6 Attach the neutral (white) wire to the center
terminal block screw.
7 Connect the external ground (if required by
local codes) to the green ground screw.
8 Tighten all screws securely.
9 Reinstall the terminal block access cover.
a Hot lead (black and red)
b Neutral wire (white)
c External ground wire (if required by local
codes)
d Wire from the appliance harness
e Ground screw (green)
Final Installation Check
Once you have completed the installation of the
dryer and it is in its final location, confirm proper
operation with the following tests.
Test Dryer Heating
Gas Models
Close the dryer door and press the Power button
to turn the dryer on. Turn the knob and select the
Quick Dry. Press the Start/Pause buttons to start
the test. When the dryer starts, the igniter should
ignite the main burner.
NOTE
• If all air is not purged from the gas line, the gas
igniter may turn off before the main burner
ignites. If this happens, the igniter will reattempt
gas ignition after approximately two minutes.
Electric Models
Close the dryer door and press the Power button
to turn the dryer on. Turn the knob and select the
Quick Dry. Press the Start/Pause buttons to start
the test. The exhaust air should be warm after the
dryer has been operating for 3 minutes.
Checking Airflow
Effective dryer operation requires proper airflow.
The adequacy of the airflow can be measured by
• Use UL-listed 3-wire, #10 AWG minimum
copper conductor cable. Allow at least 5 ft. (1.5
m) length to allow for removal and installation
of dryer.
1’’ (2.5 cm)
Bekijk gratis de handleiding van LG D8201W, stel vragen en lees de antwoorden op veelvoorkomende problemen, of gebruik onze assistent om sneller informatie in de handleiding te vinden of uitleg te krijgen over specifieke functies.
Productinformatie
| Merk | LG |
| Model | D8201W |
| Categorie | Wasdroger |
| Taal | Nederlands |
| Grootte | 4812 MB |


