Kichler Bead handleiding
Handleiding
Je bekijkt pagina 14 van 54
14 | KICHLER.COM
NOTE: NOTE: Each handset control carries a unique ID code to facilitate communication between Each handset control carries a unique ID code to facilitate communication between
paired devices. The ID code is set by factory and is not user changeable. However, you will be paired devices. The ID code is set by factory and is not user changeable. However, you will be
required to perform an "ID code learning" process manually under these circumstances:required to perform an "ID code learning" process manually under these circumstances:
∙If you have multiple fans install within a close proximity and want to control all fans using a ∙If you have multiple fans install within a close proximity and want to control all fans using a
same handset control.same handset control.
NOTE: NOTE: Each fan requires its own receiver.Each fan requires its own receiver.
∙When your remote control is not responding(make sure battery is not flat)∙When your remote control is not responding(make sure battery is not flat)
∙After you have replaces a faulty transmitter or receiver with a new one.∙After you have replaces a faulty transmitter or receiver with a new one.
Otherwise the remote control will not work. To perform this process manually, follow steps Otherwise the remote control will not work. To perform this process manually, follow steps
below:below:
After installing and wiring the unit, restore power to your fan, press and hold the LEARN key After installing and wiring the unit, restore power to your fan, press and hold the LEARN key
for 1~3 seconds, the fan will turn on at medium speed and light (if installed) will turn on. This for 1~3 seconds, the fan will turn on at medium speed and light (if installed) will turn on. This
confirms that the learning process have been completed. This operation must be completed confirms that the learning process have been completed. This operation must be completed
within 30 seconds after restore power to the fan. (Fig. 20)within 30 seconds after restore power to the fan. (Fig. 20)
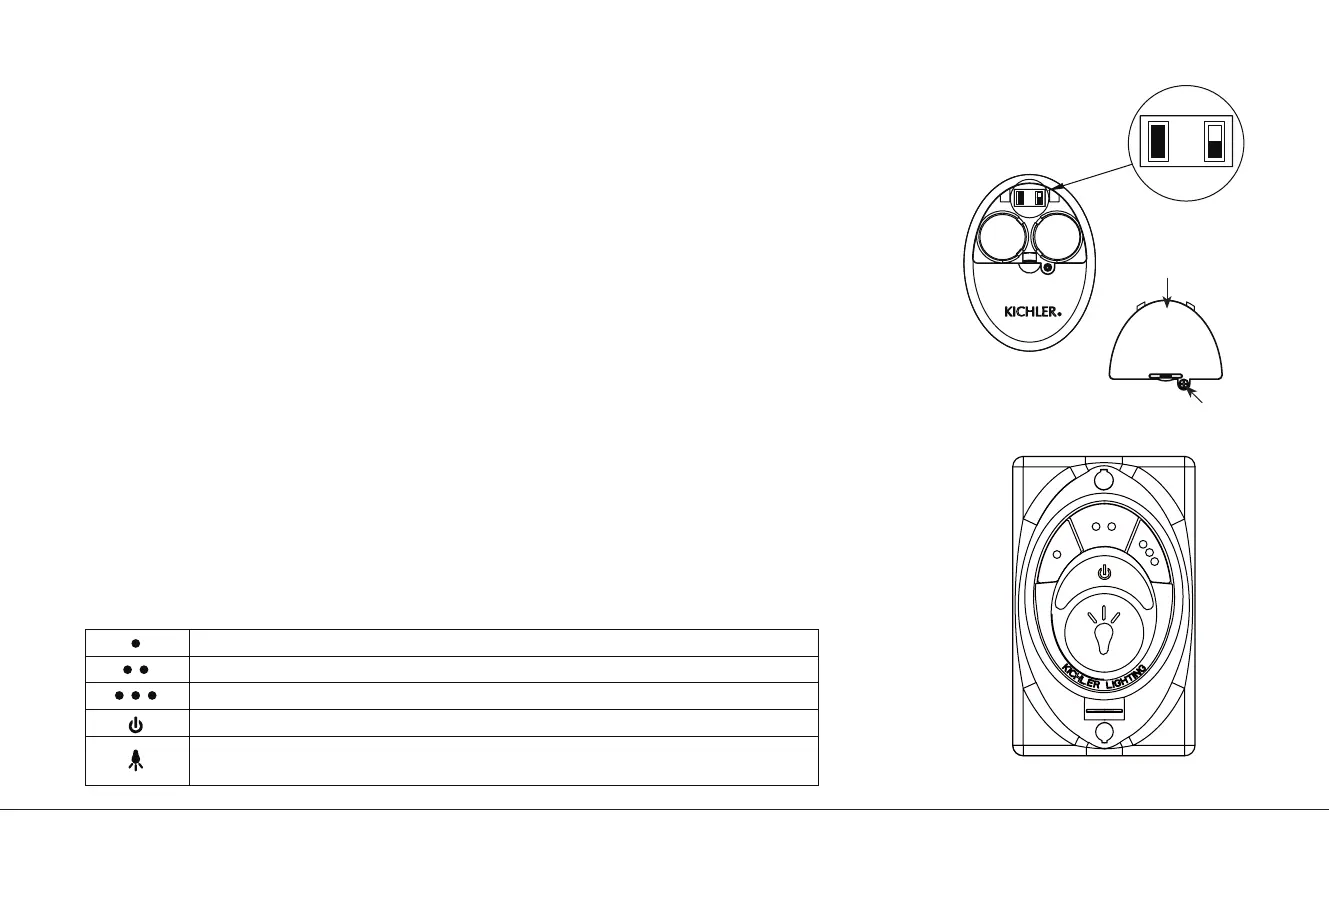
NOTE:NOTE: If the fan has fluorescent lighting, slide to "O" position. If the fan is with incandescent or If the fan has fluorescent lighting, slide to "O" position. If the fan is with incandescent or
halogen lighting or LED, slide to "D" position. Factory set is on "D" position. (Fig. 20)halogen lighting or LED, slide to "D" position. Factory set is on "D" position. (Fig. 20)
Step 4.Step 4. Replace the battery cover and tighten with screwdriver. (Fig. 20) Replace the battery cover and tighten with screwdriver. (Fig. 20)
Step 5. Step 5. The buttons control the fan speed and light as follows: (Fig. 21) The buttons control the fan speed and light as follows: (Fig. 21)
D
O
D
O
L
E
A
R
N
CR20323V
CR20323V
L
E
A
R
N
Fig. 20
Fig. 21
Battery Cover
Screw
OPERATING INSTRUCTIONS
Low speedLow speed
Medium speedMedium speed
High speedHigh speed
Fan OFFFan OFF
a.) Light ON/ OFF.a.) Light ON/ OFF.
b.) Press and hold to dim or brighten light to desired levelb.) Press and hold to dim or brighten light to desired level
Bekijk gratis de handleiding van Kichler Bead, stel vragen en lees de antwoorden op veelvoorkomende problemen, of gebruik onze assistent om sneller informatie in de handleiding te vinden of uitleg te krijgen over specifieke functies.
Productinformatie
| Merk | Kichler |
| Model | Bead |
| Categorie | Ventilator |
| Taal | Nederlands |
| Grootte | 3931 MB |


