Kichler Basics Pro Premier handleiding
Handleiding
Je bekijkt pagina 8 van 57
HANGING THE FAN
Standard Ceiling Installation
Step 1. Pass the 120-volt supply wires through the center hole in the ceiling hanger
bracket as shown in Fig. 5.
Step 2. Secure the hanger bracket to the ceiling outlet box with the screws and
washers provided with your outlet box.
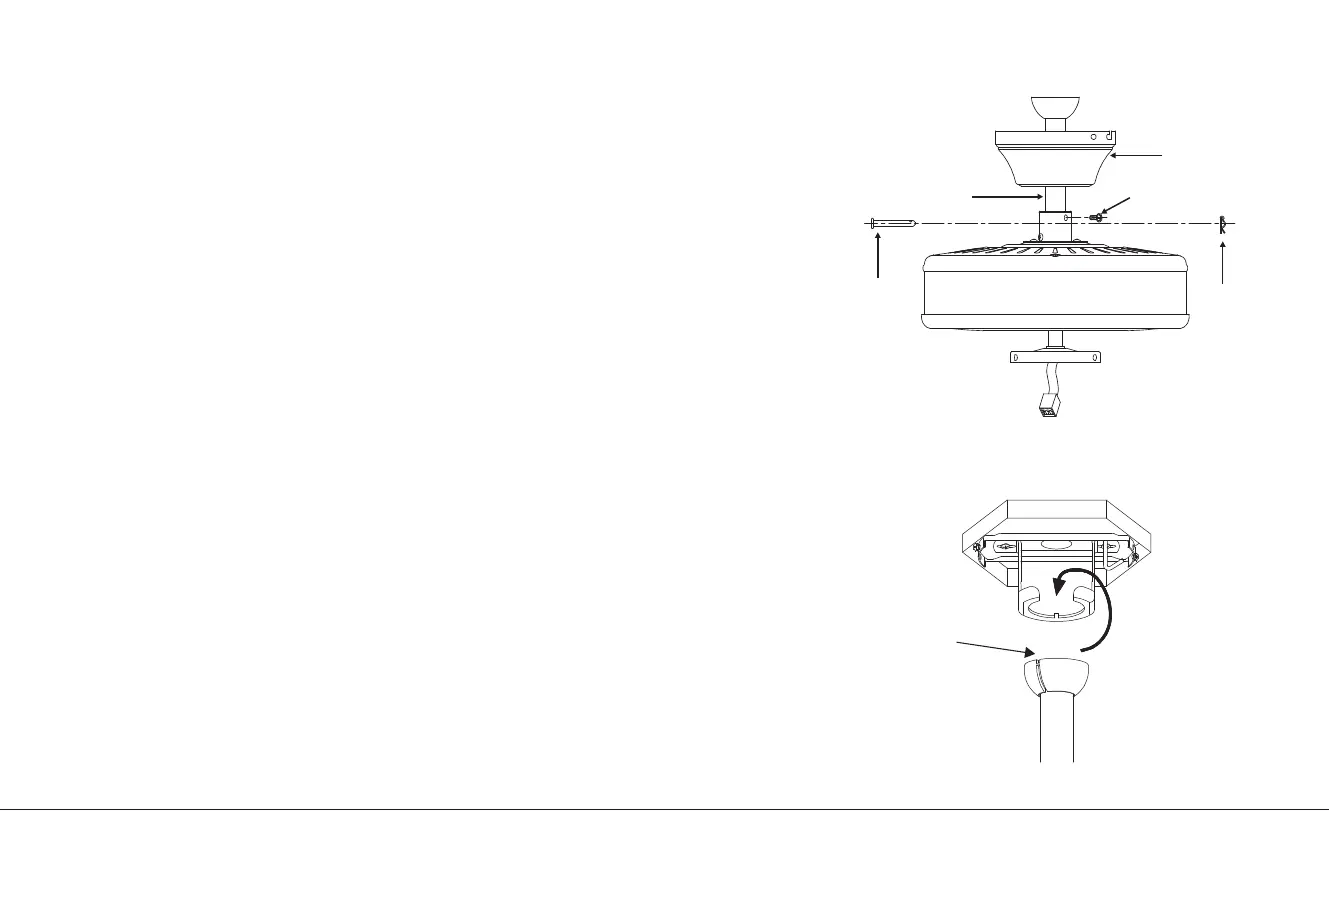
Step 3. Remove the hitch pin, lock pin and set screws from the top of the motor assembly.
Step 4. Route wires exiting from the top of the fan motor through the coupling
cover, canopy and then through the ball/downrod (Fig. 6)
Step 5. Align the holes at the bottom of the downrod with the holes in the collar on top
of the motor housing (Fig. 6). Carefully insert the hitch pin through the holes in the collar
and downrod. Be careful not to jam the pin against the wiring inside the downrod.
Insert the locking pin through the hole near the end of the hitch pin until it snaps into
its locked position, as noted in the circle inset of Fig. 6.
Step 6. Tighten two set screws on top of the fan motor firmly (Fig. 6).
Step 7. Place downrod ball into the hanger bracket socket (Fig 7).
Rotate the entire assembly until the "Check Tab" has dropped into the "Registration Slot"
and seats firmly. (Fig. 7)
The entire motor assembly should not rotate (left or right) when seated properly.
WARNING: Failure to reattach the cross pin and seat the "Check Tab" can cause the fan to
fall from the ceiling during operation. Take special care to make sure this pin is reattached.
Fig. 7
Fig.
6
Downrod
Retaining clip
Set screws
Ceiling canopy
Hitch pin
Registration slot
8 | KICHLER.COM
Bekijk gratis de handleiding van Kichler Basics Pro Premier, stel vragen en lees de antwoorden op veelvoorkomende problemen, of gebruik onze assistent om sneller informatie in de handleiding te vinden of uitleg te krijgen over specifieke functies.
Productinformatie
| Merk | Kichler |
| Model | Basics Pro Premier |
| Categorie | Ventilator |
| Taal | Nederlands |
| Grootte | 4530 MB |


