IOGEAR GW4K60KIT handleiding
Handleiding
Je bekijkt pagina 4 van 17
1 2 3 4 5 6
8 9 10 11 12
7 7
6 7
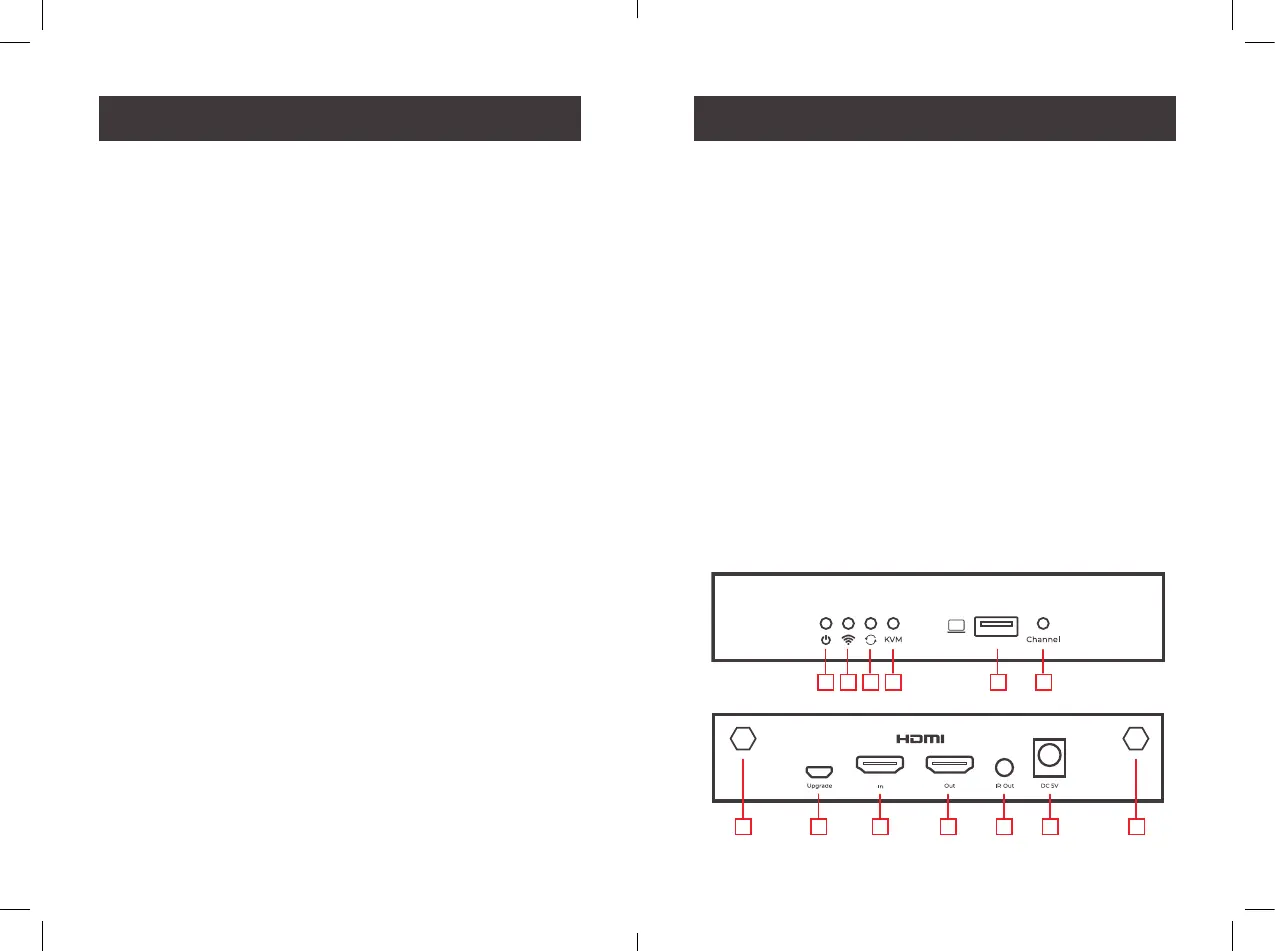
Overview
Front of Transmitter
1. Power Indicator:
• The indicator will turn blue when the power is turned on.
2. Wi Indicator
a. LED Slow Flashing: waiting for connection
b. LED Illuminated: connection successful
c. LED Quick Flashing: SSID Pairing Mode
3. Signal Indicator
a. LED O: no HDMI Signal
b. LED Illuminated: HDMI Signal is transmitting
c. LED Quick Flashing: restoring factory settings
4. KVM Indicator:
a. LED Flashing: The KVM is transmitting
b. LED Illuminated: The computer and the USB port are con-
nected
5. USB-A Port:
• Connect to the Computer with the included USB cable
6. Channel Switch Button
a. Press to switch channels
b. Press and hold for 5 seconds to enter SSID Pairing
c. Press and hold for 10 seconds to restore factory settings
Back of transmitter
7. Antenna Connector
• Connect the included antennas
8. Micro USB Port
• Used for rmware upgrades
9. HDMI Input
• Connect to the HDMI Source
10. HDMI Output
• Connect to a local HDMI Display device
11. IR Out
• Connect to the included IR Blaster extension cable
12. Power Input
• Connect to the included 5V/2A power adapter
Bekijk gratis de handleiding van IOGEAR GW4K60KIT, stel vragen en lees de antwoorden op veelvoorkomende problemen, of gebruik onze assistent om sneller informatie in de handleiding te vinden of uitleg te krijgen over specifieke functies.
Productinformatie
| Merk | IOGEAR |
| Model | GW4K60KIT |
| Categorie | Niet gecategoriseerd |
| Taal | Nederlands |
| Grootte | 1248 MB |


