Handleiding
Je bekijkt pagina 12 van 28
12
POWER SOURCE AND GROUNDING
It’s recommended to use the dryer on its own dedicated
power outlet for both convenience and safety. The
power outlet must be grounded.
Important! If the power cord is damaged, it must
be replaced by your local distributor or one of its
authorised service representatives. Please contact your
local Customer Care team and ensure the appliance is
completely disconnected from the power supply.
INSTALLATION
Refer to the diagram on page 8 of this manual.
Your Dryer should be placed in a ventilated area with a
minimum of 80mm between the top of the dryer and
ceiling and with no less than 10cm distance from the
wall or cabinetry. It is also recommended that there are
no obstacles within 1.5m of the dryers’ front, to ensure
ease of operation and ventilation.
WALL HANGING INSTALLATION
Step 1: Confirm the following components are all within
the included accessories:
• 2 × Hooks
• 2 × Holders
• 4 × Expansion bolts
• 1 × Installation positioning paper
Wall Hanging Installation Manual
1. Accessories include components:
hooks (2), holders (2), expansion bolts (4), installation
positioning paper (1), and installation manual (1).
Hook
Holder
Expansion
Bolt
Installation
Positioning Paper
When hang
straight,Hang the
hooks into the
two holes.
When hang
upside down,
Hang the hooks
into these two holes.
When hang upside
down, Fix the holder
at the position of the
two screws.
When hang straight,
Fix the holder at the
position of the two
screws.
(Applicable to 6kg and 7kg models)
Step 2: Determine a location to mount the dryer and
confirm that the construction type of the wall and
location is suitable for installation.
• Do not hang the dryer on the wall if the wall is not
solid.
• The distance in front of the wall must be more than
150cm.
Tip! Ensure power cord and plug is accessible and
reaches a power source.
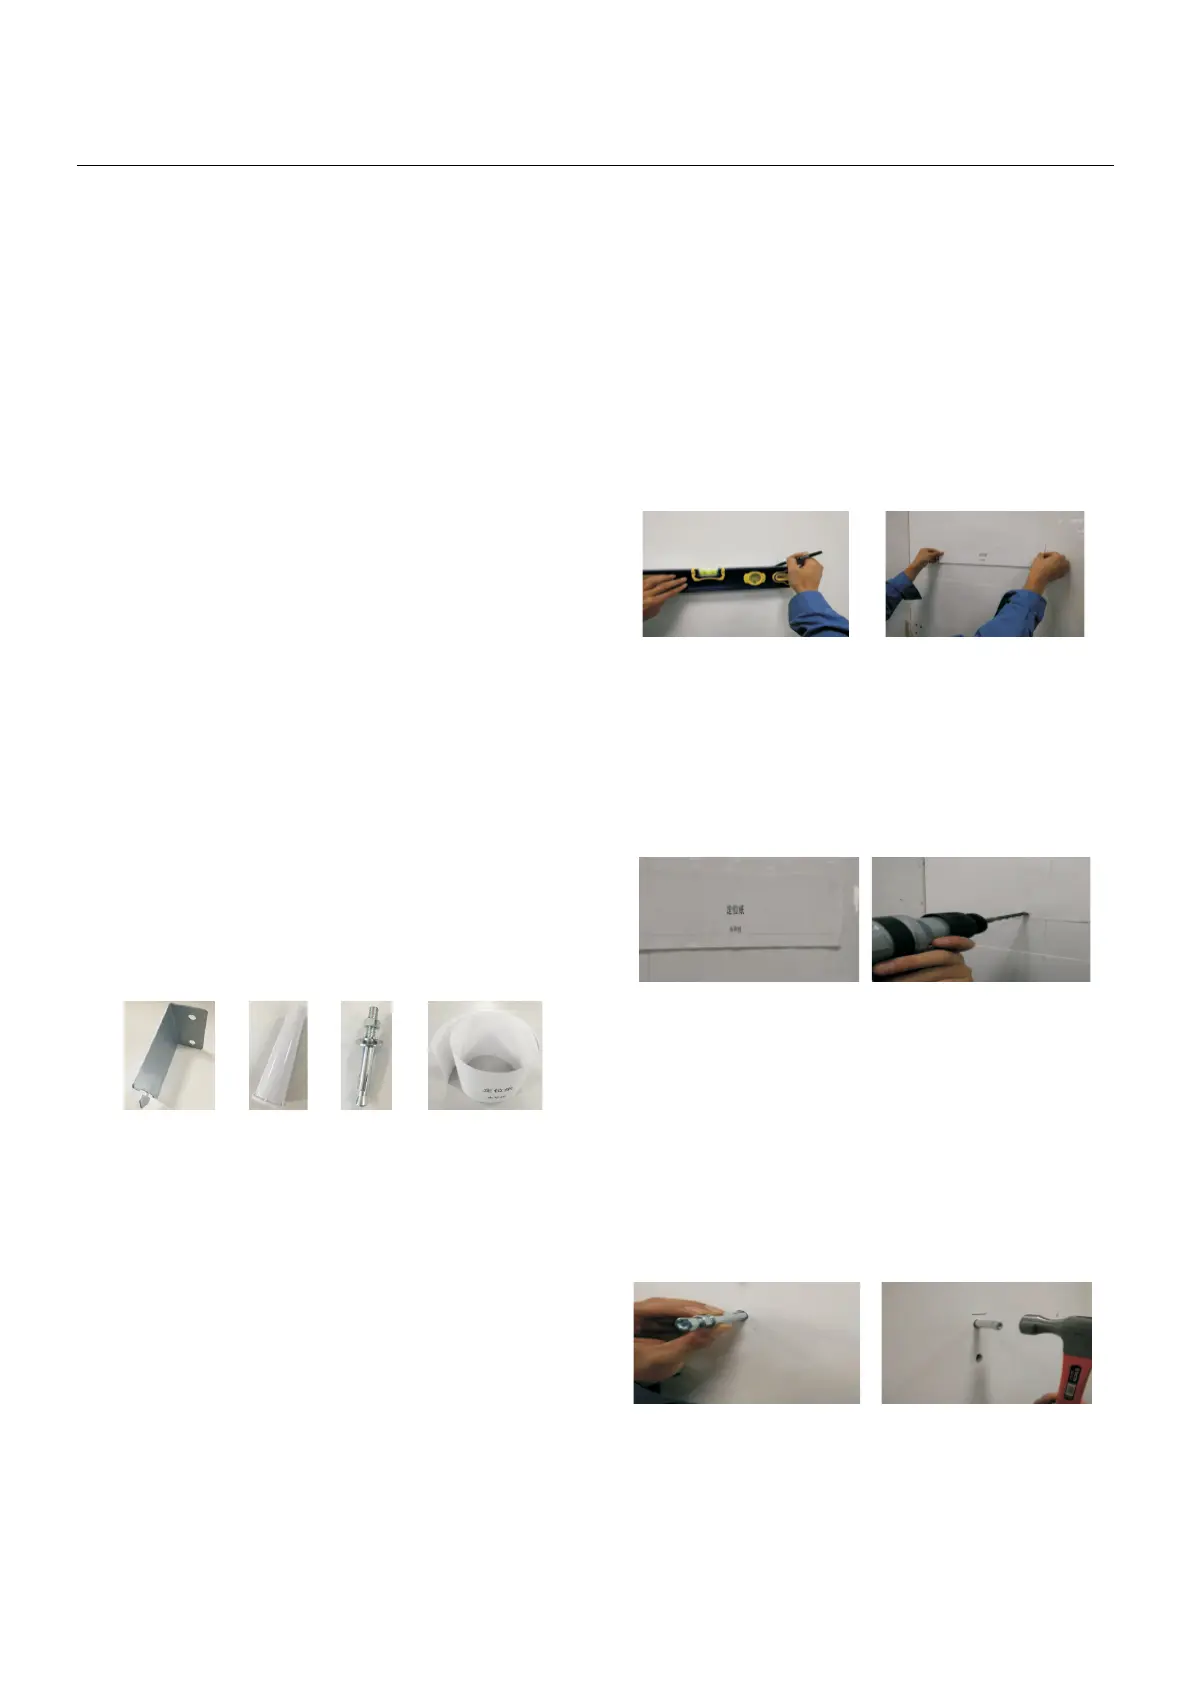
Step 3: Paste the installation positioning paper to the
solid wall.
• Draw a line with a level, and paste the positioning
paper based on the line.
Note: Ensure the screw holes will not overlap with
the power outlets or taps nearby.
• The bottom edge of the positioning paper must be
45cm+ higher than the floor.
Remove the adhesive paper behind the positioning
paper, and paste the positioning paper
to the wall horizontally.
Wall Hanging Installation Manual
1. Accessories include components:
hooks (2), holders (2), expansion bolts (4), installation
positioning paper (1), and installation manual (1).
Hook
Holder
Expansion
Bolt
Installation
Positioning Paper
When hang
straight,Hang the
hooks into the
two holes.
When hang
upside down,
Hang the hooks
into these two holes.
When hang upside
down, Fix the holder
at the position of the
two screws.
When hang straight,
Fix the holder at the
position of the two
screws.
(Applicable to 6kg and 7kg models)
Step 4: Drill holes for expansion bolts. The drill diameter
is 14mm. Drill 4 holes according to the positioning paper
drawing (hole depth 60mm). Find the hole mark on the
positioning paper. Drill 4 holes orderly at the positioning
paper hole mark with a Ø 14 drill bit (use specially-made
Ø 14 drill bit to pre-drill for the walls with tiles).
Wall Hanging Installation Manual
1. Accessories include components:
hooks (2), holders (2), expansion bolts (4), installation
positioning paper (1), and installation manual (1).
Hook
Holder
Expansion
Bolt
Installation
Positioning Paper
When hang
straight,Hang the
hooks into the
two holes.
When hang
upside down,
Hang the hooks
into these two holes.
When hang upside
down, Fix the holder
at the position of the
two screws.
When hang straight,
Fix the holder at the
position of the two
screws.
(Applicable to 6kg and 7kg models)
Step 5: Fix the hook to wall. Fix the hook with an
expansion bolt to the wall.
Take out the expansion bolt from the accessories. Insert
the bolt and expansion tubular into the drilled holes.
Insert one nut into the bolt. To prevent the thread being
damaged, don’t expose the end-thread of the bolt.
Then hammer the 4 bolts into the holes orderly;
Wall Hanging Installation Manual
1. Accessories include components:
hooks (2), holders (2), expansion bolts (4), installation
positioning paper (1), and installation manual (1).
Hook
Holder
Expansion
Bolt
Installation
Positioning Paper
When hang
straight,Hang the
hooks into the
two holes.
When hang
upside down,
Hang the hooks
into these two holes.
When hang upside
down, Fix the holder
at the position of the
two screws.
When hang straight,
Fix the holder at the
position of the two
screws.
(Applicable to 6kg and 7kg models)
Installation Instructions
Bekijk gratis de handleiding van InAlto IVD7G, stel vragen en lees de antwoorden op veelvoorkomende problemen, of gebruik onze assistent om sneller informatie in de handleiding te vinden of uitleg te krijgen over specifieke functies.
Productinformatie
| Merk | InAlto |
| Model | IVD7G |
| Categorie | Wasdroger |
| Taal | Nederlands |
| Grootte | 3640 MB |


