Handleiding
Je bekijkt pagina 7 van 64
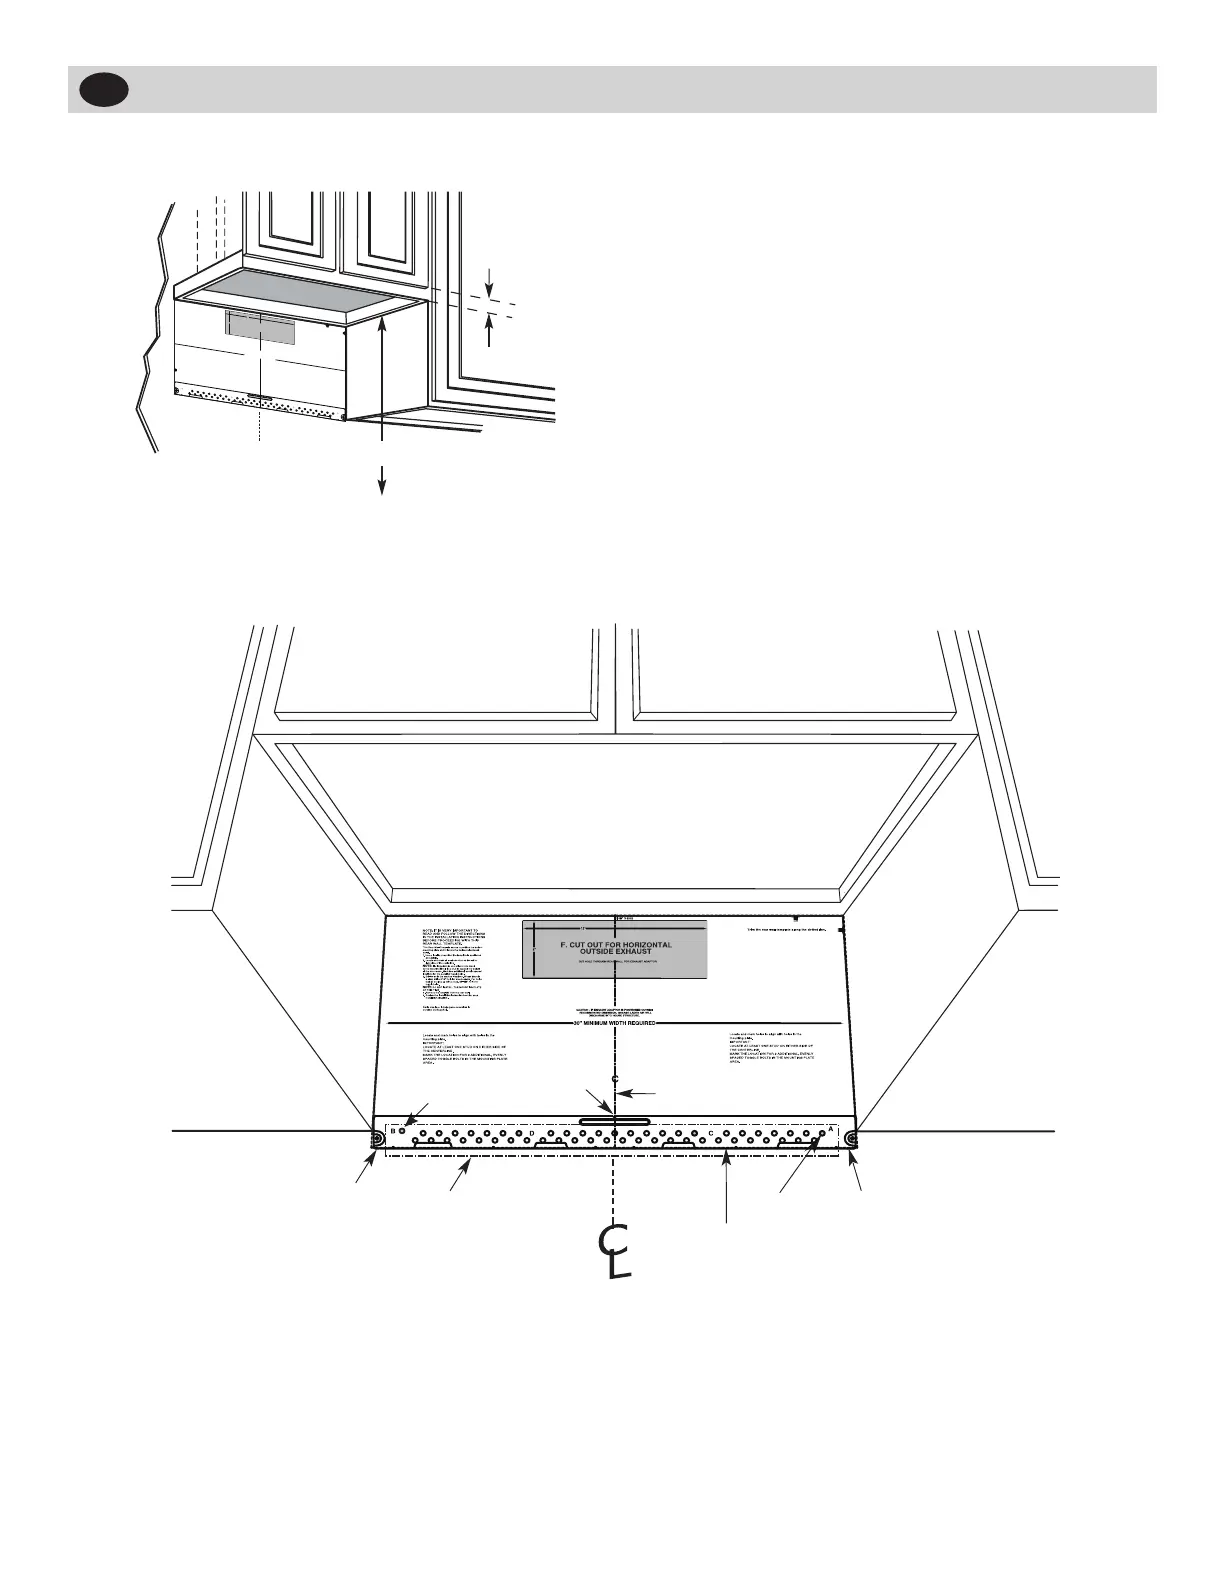
Plate position-beneath framed recessed cabinet
bottom
C
3
/
8
"
T
O
E
D
G
E
N
O
T
E
:
IT
IS
V
ER
Y
IM
P
O
R
T
AN
T
TO
R
E
A
D
A
N
D
FO
LL
O
W
T
HE
D
I
RE
CT
I
O
N
S
I
N
T
HE
IN
S
T
AL
L
A
T
IO
N
I
N
S
TR
U
CT
I
O
N
S
B
E
F
O
RE
P
R
O
C
E
E
D
I
N
G
W
I
T
H
T
H
I
S
R
E
A
R
W
A
L
L
T
E
M
P
L
A
T
E
.
T
h
is
R
e
a
r
W
a
l
l
T
e
m
p
la
t
e
s
e
r
v
e
s
t
o
p
o
s
i
t
i
o
n
t
h
e
b
o
t
t
o
m
m
o
u
n
t
i
n
g
p
la
t
e
a
n
d
t
o
lo
c
a
t
e
t
h
e
h
o
r
i
z
o
n
t
a
l
e
x
h
a
u
s
t
o
u
t
l
e
t
.
1
.
U
s
e
a
le
v
e
l
t
o
c
h
e
c
k
t
h
a
t
t
h
e
t
e
m
p
l
a
t
e
i
s
p
o
s
i
t
i
o
n
e
d
a
c
c
u
ra
t
e
l
y
.
2
.
L
o
c
a
t
e
a
n
d
m
a
rk
a
t
l
e
a
s
t
o
n
e
s
t
u
d
o
n
t
h
e
le
f
t
o
r
r
i
g
h
t
s
i
d
e
o
f
th
e
c
e
n
t
e
r
l
i
n
e
.
I
t
is
i
m
p
o
r
t
a
n
t
t
o
u
s
e
a
t
l
e
a
s
t
o
n
e
w
o
o
d
s
c
r
e
w
m
o
u
n
t
e
d
f
i
r
m
l
y
i
n
a
s
tu
d
t
o
s
u
p
p
o
r
t
t
h
e
w
e
i
g
h
t
of
t
h
e
m
i
c
r
o
w
a
v
e
.
M
a
rk
t
w
o
a
d
d
it
i
o
n
a
l
,
e
v
e
n
l
y
s
p
a
c
e
d
l
o
c
a
ti
o
n
s
f
o
r
t
h
e
s
u
p
p
l
i
e
d
t
o
g
g
l
e
b
o
lt
s
.
3
.
D
ri
l
l
h
o
le
s
in
t
h
e
m
a
r
ke
d
l
o
ca
t
i
o
n
s
.
W
h
e
r
e
t
h
e
r
e
is
a
s
t
u
d
,
d
r
il
l
a
3
/
1
6
"
h
o
le
f
o
r
w
o
o
d
s
c
r
e
w
s
.
F
o
r
h
o
l
e
s
t
h
a
t
d
o
n
o
t
l
in
e
u
p
w
i
t
h
a
s
t
u
d
,
d
r
i
l
l
5
/
8
"
h
o
l
e
s
f
o
r
t
o
g
g
l
e
b
o
l
t
s.
D
O
N
O
T
I
N
S
T
A
L
L
T
H
E
M
O
U
N
T
I
N
G
P
LA
T
E
A
T
T
H
I
S
T
I
M
E
.
4
.
R
e
m
o
v
e
t
h
e
t
e
m
p
l
a
t
e
f
r
o
m
t
h
e
re
a
r
w
a
ll
.
5
.
R
e
v
i
e
w
t
h
e
I
n
s
t
a
l
l
a
t
i
o
n
I
n
s
t
r
u
c
t
i
o
n
b
o
o
k
f
o
r
y
o
u
r
i
n
s
ta
l
l
a
t
i
o
n
s
it
u
a
t
i
o
n
.
Lo
c
a
t
e
a
nd
m
a
rk
h
ol
es
to
a
l
i
gn
wi
th
ho
l
e
s
i
n
t
he
m
o
u
n
t
i
n
g
p
l
a
te.
I
M
P
O
R
T
A
N
T
:
L
O
CA
TE
A
T
L
E
A
S
T
O
N
E
S
T
U
D
O
N
E
IT
HE
R
SI
D
E
O
F
T
HE
C
E
N
T
E
R
L
INE
.
M
A
R
K
T
H
E
L
O
C
A
T
I
O
N
F
O
R
2
A
D
D
I
T
IO
N
AL
,
E
V
E
NL
Y
S
P
A
C
E
D
T
O
G
G
L
E
B
O
L
TS
I
N
T
HE
M
O
U
N
T
IN
G
P
L
AT
E
A
R
E
A
.
L
o
c
a
t
e
a
n
d
m
a
rk
h
o
le
s
t
o
a
l
i
gn
w
i
t
h
ho
l
e
s
in
t
h
e
m
ou
n
t
in
g
p
l
a
t
e
.
IM
P
O
R
T
A
N
T
:
L
O
C
A
T
E
A
T
L
E
A
S
T
ON
E
S
TU
D
O
N
E
IT
H
E
R
S
I
D
E
O
F
TH
E
C
E
NT
E
R
L
I
N
E
.
M
A
R
K
T
H
E
L
O
C
A
T
I
O
N
F
O
R
2
A
D
D
I
T
I
O
N
A
L
,
E
V
E
N
L
Y
S
P
A
C
E
D
T
O
G
G
L
E
B
O
L
T
S
I
N
T
H
E
M
O
UN
T
IN
G
P
LA
T
E
A
R
E
A
.
T
r
i
m
t
he
re
ar
w
a
l
l
te
m
p
l
a
te
a
l
on
g
th
e
d
ott
e
d
li
n
e
.
Tr
im
t
h
e
re
a
r
w
al
l t
e
m
p
l
a
te
a
l
o
n
g
t
h
e
d
o
t
t
e
d
l
in
e
.
12
"
4"
D
a
r
l
e
v
u
e
l
t
a
a
la
h
o
j
a
p
a
r
a
c
o
n
s
u
l
t
a
r
l
a
v
e
r
s
i
ó
n
e
n
E
s
p
a
ñ
o
l.
1/4"
Minimum
clearance
30" to Cooktop
Draw a vertical line on the wall at the center of the 30"
space.
TapetheRearWallTemplateontothewallmatchingthe
centerline and touching the bottom cabinet frame.
Your cabinets may have decorative trim that interferes
with the microwave installation. Remove the decorative
trim to install the microwave properly and to make it
level.
THE MICROWAVE MUST BE LEVEL.
Use a level to make sure the cabinet bottom is level.
3. For this type of installation with front overhang only,
alignthemountingtabswiththishorizontalline,not
touching the cabinet bottom as described in Step D.
1.
Draw a vertical line on the wall at the center of the 30"
wide space.
2.Drawahorizontallineonthewallatthebottomof
“RearWallTemplate”.
3. Find a wall stud in area "E" of mounting plate Refer to
section 1B. Finding the wall studs.
4. For attaching the mounting plate into stud drill a 3/16"
hole into wood stud. Drill a 5/8" hole for toggle bolt in
1 other location (Hole A or Hole B)
NOTE: DO NOT MOUNT THE PLATE AT THIS
TIME.
NOTE: Holes A and B are inside area E. If neither of Holes
AandBarenotinastud,ndastudsomewhereinarea
E and draw a circle to line up with the stud. It is impor-
tant to have at least one wood screw mounted rmly
in a stud to support the weight of the microwave. Set
the mounting plate aside.
Centerline
notches
Hole B
Horizontal
Line
Drawahorizontallineon
wall at the bottom of “Rear
WallTemplate”.
Hole A HorizontalLine
Area E
Draw a Vertical Line
onWallfromCenter
of Top Cabinet
REAR WALL TEMPLATE
D. ALIGNING THE WALL PLATE
EN
If the cabinets have a or front filler piece. only, with no
back or side frame, install the mounting plate down the
2.Drawahorizontallineonthebackwallanequaldis-
same distance as the front overhang or front filler piece
tance below the cabinet bottom as the inside depth of
thickness. This will keep the microwave level.
1. Measure the inside depth of the or front filler piece.
the or front filler piece.
7
Bekijk gratis de handleiding van IKEA MEDELNIVÅ 004.621.66, stel vragen en lees de antwoorden op veelvoorkomende problemen, of gebruik onze assistent om sneller informatie in de handleiding te vinden of uitleg te krijgen over specifieke functies.
Productinformatie
| Merk | IKEA |
| Model | MEDELNIVÅ 004.621.66 |
| Categorie | Magnetron |
| Taal | Nederlands |
| Grootte | 13486 MB |