Handleiding
Je bekijkt pagina 14 van 64
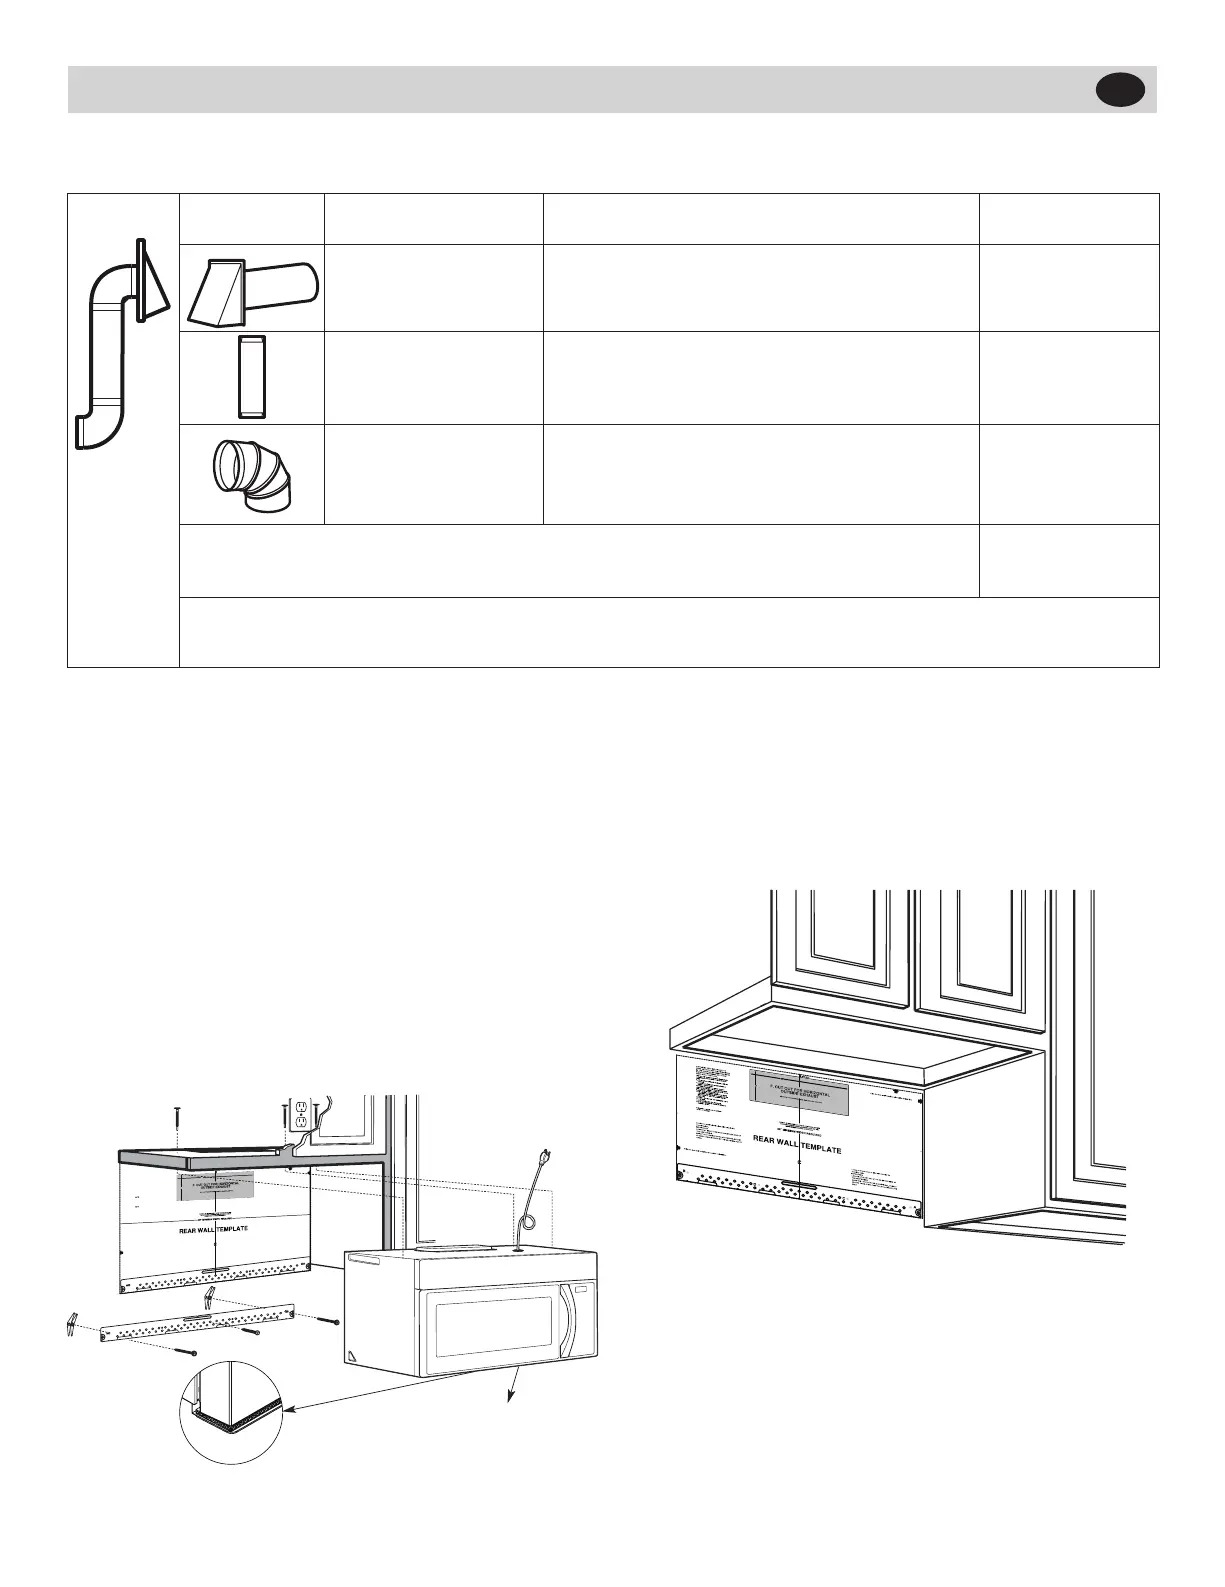
OUTSIDE BACK EXHAUST (EXAMPLE ONLY)
The following chart describes an example of one possible ductwork installation.
DUCT PIECES EQUIVALENT
LENGTH x
NUMBER
USED =
EQUIVALENT
LENGTH
WallCap 40 Ft. (12.2 m) x (1) = 40 Ft. (12.2 m)
3 Ft. Straight Duct
(3
1
⁄
4
”x10”/8.2x25.4
cm Rectangular)
3 Ft. (0.9 m) x (1) = 3 Ft. (0.9 m)
90° Elbow 10 Ft. (3 m) x (2) = 10 Ft. (3 m)
Equivalentlengthsofductpiecesarebasedonactualtestsandreect
requirements for good venting performance with any vent hood.
Total Length = 63 Ft. (19.2 m)
* IMPORTANT: For back exhaust, care should be taken to align exhaust with space between studs, or wall
should be prepared at the time it is constructed by leaving enough space between the wall studs to accommo-
date exhaust.
B OUTSIDE BACK EXHAUST (Horizontal
Duct)
INSTALLATION OVERVIEW
B1.PrepareRearWall
B2. Remove Blower Plate
B3.AttachMountingPlatetoWall
B4. Prepare Top Cabinet
B5. Adjust Blower
B6. Mount the Microwave Oven
IMPORTANT NOTES:
• Makesurethescrewsfortheblowermotorandblower
plate are securely tightened when they are reinstalled.
This will help to prevent excessive vibration.
• Makesurethemotorwiringhasbeenproperlyrouted
and secured, and that the wires are not pinched.
IMPORTANT :Do not remove the
cardboard spacers between the
heat shield and door.
3/
8
"TO EDGE
N
OTE
: IT IS
VER
Y IMPO
R
TANT TO
READ AND FOLLO
W
T
H
ED
IRECTI
ONS
IN THE INSTALLAT
ION INSTRU
CTI
ONS
BE
F
O
RE PR
O
CEEDINGWITH T
HIS
REAR W
A
LL TEMPL
A
T
E.
T
hi
s R
ea
r
Wall T
e
mplate
s
erve
s
to
po
s
ition th
e botto
m
mounting pl
a
tea
n
d
to loc
ate
the ho
r
iz
ont
al exhau
st
ou
t
le
t.
1.
Us
e
a l
evel
to c
h
ec
k th
at
the tem
plate is p
osit
ion
ed
ac
cu
r
at
el
y.
2. L
ocat
e a
nd
mark
at
le
as
t o
ne
stu
d
on
thele
ft o
r
r
ight sid
e
o
f
the c
enterli
ne.
It is
impo
rtant t
o u
se
at le
ast
one wood
screw
mo
u
nt
e
d
firmly
in a
s
tud
to support
the weight
ofthe microwav
e.
Mark t
wo
addi
tional,
evenlyspac
ed
lo
catio
n
s f
or
the
suppl
ied
t
oggle
bol
t
s.
3. D
r
i
ll holes in
the mar
ked lo
cation
s.W
he
r
e
the
re is
a
stud
,
d
r
ill
a 3/
16" h
ol
e
for
w
ood scre
w
s.
F
or holes
thatdo not lin
e up
w
ith
a
s
t
u
d,
dr
ill 5/
8" h
o
le
s
for
t
oggl
e bo
lts
.
DO
NOT
IN
S
T
A
L
L THE MO
U
NTI
NG
P
L
A
TE
A
T T
HIS
T
I
M
E.
4. Re
m
ove the templa
te fr
om
the rea
r
wal
l.
5.
Re
vie htw
e
In
st
allat
ion
Ins
t
r
uction book
for y
our
installation sit
uat
ion.
Locat
e and m
ark holes
to ali
gn wi
th holes
in the
mounting
plate.
IMPORTANT:
LO
C
A
T
E AT LEAST ONE STUD ON EITHER
S
ID
E O
F
TH
E CEN
TER
LI
N
E
.
MARKT
HE LOCATIONFOR 2 ADDITIONAL, E
V
ENLY
SPACE
D
T
O
GGLE
BO
LTS I
N
THE MO
UNTING PLATE
AREA.
Locate and mark
holes to ali
gn with holes in t
he
.eta
lp
g
ni
tn
u
o
m
IMPO
RTANT
:
LOCA
T
E AT LEAST ONESTUD ON EIT
HER SI
DE
O
F
TH
E
CENT
ERLI
NE.
MARKT
HE LO
CATI
ON
F
O
R 2
AD
DIT
ION
A
L, EVENL
Y
SP
ACED
TO
G
GLE
BO
LTS IN
THE MOUNTING PLATE
AREA.
Trim t
he r
ear wall temp
lat
e alongt
he dotted
line.
Trim t
he
rear
wall template alongth
e dotted line.
12"
4"
D
a
r
l
ev
u
elt
a
a
la
ho
j
apar
ac
o
nsu
l
tar
la
v
e
r
s
i
ó
n
e
nEs
pañol.
B1. PREPARING THE REAR WALL FOR OUTSIDE
BACK EXHAUST
You need to cut an opening in the rear wall for outside
exhaust.
• ReadtheinstructionsontheREARWALLTEMPLATE.
• Tapeittotherearwall.
• Cuttheopening,followingtheinstructionsoftheREAR
WALLTEMPLATE.
EN
14
Bekijk gratis de handleiding van IKEA MEDELNIVÅ 004.621.66, stel vragen en lees de antwoorden op veelvoorkomende problemen, of gebruik onze assistent om sneller informatie in de handleiding te vinden of uitleg te krijgen over specifieke functies.
Productinformatie
| Merk | IKEA |
| Model | MEDELNIVÅ 004.621.66 |
| Categorie | Magnetron |
| Taal | Nederlands |
| Grootte | 13486 MB |