Hughes & Kettner Coreblade handleiding
Handleiding
Je bekijkt pagina 11 van 66
11
english
4.4.2 Uploading All Presets from a Memory Stick to the Internal Memory
e STICK TO AMP button on C o r e b l a d e ’s rear panel uploads all
presets on the memory stick to C o r e b l a d e ’s internal memory in one
go. To initiate an upload, press and hold the STICK TO AMP button for about
three seconds until it lights up. You can release the button when its light flashes
intermittently during the dump. It will flash again after a few seconds to tell you
what has happened:
• e AMP TO STICK button flashes twice slowly to confirm everything’s OK.
• It flashes four times quickly to alert you to an error. Presets were not copied and
internal presets were not overwritten.
If the button fails to light up even after you press it for several seconds, the amp is
unable to detect presets on the memory stick.
CAUTION: Copying presets from the memory stick is an irreversible process
that overwrites all internal presets. We recommend that you first back up all your
amp’s presets to another memory stick.
4.5 NOISE GATE
e programmable NOISE GATE button switches the IDB™ noise gate on and
off for each preset. When activated, the noise gate kicks in to mute the amp as the
signal level drops below a certain threshold. e gate remains shut until you hit
the guitar strings, when it opens up again.
4.5.1 SENSITIVITY
e SENSITIVITY knob on the amp’s rear panel controls the noise gate’s
response. e knob’s far left position is labeled HARD; its far right position
is labeled SOFT. e noise gate’s IDB™ technology automatically adapts the
standard attack and threshold parameters. Outboard noise gates sandwiched
between the guitar and amp or plugged into the FX loop can only measure the
signal at one point. is technology gauges the signal at two points, directly
at the INPUT jack and post preamp, but pre effects. e noise gate uses these
two values to calculate the optimum response. What’s more, it does not cut off
REVERB and DELAY signals.
e further you twist the SENSITIVITY knob to the right, the more sensitive
the noise gate’s response. Set it to 12 o'clock if you want it to open up at very soft
signal levels. e further you twist the knob to the left, the harder the noise gate
kicks in and cuts off signals.
HEADS UP: The SENSITIVITY knob’s setting applies to all presets that
incorporate the noise gate. This is convenient and intentional: If conditions on
stage are different in the rehearsal room, you can adjust the noise gate’s response
for all presets with one simple tweak.
TIP: 12 0’clock is the universal setting. It you wish to use the noise gate as a
stylistic device when playing fast staccato riffs at high gain levels, then dial in a
setting towards the HARD end of the control range.
4.6 FX LOOP
e programmable SmartLoop™ effects routing circuit offers parallel/ serial effects
loop for patching in external effect devices.
Its status - on or off and parallel or serial - is stored with each preset.
4.6.1 SERIAL
Switches the effects loop from parallel (LED does not light up) to serial (LED
lights up).
4.6.2 FX ON
Switches the effects loop on (LED lights up) and off (LED does not light up).
TIP: If you have not inserted a signal processor into the FX loop, you can use it
for purposes other than effects, and even store the configurations individually in
each preset:
• In parallel mode, you can use the RETURN jack to connect a second
instrument or any other audio source, and even route the amp’s signal to a
second power amp.
• In serial mode, the effects loop lets you control the amp’s volume remotely by
connecting an analog volume pedal to the SEND/RETURN jacks.
• e serial effects loop also lets you patch in an outboard equalizer to serve as a
master EQ, say to adapt the amp to another cabinet or a venue’s acoustics.
CAUTION: The signal chain is severed if you configure the FX loop serially but
do not connect an effect device. SEND is not the best to-mixer routing option
because it taps the preamp signal only. You’re better off patching the power amp
signal to a mixing console from the speaker outputs via a Hughes & Kettner Red
Box®.
HEADS UP: FX ON/OFF is footswitchable. Connecting a footswitch disables the
front panel button. See section 5.3 for more info.
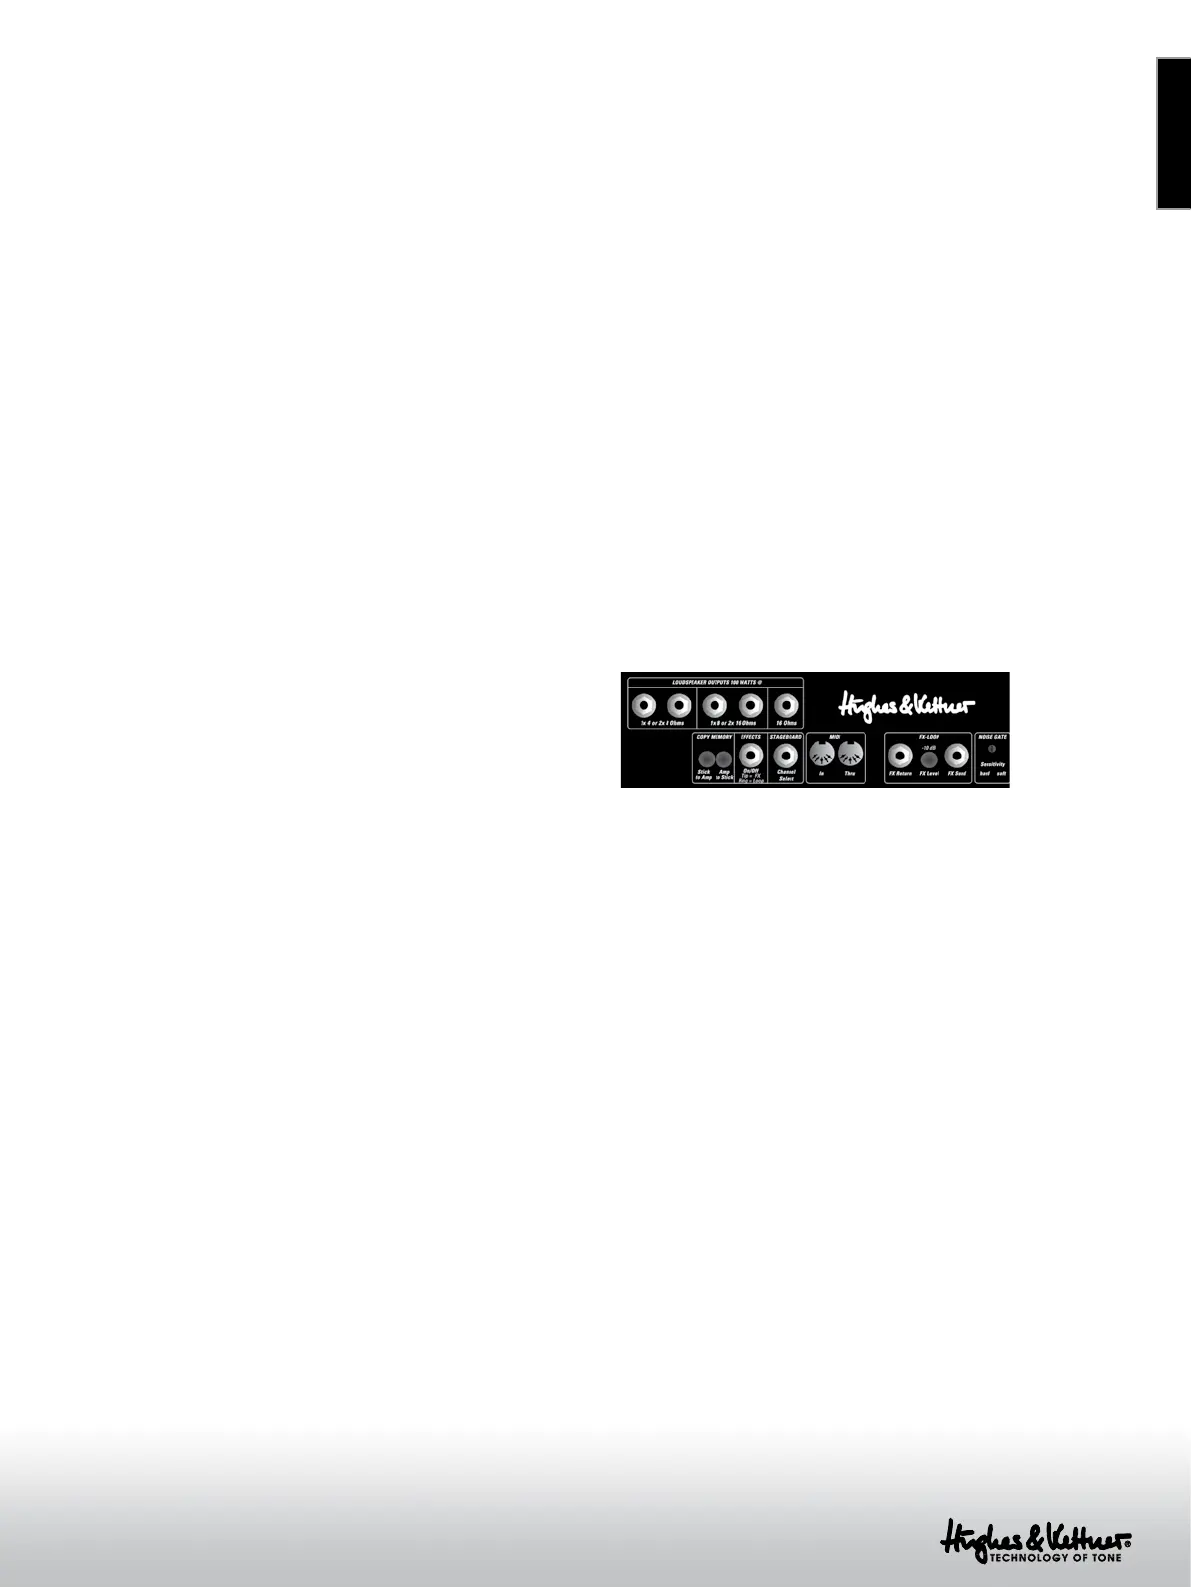
5 Rear Panel Connections and Control Features
5.1 LOUDSPEAKER OUTPUTS
C o r e b l a d e offers separate outputs for all standard impedances: You
can connect either one 4 Ω cabinet, or two 8 Ω cabinets, or two 16 Ω cabinets,
or one 16 Ω cabinet. Never connect different cabinets at the same time! If you
want to drive two cabinets with different impedances simultaneously, you must
configure a parallel circuit and connect it to the appropriate output. Use this
formula to figure out the overall impedance (R) of two cabinets with different
impedances (R1, R2) connected in parallel:
R = (R1 x R2) / (R1 + R2)
Here’s an example with one 8Ω cab and one 16Ω cab
R = (8 x 16) / (8 + 16)
R = 128 / 24
R = 5.33
e golden rule is cabinets’ impedance may never be lower than the amp’s output
impedance. So, you would connect this combination of cabs to the 1 x 4 Ω
speaker out.
5.2 AMP TO STICK / STICK TO AMP
ese buttons let you download and store the amp’s internal presets on a USB
stick and upload them any time, even to a another C o r e b l a d e . Please
read section 4.4 for more about this.
5.3 EFFECTS ON/OFF
is port accepts a two-way footswitch such as the Hughes & Kettner® FS-2.
Button 1 switches internal effects; button 2 the external effects loop. e FS-2’s
LED lights up to indicate effects are active and the FX ON button is engaged.
Bekijk gratis de handleiding van Hughes & Kettner Coreblade, stel vragen en lees de antwoorden op veelvoorkomende problemen, of gebruik onze assistent om sneller informatie in de handleiding te vinden of uitleg te krijgen over specifieke functies.
Productinformatie
| Merk | Hughes & Kettner |
| Model | Coreblade |
| Categorie | Niet gecategoriseerd |
| Taal | Nederlands |
| Grootte | 19467 MB |


