Handleiding
Je bekijkt pagina 49 van 56
EN / 49
8. Do not contact burner caps with ag-
gressive detergents such as oven in-
terior cleaning agents, descalers while
cleaning them, this may cause discol-
ouration.
9. Clean the pot holders with detergent wa-
ter and non-scratching, soft brush after
each operation and then dry them.
10.When the burner caps and pot holders
are used as wet, persistent lime stains
may occur as a result of the heat. En-
sure that it is dried before operation.
11.Place burner heads, caps and pot hold-
ers respectively.
12.When placing the pot holders, ensure
that they centre the burners. In pin mod-
els, fit the pins on the burner plate to the
pin slots on the pot holders.
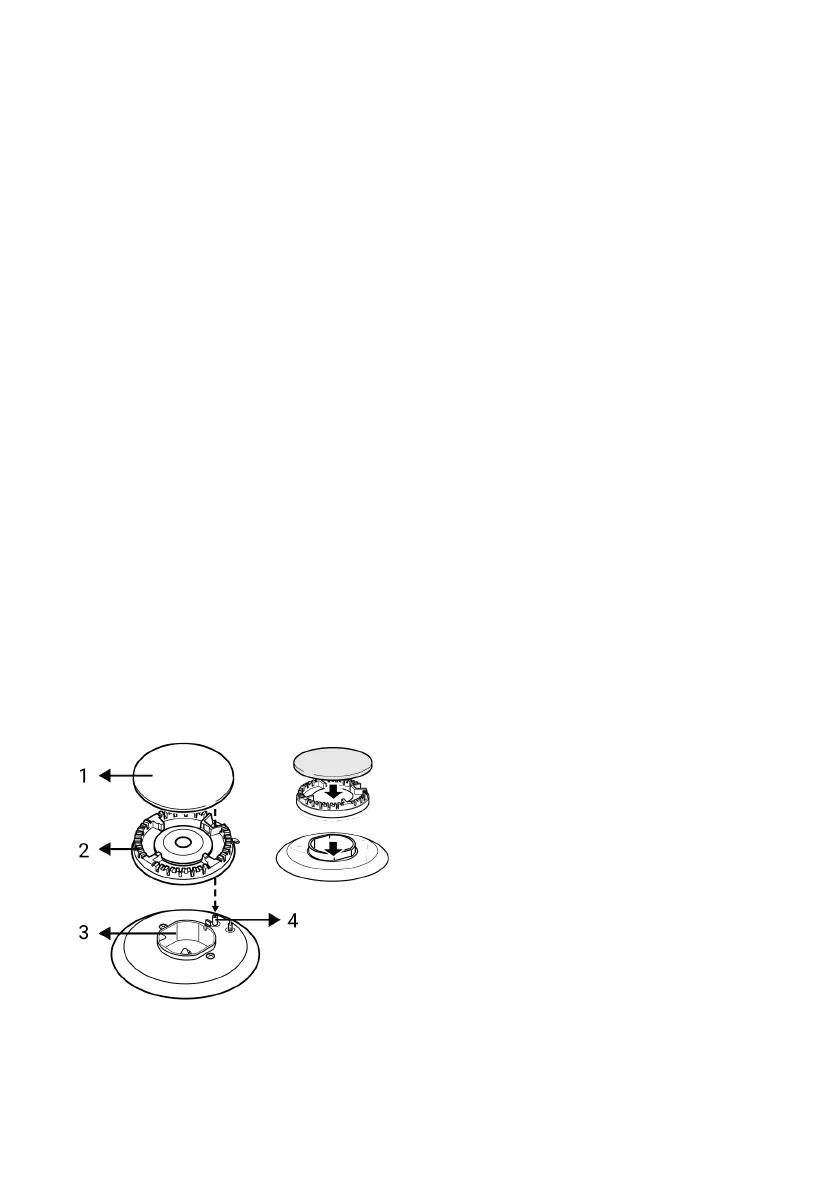
Assembling the burner parts
1. Place the parts as in the figure after
cleaning the burners.
2. Place the burner head ensuring that it
passes through the burner spark plug
(4). Turn the burner head right and left
to make sure that it is seated in the
burner chamber.
3. Place the burner cap on the burner
head.
1 Burner cap
2 Burner head
3 Burner chamber
4 Spark plug (in models with ignition)
9.4 Cleaning the Control Panel
• When cleaning the panels with knob-con-
trol, wipe the panel and knobs with a
damp soft cloth and dry with a dry cloth.
Do not remove the knobs and gaskets un-
derneath to clean the panel. The control
panel and knobs may be damaged.
• While cleaning the inox panels with knob
control, do not use inox cleaning agents
around the knob. The indicators around
the knob can be erased.
• Clean the touch control panels with a
damp soft cloth and dry with a dry cloth.
If your product has a key lock feature, set
the key lock before performing control
panel cleaning. Otherwise, incorrect de-
tection may occur on the keys.
9.5 Cleaning the inside of the oven
(cooking area)
Follow the cleaning steps described in the
"General Cleaning Information" section ac-
cording to the surface types in your oven.
Cleaning the side walls of the oven
The side walls in the cooking area can only
be covered with enamel or catalytic walls. It
varies by model. If there is a catalytic wall,
refer to the “Catalytic surfaces” section for
information.
If your product is a wire shelf model, re-
move the wire shelves before cleaning the
side walls. Then complete the cleaning as
described in the "General Cleaning Informa-
tion" section according to the side wall sur-
face type.
To remove the side wire shelves:
1. Remove the front of the wire shelf by
pulling it on the side wall in the opposite
direction.
2. Pull the wire shelf towards you to re-
move it completely.
Bekijk gratis de handleiding van Hotpoint HDD6GDC2W, stel vragen en lees de antwoorden op veelvoorkomende problemen, of gebruik onze assistent om sneller informatie in de handleiding te vinden of uitleg te krijgen over specifieke functies.
Productinformatie
| Merk | Hotpoint |
| Model | HDD6GDC2W |
| Categorie | Fornuis |
| Taal | Nederlands |
| Grootte | 5556 MB |


