Horizon Hydrofill Pro FCH-020 handleiding
Handleiding
Je bekijkt pagina 2 van 2
3
TROUBLESHOOTING
USEFUL INFORMATION / MAINTENANCE
1.
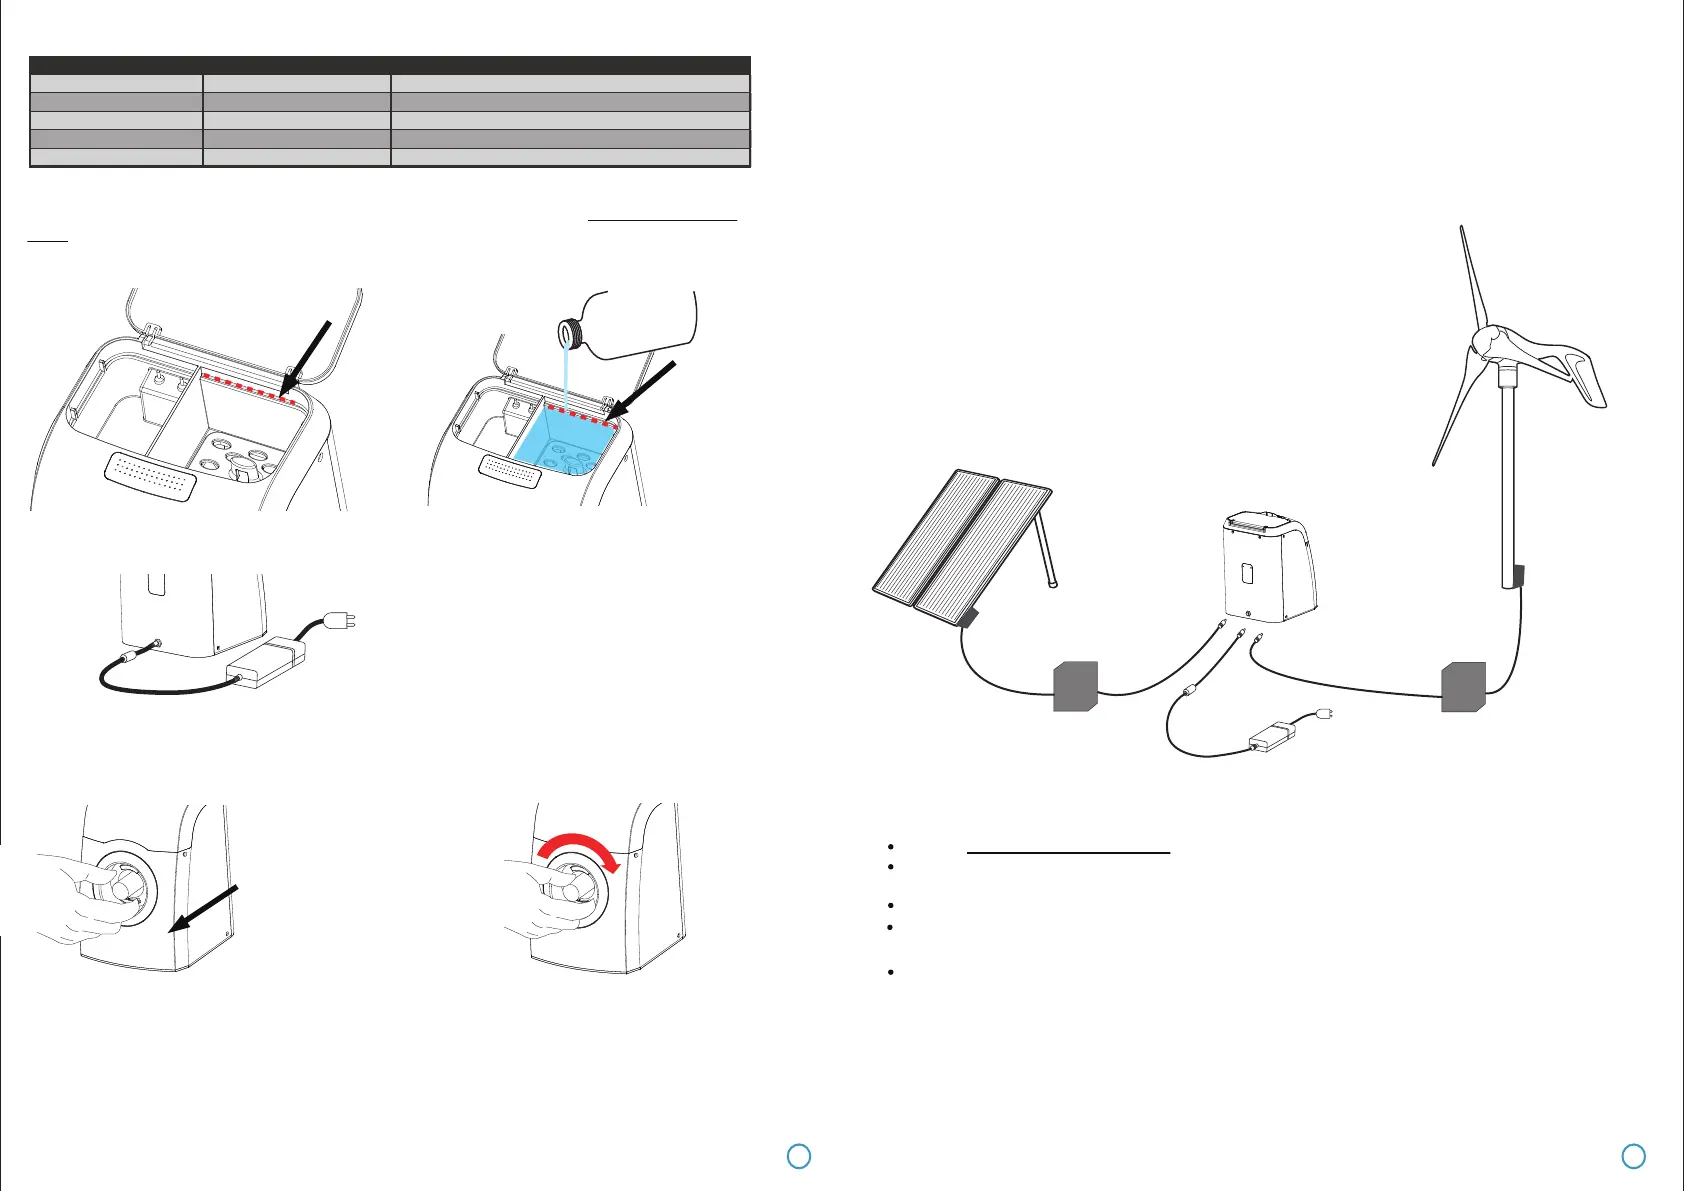
SWITCHING FROM AC TO DC SOLAR OR WIND POWER OPTIONS
HYDROFILL PRO can be powered by using the standard (included) AC to DC power cable (b), or can be
connected to renewable power sources such as solar PV or small wind turbines. Both sources should
include a baery buffer to regulate power supplied to the HYDROFILL PRO.
Recommended Solar PV system set-up:
-Min. 25W-40W Solar PV panels with baery charge controller (not included)
-11V - 14.4V / 10-15Ah baery (not included)
-DC cable (plug compable to HYDROFILL PRO DC socket) (not included)
Recommended wind turbine system set-up:
-Min. 40W wind turbine with baery charge controller (not included)
-11V - 14.4V / 10-15Ah baery (not included)
-DC cable (plug compable to HYDROFILL PRO DC socket) (not included)
Only use
de-ionized or dislled water.
Wait for half an hour to start the HYDROFILL PRO aer adding water to the water tank if it is used for the
first me or it has been stored for more than 2 months.
4-6.5 hours of operaon will normally be required to fully charge an empty HYDROSTIK or HYDROSTIK PRO.
The HYDROFILL PRO can sll run and generate hydrogen even if the LED light alternates between red for 1
second and off for 3 seconds, but HYDROSTIK or HYDROSTIK PRO charging time will be slower.
If the LED status indicator light alternates red for 1 second and off for 1 second, check the water level of the
water tank and waste water tank. Either add water to the water tank or remove water from the waste water
tank as required. Follow set up instrucons carefully.
solar charge
controller
11-14.4V baery
25W-40W solar panels
40W wind turbine
AC cord
11-14.4V baery
wind-charge
controller
DC cable
DC cable
DC cable
The LED status indicator light does not flash green aer the power supply cord is connected.
SOLUTION: Check the connecon between the AC-DC adapter and the power supply.
HYDROFILL PRO
3. Fully insert the HYDROSTIK or HYDROSTIK PRO cartridge into the HYDROFILL PRO unit by turning it
clockwise into the cartridge port unl firmly secured. During the inseron process, the green indicator
light may turn red to indicate a connecon (Fig D), but connue turning to make sure the HYDROSTIK or
HYDROSTIK PRO is firmly secured (Fig E). Secure the HYDROSTIK or HYDROSTIK PRO ghtly to the unit,
but be careful not to apply excessive force.
OPERATION INSTRUCTIONS
2
STATUS INDICATOR LIGHTS
The ridge is the
water level
4. While the indicator light is RED, your HYDROSTIK or HYDROSTIK PRO cartridge is being filled with
hydrogen. The HYDROSTIK or HYDROSTIK PRO cartridge is fully charged when the indicator lights GREEN.
When completed, disconnect the HYDROSTIK or HYDROSTIK PRO cartridge from the HYDROFILL PRO (turn
an-clockwise to disconnect).
Note: 1. It will be normal to hear short bursts or puffs during the refilling procedure, due to
water being purged from the system from me to me.
2. It will be normal to hear the sound of air being released when the HYDROSTIK or HYDROSTIK PRO is disconnected from the
HYDROFILL PRO.
5. Disconnect the HYDROFILL PRO from the AC and empty the water tank if you will not use the HYDROFILL
PRO within one hour. If more cartridges need to be charged, repeat step 3.
1. Open the water tank cover located at the top of the unit (Fig. A). Carefully add de-ionized or dislled
water** EXACTLY up to the ridge level inside the water tank as shown below in Fig. B. Close the cover.
Wait for half an hour to start the system aer adding water for the first me use or the product has
been stored for more than 2 months.
WARNING:
Only use de-ionized
or dislled water.
Ridge
status indicator light
will switch from
green to red
Green
System Status
on
HYDROSTIK or HYDROSTIK PRO cartridge is full
on
HYDROSTIK or HYDROSTIK PRO cartridge is being filled
on 1 second, off 1 seconds
Add water or empty waste water tank
on 1 second, off 1 second Waing to fill HYDROSTIK or HYDROSTIK PRO cartridge
Red
connect HYDROSTIK
or HYDROSTIK PRO
unl firmly secured
2. Connect the AC-DC adapter to the unit (Fig. C).
Once plugged in to an AC point, the unit’s status indicator light should start to flash green.
AC-DC adapter (b)
Fig. A
Fig. B
Fig. C
Fig. D
Fig. E
Bekijk gratis de handleiding van Horizon Hydrofill Pro FCH-020, stel vragen en lees de antwoorden op veelvoorkomende problemen, of gebruik onze assistent om sneller informatie in de handleiding te vinden of uitleg te krijgen over specifieke functies.
Productinformatie
| Merk | Horizon |
| Model | Hydrofill Pro FCH-020 |
| Categorie | Niet gecategoriseerd |
| Taal | Nederlands |
| Grootte | 822 MB |


