HiLook THC-B150-M handleiding
Handleiding
Je bekijkt pagina 7 van 15
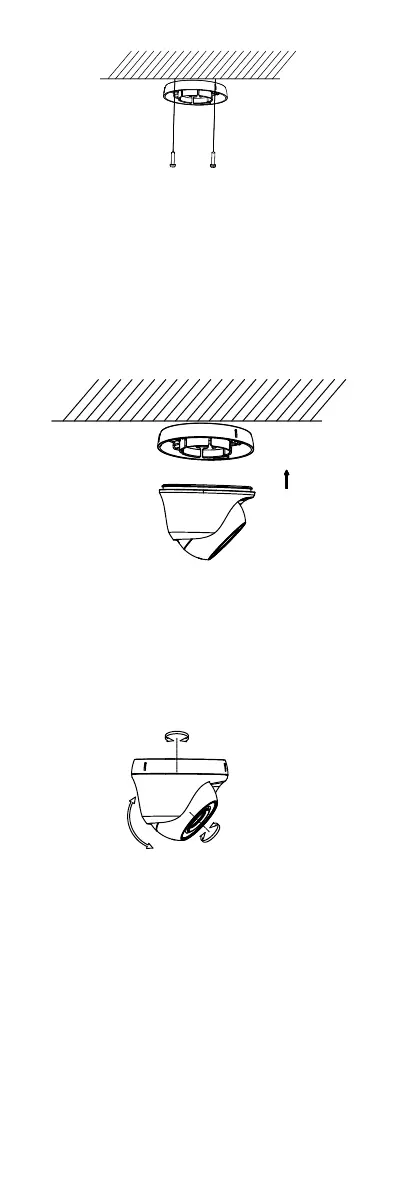
Figure 2-3 Attach the Mounting Base to the Ceiling
Notes:
The supplied screw package contains
self-tapping screws, and expansion bolts.
For cement ceiling, expansion bolts are required
to fix the camera. For wooden ceiling,
self-tapping screws are required.
5. Route the cables through the cable hole, or the side
opening.
6. Align the camera with the mounting base, and
tighten the screws to secure the camera on the
mounting base.
Figure 2-4 Secure the Camera with Mounting Base
7. Connect the cables, such as power cord and video
cable.
8. Check whether the image on the monitor is gotten
from the optimum angle. If not, adjust the camera
according to the figure below to get an optimum
angle.
Pan Position
[0° to 360°]
Rotation Position
[0°to 360°]
Tilt Position
[0°to 75°]
Figure 2-5 3-axis Adjustment
1). Hold the camera body and rotate the enclosure
to adjust the pan position [0° to 360°].
2). Move the camera body up and down to adjust
the tilt position [0° to 75°].
3). Rotate the camera body to adjust the rotation
position [0° to 360°].
2.2 Installation of Type II Camera
Before you start:
Both wall mounting and ceiling mounting are suitable
for the camera. We take ceiling mounting as an example
in this section. You can take the steps of ceiling
mounting as a reference, when adopting wall mounting.
Steps:
1. Disassemble the turret camera.
Bekijk gratis de handleiding van HiLook THC-B150-M, stel vragen en lees de antwoorden op veelvoorkomende problemen, of gebruik onze assistent om sneller informatie in de handleiding te vinden of uitleg te krijgen over specifieke functies.
Productinformatie
| Merk | HiLook |
| Model | THC-B150-M |
| Categorie | Bewakingscamera |
| Taal | Nederlands |
| Grootte | 2102 MB |
Caratteristiche Prodotto
| Kleur van het product | Wit |
| Gewicht | 230 g |
| Breedte | 62 mm |
| Diepte | 165 mm |
| Hoogte | 58 mm |

