Hillvert HT-PILOT-1500 handleiding
Handleiding
Je bekijkt pagina 6 van 25
14.05.2020 14.05.2020
10 11
EN EN
This table lists the standard
intervals for service and
maintenance of the machine
under normal operation
conditions. In the case of
operation under harder
conditions, e.g. dusty
surroundings, long hours of
continuous operation, etc.,
service intervals are shorter.
Before work
After woork or daily
After oil rell
Every week
Every month
When worn down
When required
Complete
machine
Visual check
(general
condition,
tightening
screws)
√ √
Cleaning √
Control
handle/
switches
Operation
check
√ √
Air lter
Cleaning √ √
Replacement √
Fuel lter
Check √
Replacement √
Fuel tank/
fuel tank
cap
Cleaning √ √
Check √ √
Tightening √
Gear/
cylinder
Cleaning √
Oil rell √
Muer
Check √
Removing
accumulated
dirt
√
Cylinder
radiator
Check √
Cleaning √
Spark plug
Check/
setting the
gap between
electrodes
√
Replacement √
Nuts
and bolts
Check √ √
Tightening √
3.4.2. AIR FILTER
Regularly check the condition of the air lter for
contamination that could block it, thus reducing engine
performance and its service life. If the lter is dirty, remove
it and rinse in warm water with detergent, then wipe it
with a dry cloth. A damaged lter must be replaced. If
the machine often operates in a dusty environment, the
lter maintenance interval should be shortened (see table
above).
3.4.3. FUEL FILTER
If the fuel lter is blocked, the engine speed and impact
energy of the machine will be reduced. To clean the lter,
unscrew the cap from the tank, pull out the lter through
the hole using a metal hook and clean the lter. If you need
to clean the fuel lter you should also clean the fuel tank.
3.4.4. CARBURETOR
Residual oil accumulates in both the fuel tank and the
carburetor. Over time, these leftovers become denser
blocking the oil channels and making the engine hard to
start. For this reason, if the machine is not to be used for
more than a week, the fuel should be drained completely.
To do this, remove the oil hose, then keep pressing the fuel
control bubble until all the leftovers run out. When the
fuel control bubble and the oil return hose are completely
empty (they become transparent), reinsert the oil hose.
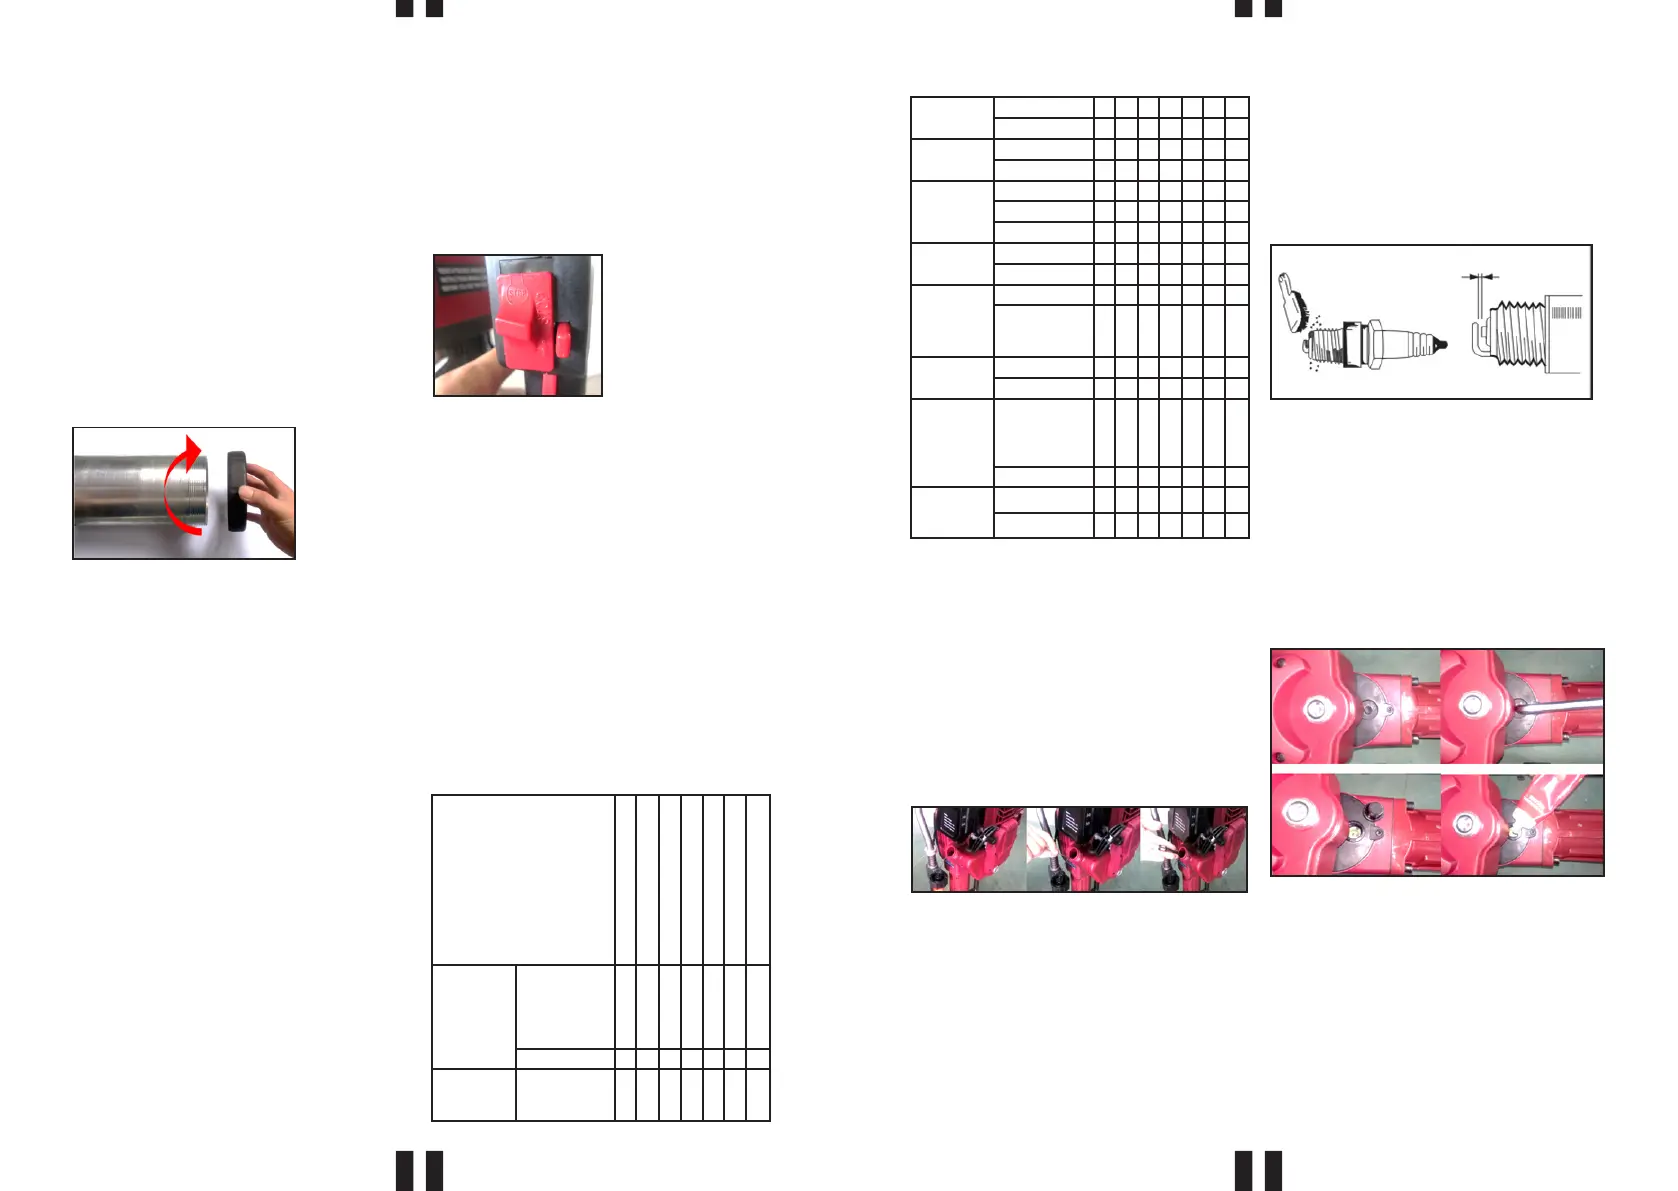
3.4.5. SPARK PLUG
To ensure proper engine operation, the spark plug gap
must be properly set (0.5-0.7 mm). For a used spark plug,
Available sizes of pile adapters:
• Ø49 mm - for piles with a diameter of 20 ~ 49 mm
• Ø 69 mm - for piles with a diameter of 50 ~ 69 mm
• Ø 100 mm - for piles with a diameter of 70 ~ 100 mm
3.3. DEVICE USE
3.3.1. STARTING
• After lling the fuel tank before the rst start, press
the fuel control bubble (6) several times until the
carburetor is lled with fuel. If the engine is cold, cut
o the cold air supply - move the air supply switch (5)
to the „OFF“ position (choke will start).
• Place the device upright. Firmly hold the upper part
of the control handle with one hand and vigorously
pull the starter handle (17) with the other. If the device
does not start the rst time, do not release the starter
handle but let it return to the initial position by slowly
controlling its return movement with your hand.
• After starting the engine, let the machine run at idle
for 5 minutes to bring it to operating temperature.
After this time, open the cold air supply - slide the
air switch (5) to the „ON“ position (suction will be
switched o). Now you can start working with the
machine.
3.3.2. HOW TO USE THE MACHINE
• When the machine reaches the operating
temperature, lay it on the pile and set the desired
working speed (impact energy) with the throttle
switch (9).
Important! When used for the rst time, the device
should work for the rst 20 hours within the low to
medium speed range for the engine to break in. To
extend the life of the device, avoid operating it at high
speeds.
• If the device will not be used for some time, let it cool
down completely and drain the remaining fuel from
the tank.
3.4. CLEANING AND MAINTENANCE
a) Before each cleaning, adjustment, replacement of
accessories and also when the device is not in use,
let it cool down completely. Wait for the rotating
elements to stop.
b) Use only non-corrosive cleaners to clean the surface.
c) Store the unit in a dry, cool place, free from moisture
and direct exposure to sunlight.
d) Do not spray the device with a water jet or submerge
it in water.
e) Do not allow water to get inside the device through
vents in the housing of the device.
f) Clean the vents with a brush and compressed air.
g) The device must be regularly inspected to check its
technical eciency and spot any damage.
h) Use a soft cloth for cleaning.
i) Do not use sharp and/or metal objects for cleaning
(e.g. a wire brush or a metal spatula) because they
may damage the surface material of the appliance.
3.4.2. MAINTENANCE INTERVALS
3.2. PREPARING FOR USE
The ambient temperature must not exceed 45°C and the
relative humidity should not exceed 85%. Only use the
device in well-ventilated areas. Do not obstruct the air outlet
of the device. Keep the device away from any hot surfaces.
The device should always be operated on a stable, reproof
surface and out of reach of children and persons with limited
mental and/or sensory functions.
To power the device, use only the fuel/oil mixture in the
correct proportions (gasoline and engine oil dedicated to
2-stroke engines):
• 20: 1 - for work up to 20 hours
• 25: 1 - for work over 20 hours.
Pour the mixture into the fuel tank (7).
WARNING! Do not add more oil than recommended and do
not overll above the fuel tank neck.
3.2.1. INSTALLING THE SCREW PILE ADAPTER
Select the pile adapter (12) of suitable diameter and screw it
onto the pile holder thread (11) until it stops.
• The proper operation is at average engine speed.
Warning! Do not run the machine at high speeds
when it is not piling.
3.3.3. TURNING THE DEVICE OFF
• Release the throttle switch (9) and let the machine run
for another 3-5 minutes at idle.
• Slide the adjustment switch (8) to the stop position,
upwards in accordance with the arrow on it (see the
picture below).
before checking and adjusting the gap, rst use a wire
brush to clean the impurities accumulated on the plug end
(the electrode). Use extraction gasoline if the dirt is dicult
to remove.
3.4.6. MUFFLER
Regularly remove the dirt at the inlet and outlet of the
muer. You can also clean it with appropriate detergents.
WARNING! Only clean the muer when it is cold.
3.4.7. LUBRICATION OF THE GEARING
Remove the gearbox cover and pour gear oil on the gears.
Perform this activity regularly.
3.4.8. CYLINDER RADIATOR
Regularly remove the accumulated dust and other dirt
from the cylinder cooling ns. The machine has an air-
cooled engine, therefore unobstructed cylinder ns are
crucial for its trouble-free, long-term operation.
3.4.9. LUBRICATION OF THE IMPACT CYLINDER
After cumulative 50 hours of operation (piling), lubricate
the impact cylinder. To do this, unscrew the cylinder
housing cap and squeeze approx. 50g of grease (provided
with the machine) into the mechanism (see pictures below).
0.5
-
0.7mm
DISPOSING OF USED DEVICES
Do not dispose of this device in municipal waste systems.
Hand it over to an electric and electrical device recycling
and collection point. Check the symbol on the product,
instruction manual and packaging. The plastics used to
construct the device can be recycled in accordance with
their markings. By choosing to recycle you are making
a signicant contribution to the protection of our
environment. Contact local authorities for information on
your local recycling facility.
Bekijk gratis de handleiding van Hillvert HT-PILOT-1500, stel vragen en lees de antwoorden op veelvoorkomende problemen, of gebruik onze assistent om sneller informatie in de handleiding te vinden of uitleg te krijgen over specifieke functies.
Productinformatie
| Merk | Hillvert |
| Model | HT-PILOT-1500 |
| Categorie | Niet gecategoriseerd |
| Taal | Nederlands |
| Grootte | 7032 MB |


