Harder & Steenbeck Ultra X handleiding
Handleiding
Je bekijkt pagina 10 van 36
10
Weitere Wartungshinweise:
Legen Sie niemals den ganzen Apparat in Lösemittel. Geben Sie gelegentlich etwas dünnes Öl an die Hebel-
mechanik (E). Halten Sie Nadelspitze und Düse (B) frei von Öl und Fett, da es das Spritzbild beeinfl ussen kann.
Nadel, Düse und Dichtungen sind Verschleißteile, die bei Bedarf auszutauschen sind. Düsensätze (A/B/H) )
sowie Fließbecher (C) sind auf verschiedene Größen umrüstbar.
(Bestell-Nr. siehe S. 05)
Further maintenance instructions:
Never immerse the entire instrument in solvent. A little thinned oil should be applied occasionally to the lever
mechanism (E). Keep the needle tip and nozzle (B) free of oil and grease, as this can infl uence the spraying
characteristics. The needle, nozzle and seals are components subject to wear and should be replaced when
necessary. Nozzle sets (A/B/H) and fl ow cups (C) are available in different sizes to facilitate conversion.
(see p. 05 for order no.)
Conseils d’entretien supplémentaires:
Ne jamais plonger l’appareil entier dans du solvant. De temps à autre, lubrifi er légèrement le mécanisme de la gâchette (E). Veiller à ce que la
pointe de l’aiguille et la buse (B) soient exemptes d’huile et de lubrifi ant car ceci pourrait infl uencer négativement la qualité du jet. L’aiguille,
la buse et les joints d’étanchéité sont des pièces d’usure qu’il convient au besoin de remplacer. Les jeux de buses (A/B/H) ainsi que les
godets á gravité (C) peuvent être montés en différentes tailles. (N° de commande voir p. 05)
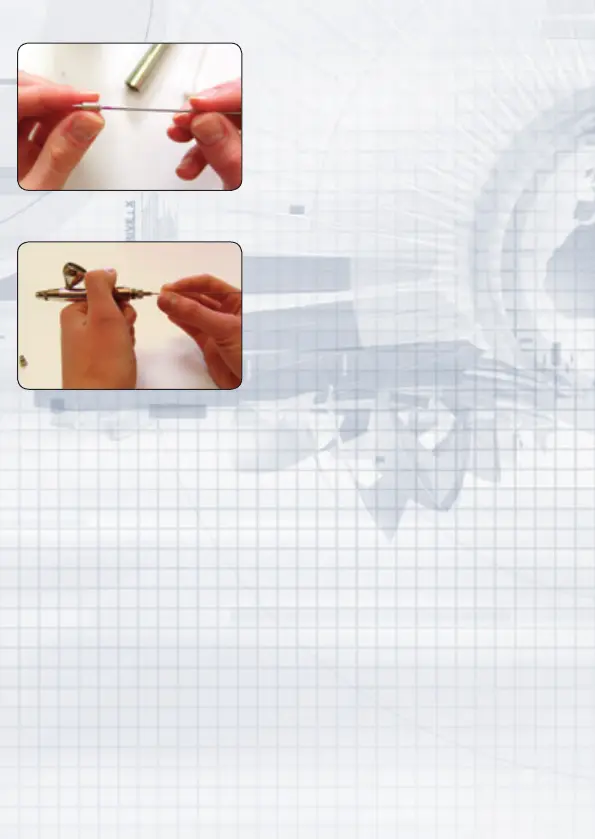
4. Düse (B) entnehmen, mit sehr feinem Pinsel oder Nadel
(H) vorsichtig Farbreste aus dem Inneren herausschieben.
Düse und Dichtung auf Risse oder Deformationen überprüfen.
4. Remove the nozzle (B) and push any paint residue careful-
ly out of the interior with a fi ne brush or needle (H). Check the
nozzle and seal for cracks or deformation.
4. Oter la buse (B), puis en extraire précautionneusement les résidus de pein-
ture avec un pinceau extrêmement fi n ou avec l’aiguille (H). Contrôler que ni
la buse ni le joint d’étanchéité ne présentent de déformations ou de fi ssures.
5. Düse (B) in Luftkopf (A) einsetzen und anschrauben.
Hebel (E) herunterdrücken und Nadel (H) vorsichtig bis zum
Anschlag einführen. Nadelklemmmutter (J) und Endstück (K)
aufschrauben.
5. Insert the nozzle (B) into the air head (A) and screw into
position. Press the lever (E) down and insert the needle (H)
carefully up to the stop. Screw the needle securing nut (J) and
end piece (K) into position.
5. Placer la buse (B) dans la tête d’air (A) et visser. Appuyer sur la gâchette
(E) et introduire précautionneusement l’aiguille (H) jusqu’à la butée. Revisser le
contre-écrou de l’aiguille (J) et la queue (K).
4
5
Bekijk gratis de handleiding van Harder & Steenbeck Ultra X, stel vragen en lees de antwoorden op veelvoorkomende problemen, of gebruik onze assistent om sneller informatie in de handleiding te vinden of uitleg te krijgen over specifieke functies.
Productinformatie
| Merk | Harder & Steenbeck |
| Model | Ultra X |
| Categorie | Niet gecategoriseerd |
| Taal | Nederlands |
| Grootte | 22132 MB |
Caratteristiche Prodotto
| Kleur van het product | Zilver |
| Aantal mondstukken | 1 |
| Coating materiaal | Nikkel |
| Type doorvoer | Heveltoevoer |
| Diameter mondstuk | 0.4 mm |


