Golden Lighting Mercer 4309-M3 handleiding
Handleiding
Je bekijkt pagina 2 van 2
Assembly Instructions: 4309-SF/M3 (Mercer)
IMPORTANT:
• ALL INSTALLATION WORK SHOULD BE DONE BY ACCREDITED PROFESSIONAL.
• SHUT OFF POWER SUPPLY AT FUSE OR CIRCUIT BREAKER!
• USE ONLY THE SPECIFIED BULBS. DO NOT EXCEED THE MAXIMUM WATTAGE!
PREPARING FOR INSTALLATION
Remove all of the contents from the carton. See the important notes above. Remove the old xture
from the ceiling, including the old mounting strap. This xture may be mounted as a pendant or ush
mount. Choose how you would like to mount the xture and follow the corresponding instructions.
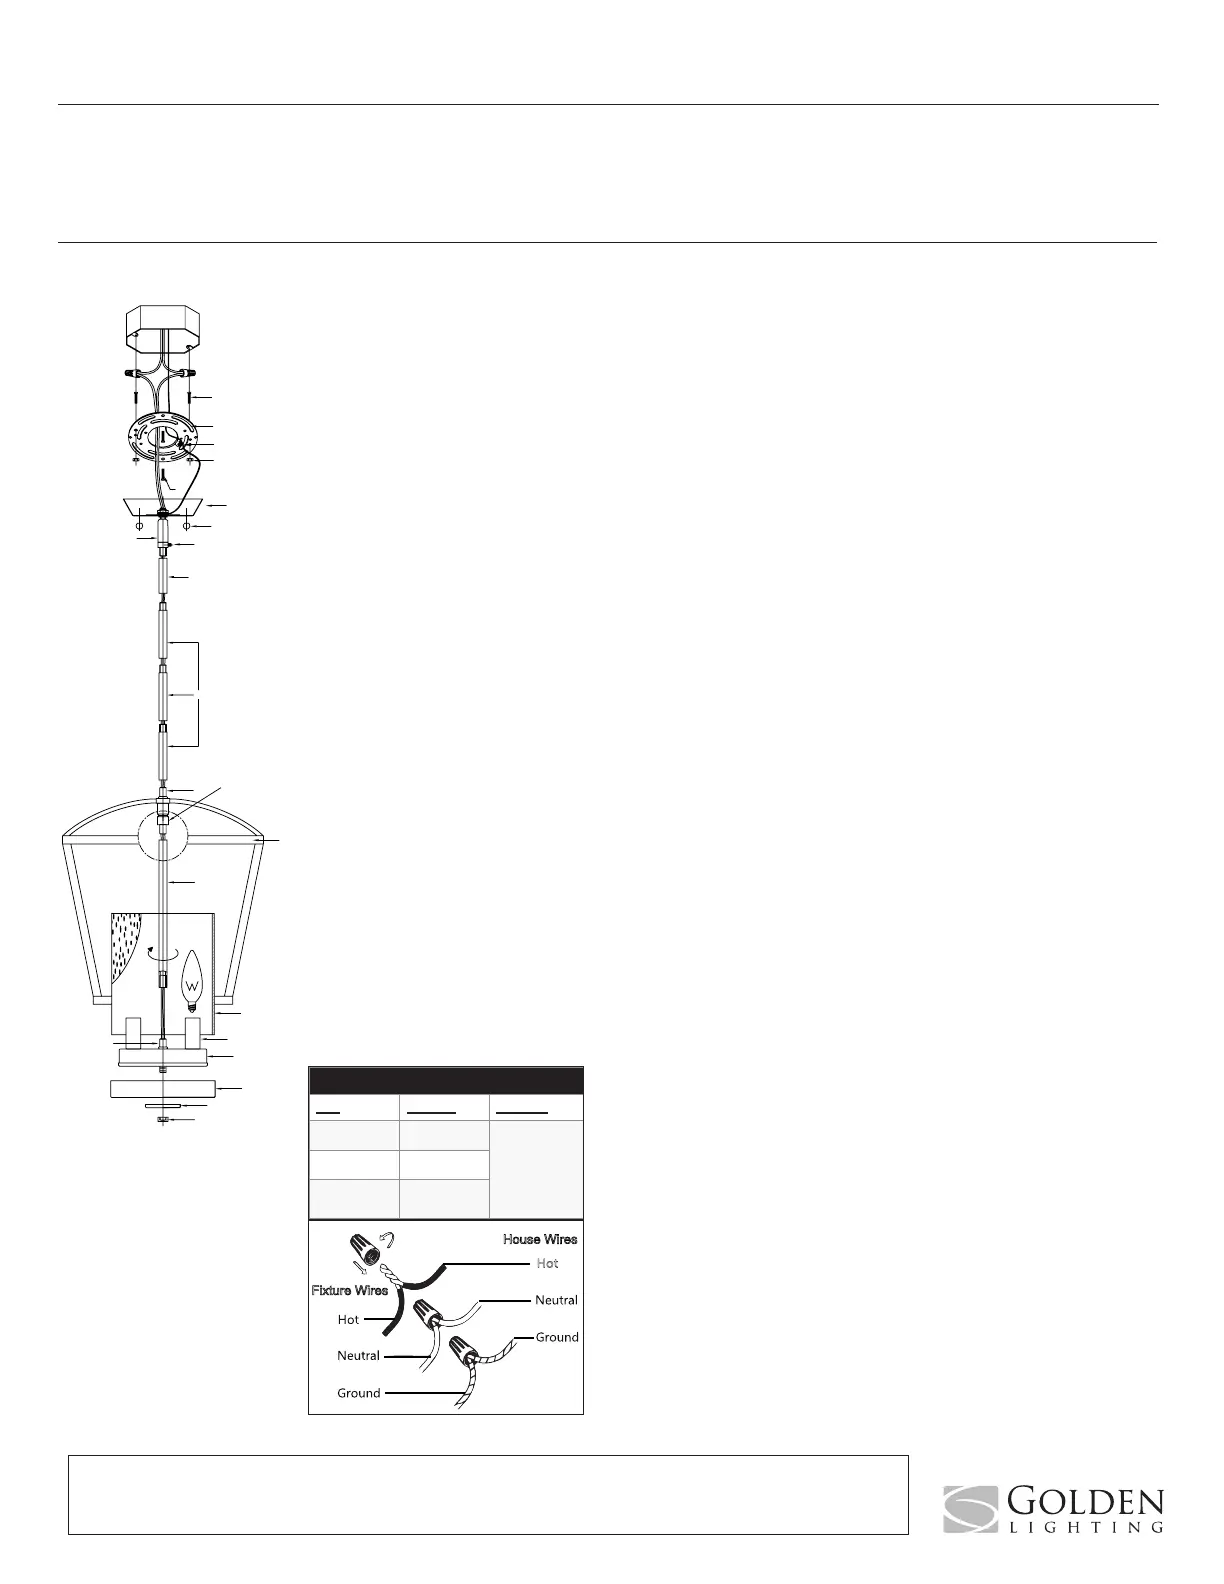
1. From the parts bag remove the mounting strap assembly. Mounting strap (B) contains holes. Two of
mounting screws (A) should be attached to mounting strap (B). You may need to tighten nuts (C) that hold
these screws in place.
2. Place mounting strap (B) over the junction box so that mounting screws (A) are vertical, and in alignment
with the locations of the holes on canopy (G). Secure mounting strap (B) to the junction box with mounting
screws (D) and a screwdriver. Tighten the screws securely.
3. Center rod (M) is on the wires, but not connected to lamp cluster (P). You may need to twist center rod (M)
tightlyontothethreadsofposts(V)and(T).Thisxturecontainsthree12”rods(K)andone6”rod(J).Each
rod can be connected to another by twisting the threaded end of one into the opposite end of another. Each
rodmayalsobeusedalonetoconnectthexture’sbodytoswivel(H)ofcanopy(G).Bymeasuring,decide
thedesiredoverallheightofyourxtureanddeterminehowmanyrodsareneededtoachievethedesired
height.
4.Pushthexture’swiresthrougheachrod.Threadthebottomrodontopost(L)atthecenterofthexture’s
body.Pullthexture’swiresthroughthetopofeachroduntiltautbeforeconnectingtherodstogetheras
described above. Loosen screw (I) and angle the top rod into the bottom of swivel (H). Twist the threads of
the rod into swivel (H). Tighten screw (I) to hold the rod in place inside the swivel.
CLEANING TIPS
Treat the xture gently! Regular cleaning will reduce the need for deep cleaning. For regular cleaning, turn off the light and wipe down the
xture with a clean lint-free cotton or microber cloth. Never spray cleaner directly onto the xture.
FINISHING THE INSTALLATION
6. Push canopy (G) up to the ceiling and tightly thread nuts (F) onto
the exposed threads of mounting screws (A).
7. Slide candle sleeves (U) over the sockets. Install light bulbs (not
provided)inaccordancewiththexture’sspecications.Donot
exceed the maximum wattage.
8. Slide glass shade (O) followed by cup (Q) up over the socket
cluster.
9.Threadspacer(R)andbottomnial(S)ontothethreadsatthe
bottom of the lamp cluster to secure the glass in place.
Your installation is now complete. Turn on the power and test the
xture.
CONNECTING THE WIRES
5.Haveanassistantsupportthexture’sweightwhilecompletingthewiring.Cutawaytheexcesswires.
Threadthexture’swiresthroughthecanopyloopandnipple.Refertothewiringdiagramandattachthe
xture’swirestothepowersupplywiresfromthejunctionbox.ConnectHottoHot,NeutraltoNeutral,
and Ground to Ground. Twist the ends of the wire pairs together, and then twist on a wire connector. Make
sure all twists are in the same direction. If there is no house ground wire coming from the junction box,
locategroundscrew(E)onthemountingbracket/mountingstrapandwrapthexture’sgroundwirearound
the ground screw. Use a screwdriver to tighten the top of ground screw (E) onto the wires and into the
mounting bracket/mounting strap. Tuck the wires into the junction box.
How to Identify the Fixture’s Wires
Hot Neutral Ground
Smooth
Ribbed
Bare Metal,
Green, or
Green Inner
Thread
Black
White
Black Inner
Thread
White Inner
Thread
House Wires
Fixture Wires
Hot
PENDANT
INSTALLATION
G
N
D
D
C
E
A
B
G
F
I
H
V
J
K
L
N
O
P
U
Q
R
S
T
M
For Customer Service, please
contact the place of purchase.
Please note that the xture may be hung as a
pendant or a semi-ush. Please decide how
you would like the xture to be installed and
refer to the related instructions.
Bekijk gratis de handleiding van Golden Lighting Mercer 4309-M3, stel vragen en lees de antwoorden op veelvoorkomende problemen, of gebruik onze assistent om sneller informatie in de handleiding te vinden of uitleg te krijgen over specifieke functies.
Productinformatie
| Merk | Golden Lighting |
| Model | Mercer 4309-M3 |
| Categorie | Verlichting |
| Taal | Nederlands |
| Grootte | 523 MB |


