Frigidaire GMOS1266SS handleiding
Handleiding
Je bekijkt pagina 11 van 72
Installation Instructions
A
RECIRCULATING
(Non-Vented Ductless)
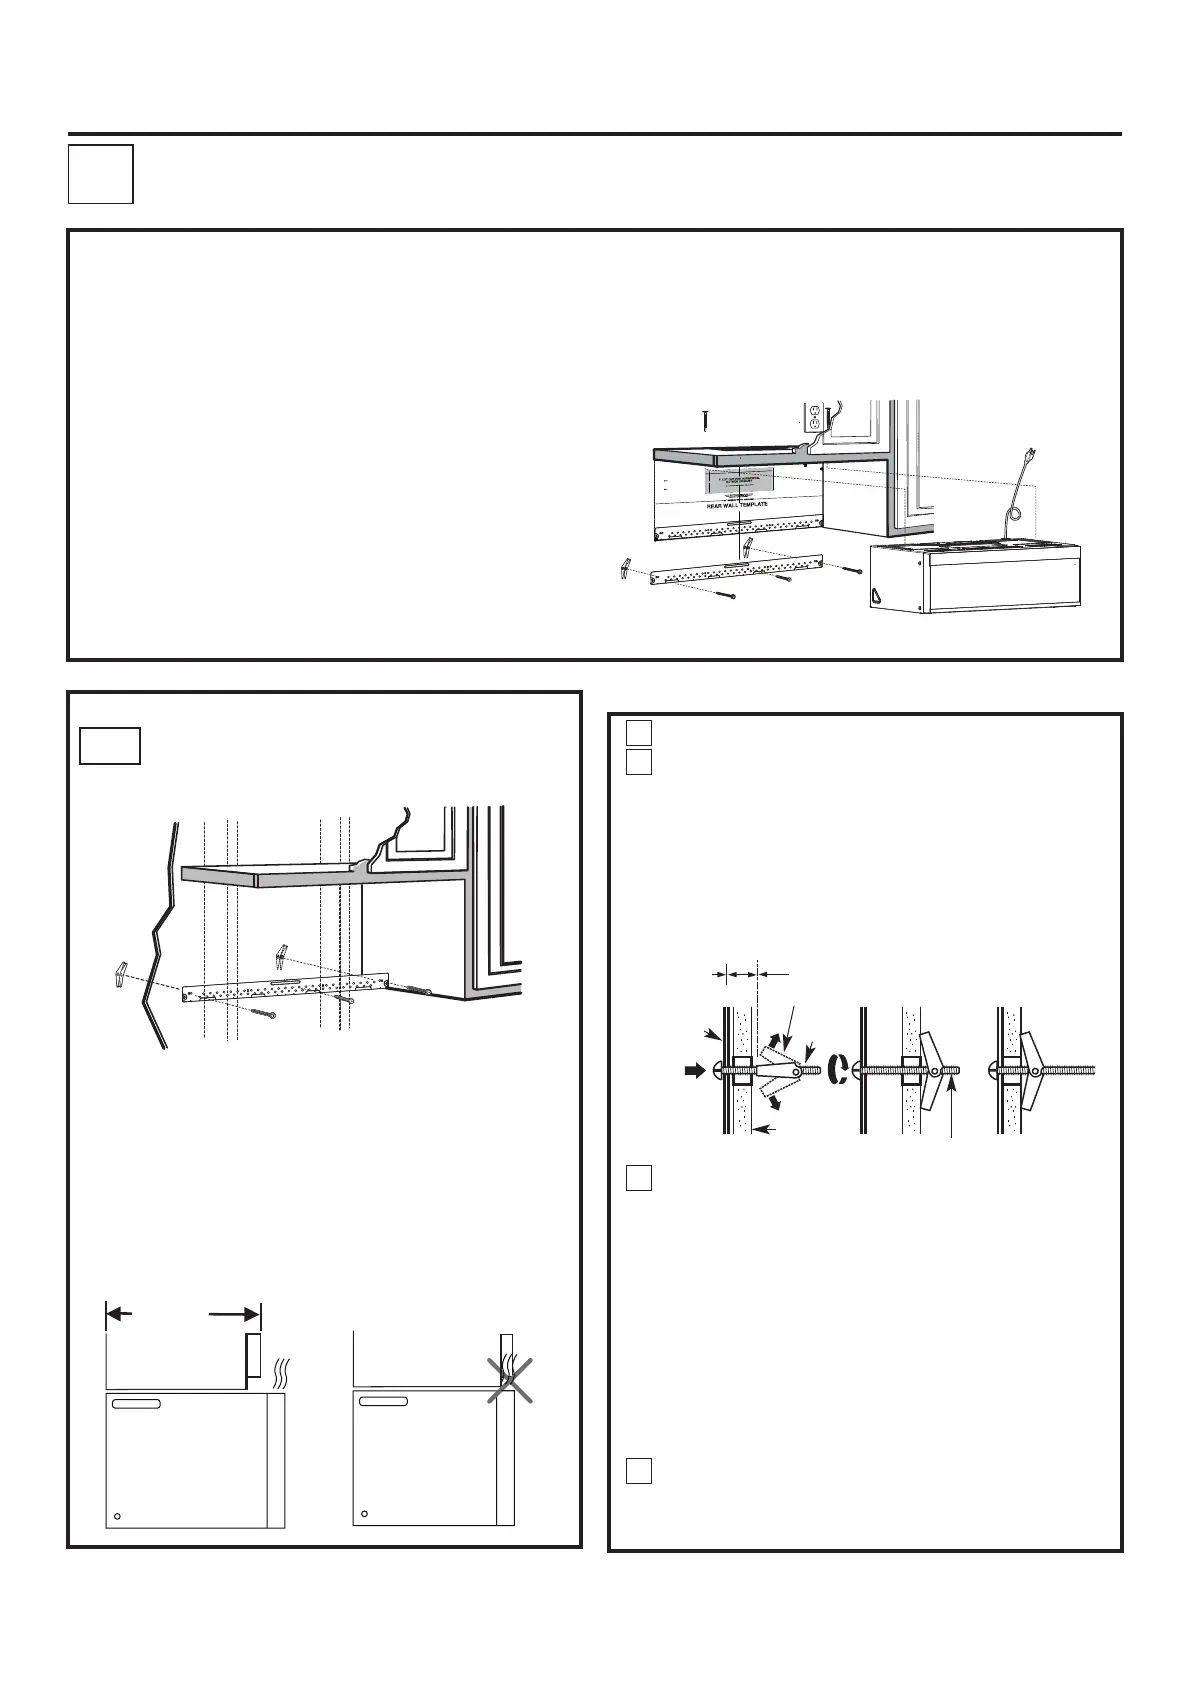
INSTALLATION OVERVIEW
A1. Attach Mounting Plate to Wall
A2. Prepare Top Cabinet
A3. Check Blower Plate
A4. Mount the Microwave Oven
A5. Install or change Charcoal Filter
IMPORTANT NOTES:
• Make sure the screws for the blower motor
and blower plate are securely tightened when
they are reinstalled. This will help to prevent
excessive vibration.
• Make sure the motor wiring has been properly
routed and secured, and that the wires are not
pinched.
3
/
8
"
T
O
ED
G
E
N
O
TE
:
I
T IS
V
E
RY
I
M
P
O
R
TA
N
T
TO
REA
D
A
N
D
F
O
L
L
O
W
T
HE
D
I
R
E
C
T
I
O
NS
I
N
T
H
E
I
NS
T
A
L
LA
T
ION
I
N
S
T
R
U
CTI
O
N
S
B
E
F
O
R
E
P
R
O
C
E
E
DI
N
G
W
I
TH
T
H
IS
RE
A
R
W
A
L
L
T
E
M
P
L
A
T
E
.
T
hi
s
R
e
a
r
Wa
l
l
T
e
m
p
l
a
t
e
s
e
r
v
e
s
to
p
o
s
i
t
i
o
n
th
e
b
o
t
t
o
m
m
o
u
n
t
i
n
g
p
l
a
te
an
d
to
l
o
c
a
t
e
t
h
e
h
o
r
i
z
o
n
t
a
l
e
x
h
a
u
s
t
o
u
t
l
e
t
.
1
.
U
s
e
a
l
e
ve
l
t
o
c
h
e
c
k
t
h
a
t
t
h
e
t
e
m
p
la
t
e
is
p
o
s
it
io
n
e
d
a
c
c
u
r
a
t
e
l
y
.
2
.
L
o
c
a
t
e
a
n
d
m
a
r
k
a
t
l
e
a
s
t
o
n
e
s
tu
d
on
t
h
e
l
e
ft
o
r
r
ig
h
t
s
id
e
of
t
h
e
c
e
n
t
e
r
l
in
e
.
It
i
s
im
po
r
t
an
t
t
o
u
s
e
a
t
l
e
a
s
t
o
n
e
wo
o
d
s
c
r
e
w
m
o
u
n
t
e
d
fi
r
m
l
y
i
n
a
s
tu
d
t
o
s
u
p
p
o
r
t
t
h
e
we
i
g
h
t
of
th
e
m
i
c
r
o
w
a
v
e
.
M
a
r
k
tw
o
addi
t
i
o
n
a
l,
e
ve
nly
s
p
a
c
ed
l
o
cat
io
n
s
f
o
r
t
h
e
s
u
pp
l
i
e
d
t
o
g
g
l
e
b
o
lt
s.
3.
D
r
i
l
l
h
o
le
s
i
n
t
h
e
m
a
r
k
e
d
l
o
ca
t
i
o
n
s.
Wh
e
r
e
t
he
r
e
i
s
a
s
tu
d
,
d
r
il
l
a
3/
1
6
"
h
o
le
f
o
r
woo
d
s
c
r
e
ws
.
F
o
r
h
ol
e
s
th
at
d
o
n
o
t
l
i
n
e
upw
ith
a
s
tu
d,
d
r
i
l
l 5
/8
"
h
o
l
e
s
f
o
r
t
o
gg
le
b
o
l
ts
.
D
O
NO
T
I
N
S
T
A
L
L T
H
E
MO
U
N
T
I
N
G
P
L
A
TE
A
T
T
H
IS
T
IM
E
.
4.
R
e
m
ove
t
h
e
te
m
p
la
te
fr
o
m
th
e
r
ea
r
w
a
l
l
.
5
.
R
e
v
ie
h
t
w
e
I
n
s
t
a
ll
a
t
i
on
I
ns
t
r
uc
t
i
o
n
b
oo
k
f
o
r
y
o
u
r
i
n
s
t
a
l
l
atio
n
s
i
t
u
a
t
i
on
.
L
oc
a
te
a
n
d
m
a
r
k
h
o
l
e
s
to a
li
gn
wi
th
h
o
le
s
i
n
t
h
e
m
o
u
n
ti
n
g
pl
a
te.
I
M
PO
RT
A
NT
:
L
O
C
A
T
E
A
T
L
EA
S
T
O
N
E
S
T
U
D
O
N
EI
T
H
E
R
S
ID
E
O
F
T
H
E
C
E
NT
E
RLIN
E
.
M
A
R
K
T
HE
L
O
CATI
O
N
F
O
R
2
ADD
I
T
IO
N
A
L,
EV
E
N
L
Y
S
P
A
CE
D
T
O
G
G
L
E
BO
L
T
S
I
N
TH
E
M
O
U
NT
IN
G
P
L
AT
E
A
R
EA
.
Lo
c
a
t
e
a
nd
mar
k
h
ol
es
to
a
l
i
gn
wit
h
h
o
l
es
i
n th
e
.
e
ta
l
p
g
n
it
n
u
o
m
IMPO
RT
A
NT
:
L
O
CA
T
E
A
T
L
EAS
T
ON
E
ST
U
D
O
N EIT
HE
R
S
I
D
E
O
F
THE
C
EN
T
ER
L
IN
E.
M
A
RK
T
HE
LO
C
A
T
IO
N
F
O
R
2
A
DDI
T
I
O
N
A
L,
E
V
EN
LY
S
P
AC
E
D
T
O
G
GL
E
B
O
L
TS I
N
T
H
E MO
UNT
ING
P
L
ATE
A
R
E
A
.
Tr
i
m
t
he
r
ea
r
w
al
l
te
m
pl
a
te
a
long
t
h
e
do
t
t
e
d
l
i
ne
.
T
rim
t
h
e
r
ea
r
w
a
l
l
t
e
m
p
l
a
t
e
a
l
o
n
g
t
h
e
d
ot
t
e
d
li
n
e
.
12"
4"
D
arl
e
v
u
e
l
t
a
a
l
a
h
o
j
a
pa
r
a
c
o
n
s
u
lt
a
r
l
a
v
e
r
s
i
ó
n
e
nE
s
p
a
ñ
o
l
.
A1.
ATTACH THE MOUNTING
PLATE TO THE WALL
Attach the plate to the wall using toggle
bolts. At least one wood screw must be used
to attach the plate to a wall stud.
NOTE: If the cabinet depth including the
cabinet doors is more than 13'""' then the
unit must be spaced out from wall using
adequate materials supporting150 Ibs to
allow proper top vent air exhaust/intake.
Cabinet
Cabinet
(35 cm)
13.8" MAX.
1
Remove the toggle wings from the bolts.
2
Insert the bolts into the mounting plate
through the holes designated to go into
drywall and reattach the toggle wings to
3⁄4"(19 mm) onto each bolt.
To use toggle bolts:
Wall
Mounting
Plate
Spacing for Toggles
More Than Wall
Thickness
Bolt End
Toggle
Bolt
Toggle Wings
3
Place the mounting plate against the wall
and insert the toggle wings into the holes in
the wall to mount the plate.
NOTE: Before tightening toggle bolts and
wood screw, make sure the bottom of the
mounting plate touch the bottom of the
cabinet when pushed flush against the wall
and that the plate is properly centered under
the cabinet.
CAUTION:Be careful to avoid pinching fingers
between the back of the mounting plate and
the wall.
4
Tighten all bolts. Pull the plate away from
the wall to help tighten the bolts.
EN-10
Bekijk gratis de handleiding van Frigidaire GMOS1266SS, stel vragen en lees de antwoorden op veelvoorkomende problemen, of gebruik onze assistent om sneller informatie in de handleiding te vinden of uitleg te krijgen over specifieke functies.
Productinformatie
| Merk | Frigidaire |
| Model | GMOS1266SS |
| Categorie | Magnetron |
| Taal | Nederlands |
| Grootte | 11447 MB |


