Frigidaire FMOS1746SS handleiding
Handleiding
Je bekijkt pagina 10 van 25
I
nstallation Instructions
Place the mounting plate against the wall
and i
nsert the toggle wings into the holes
in the wall to mount the plate.
Tighten all bolts. Pull the plate away from
the wall t
o help tighten the bolts.
4
3
ATTACH THE MOUNTING
PLATE TO THE WALL
Attach
the plate to the wall using toggle
bolts. At least one wood screw must be
used to attach the plate to a wall stud.
Remove the toggle wings from the bolts.
Ins
ert the bolts into the mounting plate
through the holes designated to go into
drywall and reattach the toggle wings to
3
⁄4″ (19 mm) onto each bolt.
1
Wall
M
ou
nting
P
lat
e
Spacing for
Toggles More
T
han Wall
Thickness
Bolt End
T
og
gle
Bolt
T
og
gle Wings
To use toggle bolts:
2
RECIRCULATING (Non-
Vented Ductless)
NOTE:
If the cabinet depth including the cabinet
NO
TE: Before tightening toggle bolts and wood
screw, make sure the bottom of the mounting
plate touch the bottom of the cabinet when
pushed flush against the wall and that the plate
is properly centered under the cabinet.
CAUTION: Be careful to avoid pinching fingers
between the back of the mounting plate and the
wall.
A
A1.
Cabinet
Cabinet
(33 cm)
13" MAX.
doors is more than 13"then the unit must be
spaced
out from wall using adequate materials
supporting 150 Ibs to allow proper top vent air
exhaust/intake.
3/8"TO
EDG
E
NO
TE
: IT IS VERY IM
POR
TANT TO
READ AND FOLLO
W
THEDIRECTIONS
IN THE INSTALLAT
ION INSTRUCTIONS
BE
F
O
RE PR
O
CEEDINGWITH TH
IS
REAR W
ALL TEMPLAT
E.
T
hi
s Rear
Wall Template serves to position
the bottom
mounting plateand to l
o
cate th
e h
or
i
zontal ex
hau
st
out
le
t.
1
. Us
e a le
velto check that the t
emplate
is p
os
ition
ed
accuratel
y
.
2. L
oca
te a
ndm
ark at le
a
s
t onestu
d
on theleft or
right
side of the c
e
nterli
ne
.
Itis import
an
t to use at le
as
t
one
wood
scre
w
mou
nte
d
fi
rmly in a
s
tud to suppor
t th
e weight
ofth
e micr
ow
ave
.
Mark two addi
tional, evenlyspa
c
ed
locatio
n
s for the
supplied toggle
bo
lts.
3. Drill hole
s in the
marked locations.Whe
r
e t
he
re is
a
stu
d
, d
r
ill a 3/16" hole
for woo
d screws. For holes
thatdo not line up with a s
tu
d, drill 5/8" h
oles fo
r
toggle bolts.
DO NOT INSTALL T
HE
MOU
NT
I
NG
PLA
T
E
A
T
THIS
T
IME.
4. Re
move the template fromthe r
ear
wal
l.
5.Revie
ht
w e In
sta
llationInstr
uc
tion book for
y
our
in
stallation
s
i
tuation.
Locate and mark holes to align with holes in the
mounting
p
late.
IMPO
RTANT
:
LO
C
AT
E AT LEAST
O
N
E STUD
ON EIT
HER
SID
E OF
TH
E CENTERLIN
E
.
MARKT
HE LO
CATION
FO
R 2 ADDITIONAL, EVENLY
SPACE
D TOGGLE BOLTS
IN
THE MOUNTING
PLATE
AREA
.
Locate and mark
holes to ali
gn with holes
in the
.
e
ta
lp
gn
itn
u
o
m
IMPO
RTANT
:
LOCAT
E AT LEAST ON
ESTUD ON EITHER SI
DE OF
THE
CENTER
LIN
E.
MARKT
HE LOCATIONFO
R 2 ADDITION
AL, EV
ENLY
SPACED
TO
G
GLE BO
LTS IN
THE MO
UN
TING PLATE
AREA
.
Trim t
he rear wall templat
e along
t
he do
tted line.
Trim the rear
wal
l t
emplat
e along
the dotted lin
e.
12"
4"
Darlevu
eltaa la ho
j
apara
c
o
nsul
t
a
r
la
v
e
r
s
i
ó
ne
nEs
paño
l.
EN-10
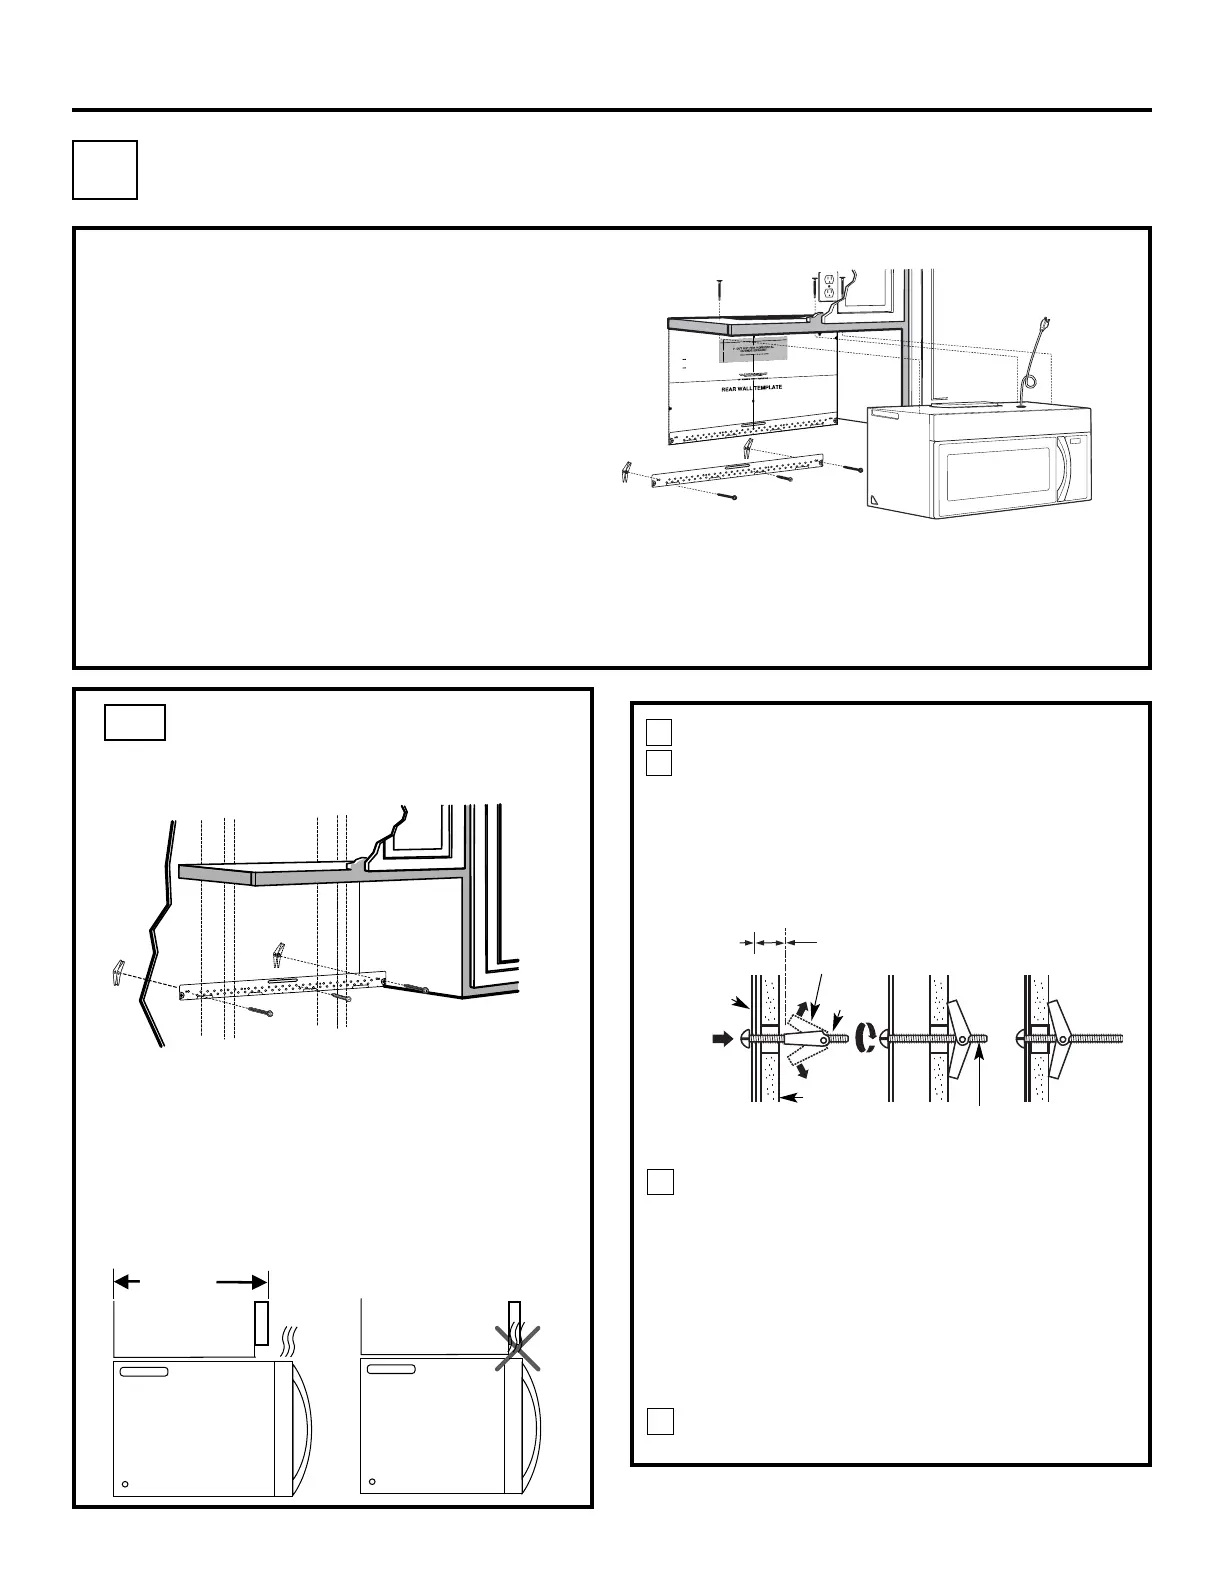
INSTALLATION OVERVIEW
IMPORTANT NOTES:
• Make sure the screws for the blower motor and
blower plate are securely tightened when they
are reinstalled. This will help to prevent
ex
cessive vibration.
• Make sure the motor wiring has been properly
routed and secured, and that the wires are not
pinched.
A
1
. A
tta
ch Mounting Plate to Wall
Prepare T
op
Cab
inet
Check
Blower Plate
Mount the Microwave Oven
Install or change Charcoal
Filter
A
2
.
A3.
A4.
A5.
Bekijk gratis de handleiding van Frigidaire FMOS1746SS, stel vragen en lees de antwoorden op veelvoorkomende problemen, of gebruik onze assistent om sneller informatie in de handleiding te vinden of uitleg te krijgen over specifieke functies.
Productinformatie
| Merk | Frigidaire |
| Model | FMOS1746SS |
| Categorie | Magnetron |
| Taal | Nederlands |
| Grootte | 4289 MB |


