Handleiding
Je bekijkt pagina 20 van 80
20
USING THE RADIO CONTROL
WARNINGS!:
Place the hood away from sources of electromagnetic
waves (e.g. microwave ovens), which could interfere with
the radio control and with the hood electronics.
The maximum operating distance is 5 metres, that may vary ac-
cording to the presence of electromagnetic interferences.
Radio control operated at 433.92MHz.
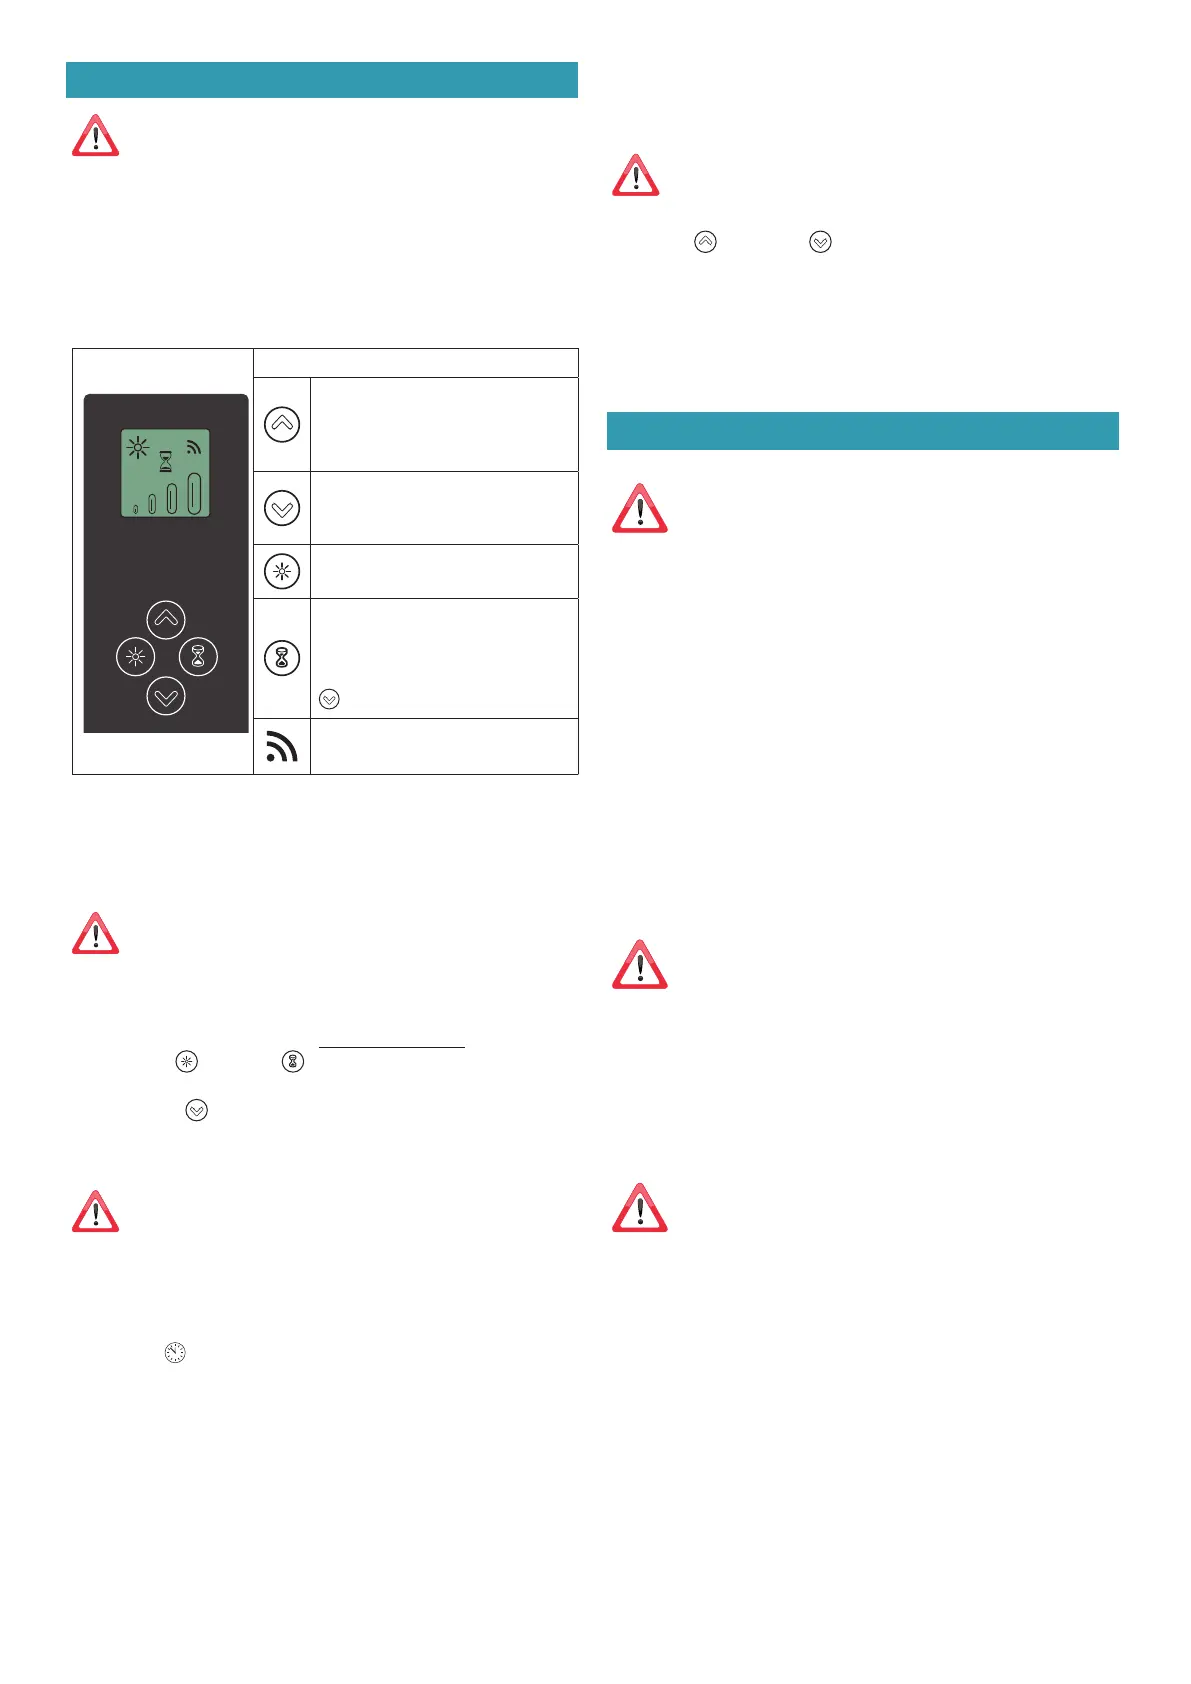
The radio control consists of two parts:
- the receiver built into the hood;
- the transmitter shown here in the gure.
DESCRIPTION OF TRANSMITTING COMMANDS
UP
Motor switch-on and speed in-
crease from 1 to 4. Speed 4 is only
active for a few minutes.
DOWN
Speed decrease and motor switch-
o.
Light ON-OFF
TIMER ON: The motor automati-
cally switches o after 15 min.
The function is automatically disa-
bled if the motor is switched o (
key)
Command transmission active
RADIO CONTROL CODE CHANGE
With only one radio control, go directly to point 2.
With several radio controls in the same room, a new code can be creat-
ed by following the procedure below.
Disconnect the power to the hood before starting the pro-
cedure.
1 CREATE A NEW CODE
The procedure is to be carried out on the radio control.
• Press LIGHT
and TIMER simultaneously until the display starts
ashing.
• Press DOWN
on the radio control: saving is conrmed by three
brief ashes of the display. The new code cancels and replaces the
previous default code.
Reconnect the hood to the electrical power supply, making
sure that the lights and motor are o.
2 ASSOCIATING THE RADIO CONTROL WITH THE HOOD
USING THE ELECTRONIC PUSHBUTTON PANEL
press TIMER (
) on the hood pushbutton panel for 2 seconds:
the red LED lights up.
press any key on the radio control within 10 seconds.
RESTORING DEFAULT CODE
the procedure is to be carried out if the hood is disposed of, sold or
transferred.
Disconnect the power to the hood before starting the pro-
cedure.
• Press UP
and DOWN simultaneously on the radio control for
more than 5 seconds: reset is conrmed by three brief ashes of the
display.
• Reconnect the hood to the electrical power supply.
• Proceed with associating the hood and the radio control, as de-
scribed in point 2.
MAINTENANCE
Before cleaning or carrying out maintenance operations,
disconnect the equipment by removing the plug or
switching o the main switch.
Do not use detergents containing abrasive, acidic or corrosive
substances or abrasive cloths.
Regular maintenance guarantees proper operation and performance
over time.
Special attention is to be paid to the metal anti-grease lters : fre-
quent cleaning of the lters and their supports ensures that no amma-
ble grease is accumulated.
CLEANING OF EXTERNAL SURFACES
You are advised to clean the external surfaces of the hood at least once
every 15 days
to prevent oily substances and grease from sticking to
them. To clean the brushed stainless steel hood, the Manufacturer rec-
ommends using "Magic Steel" wipes.
Alternatively and for all the other types of surfaces, it can be cleaned
using a damp cloth, slightly moistened with mild, liquid detergent.
Complete cleaning by rinsing well and drying with soft cloths.
Do not use too much moisture or water around the push
button control panel and lighting devices in order to pre-
vent humidity from reaching electronic parts.
The glass panels can only be cleaned with specic, non-corrosive or
non-abrasive detergents using a soft cloth.
The Manufacturer declines all responsibility for failure to comply with
these instructions.
CLEANING OF INTERNAL SURFACES
Do not clean electrical parts, or parts related to the motor
inside the hood, with liquids or solvents.
For the internal metal parts, see the previous paragraph.
Bekijk gratis de handleiding van Falmec Spazio Isola 130, stel vragen en lees de antwoorden op veelvoorkomende problemen, of gebruik onze assistent om sneller informatie in de handleiding te vinden of uitleg te krijgen over specifieke functies.
Productinformatie
| Merk | Falmec |
| Model | Spazio Isola 130 |
| Categorie | Afzuigkap |
| Taal | Nederlands |
| Grootte | 12495 MB |


