Handleiding
Je bekijkt pagina 36 van 44
36
EN
3
31
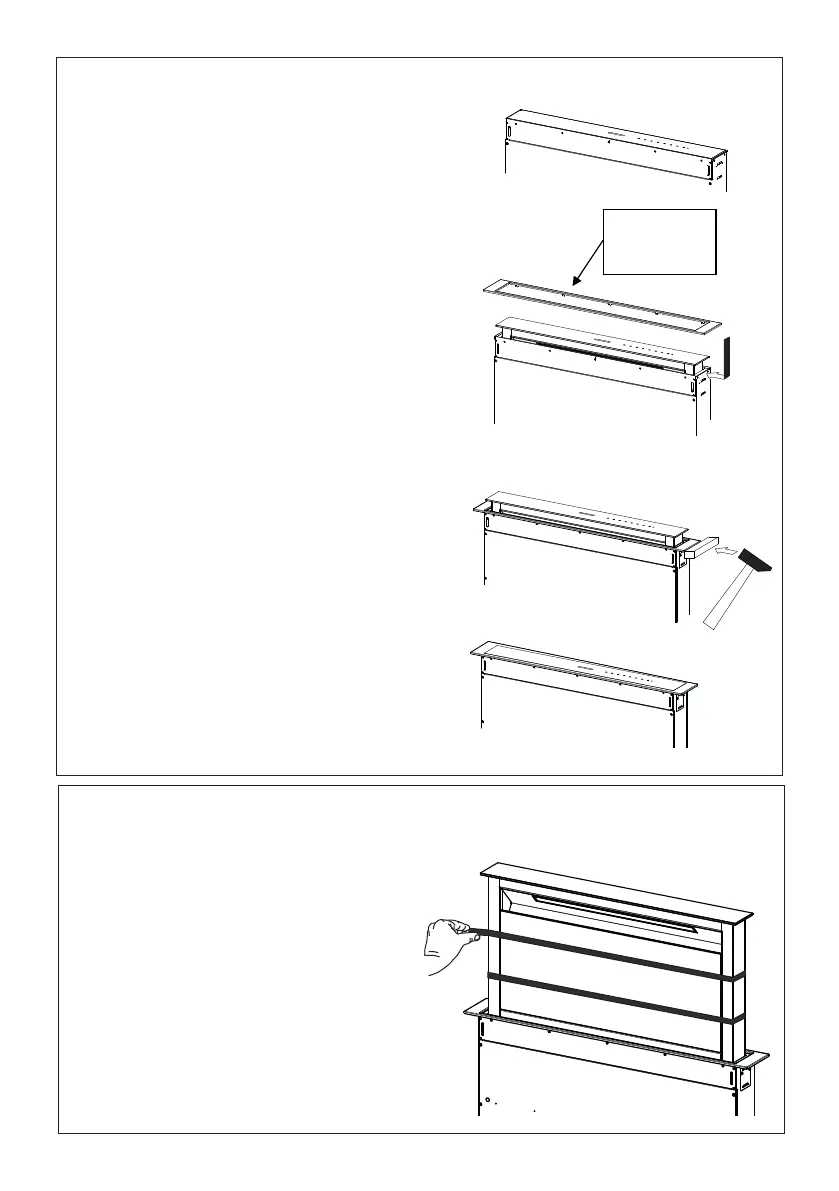
Warning..:
Handle
with care
Fitting the Front element
• Lift the mobile hood canopy
(see paragraph on Use) by just a
few centimeters.
• To stop movement, simply
press down on the mobile
canopy as it lifts up.
Warning: Never block the
sliding door when it is opening
or closing, except during the
operations required to fit the
frame.
• Remove the sponge guards
from the corners of the glass.
• Take the front Frame and insert
it from above, making sure that
its tabs insert into the slots
provided on the Hood and
sliding it to the left.
Warning..: All the tabs must
be inserted.
• Use a tool (hammer) to tap all
along the front Frame from
right to left until it is
completely flush.
A piece of wood or similar
element can be inserted
between the hammer and the
front Frame to prevent any
damage.
• Please refer to the paragraph on
Use for indications of how to
return the mobile canopy to the
Standard position.
9
Installation du cache supérieur
• Soulevez d'environ 1-2" le tirage descendant à la
position élevée (consultez la page 15 pour en savoir
plus sur l'utilisation des commandes).
• Retirez les protections en éponge sur les coins du
verre.
• Prenez le cache supérieur et insérez-le à partir
du dessus, en vous assurant que ses pattes sont
insérées dans les rainures sur le tirage descendant
et en le faisant glisser vers la gauche.
Avertissement : Toutes les pattes doivent être
insérées.
• Utilisez un maillet en caoutchouc mou ou un outil
similaire pour taper le long du cache supérieur de
droite à gauche, jusqu'à ce qu'il soit complètement
de niveau.
Il est possible d'insérer une pièce de bois ou une
cale de caoutchouc
entre le marteau et le cache avant pour prévenir les
dommages.
• Veuillez vous reporter au paragraphe sur l'utilisation
pour en savoir plus sur le retour du tirage
descendant à la position de base.
10
Panneau de protection avant
EN
3
32
Surround Suction Panel
• Open the Hood Door (see
USE).
• Remove the 2 strips of adhesive
tape fastening the panel during
transport.
• Soulevez la partie télescopique à la position
élevée (consultez la page 15 pour en savoir
plus sur l'utilisation des commandes).
• Enlevez les 2 bandes de ruban adhésif qui
retiennent le panneau durant le transport.
Bekijk gratis de handleiding van Faber SCLX3015BKNBB, stel vragen en lees de antwoorden op veelvoorkomende problemen, of gebruik onze assistent om sneller informatie in de handleiding te vinden of uitleg te krijgen over specifieke functies.
Productinformatie
| Merk | Faber |
| Model | SCLX3015BKNBB |
| Categorie | Afzuigkap |
| Taal | Nederlands |
| Grootte | 3987 MB |


