Handleiding
Je bekijkt pagina 9 van 196
The residual heat indicator is a safety
feature, indicating that the surface of the
cooking area is still at a temperature of
50°C or above, which may cause burns
if touched with bare hands. The digit for
the corresponding cooking area indic-
ates .
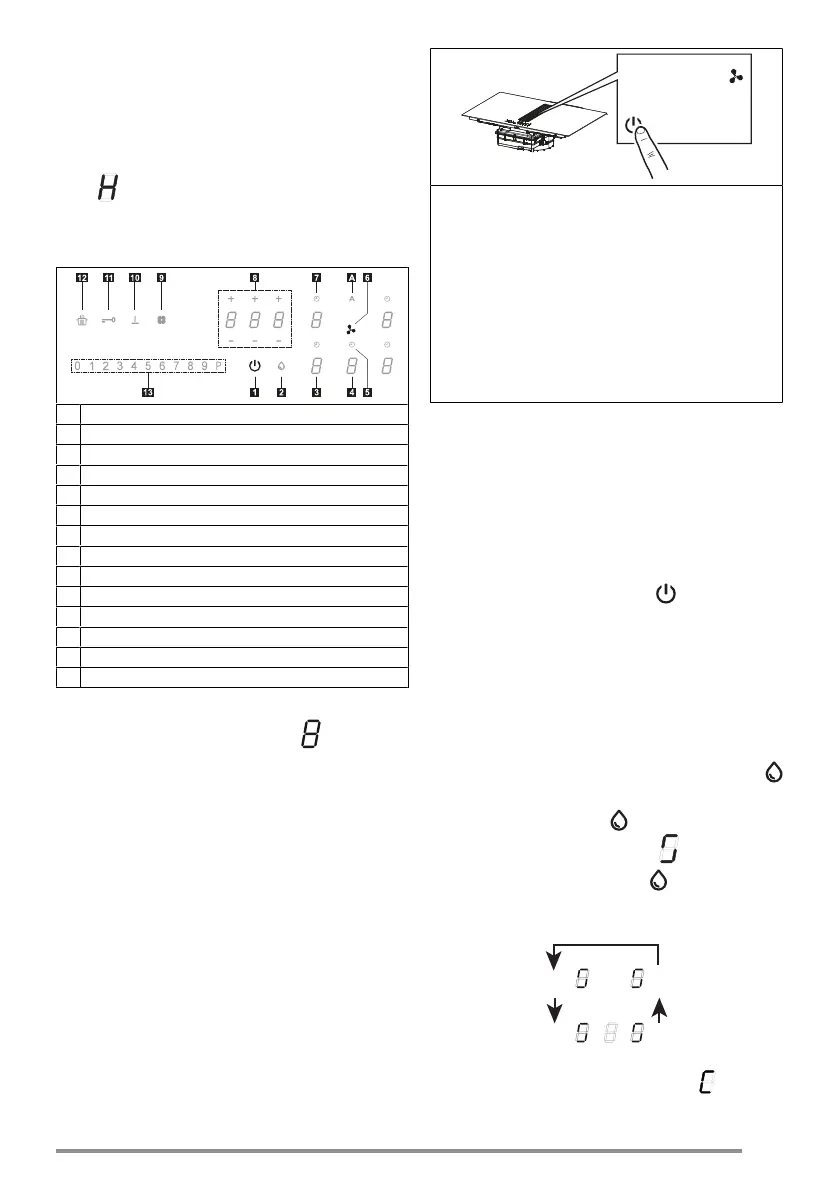
8. CONTROL PANEL
1
On/Off
2
Grease filter saturation indicator
3
Cooking zone power level indicator
4
Extractor power level indicator
5
Extractor timer control
6
Extractor controls zone symbol
7
Cooking zone timer control
8
Timer management zone
9
Activated carbon filter saturation indicator
10
Melting
11
Lock key
12
Pause key
13
Scroll keypad
A
Auto key
The cooking zones can be activated by
pressing the reference digit . The digit
becomes brighter to confirm the opera-
tion.
When a pan is placed on one of the 4
cooking areas, the hob automatically
detects its presence and lights up the
corresponding digit to activate it.
If there are no pans or other objects on
the hob, the digits are not visible.
The functions which can be selected are
always visible on the control panel, but
with a dimmed light. Select the functions
by touching the corresponding symbol.
Turning on the appliance:
Press and hold the On/Off button for 2 seconds to turn the
hob on and activate its functions.
At this point the hob is on but all the cooking zones and the
hood are at zero power. The Hob will switch off automatic-
ally after 20 seconds if it is not being used.
Warning: For safety reasons the hob can always be turned
off using the On/Off button.
Warning: The functions that can be selected will always be
the ones that are illuminated/visible on the control panel,
and these will always be the only ones that can be activ-
ated.
The controls for the cooking areas, suction hood and timer
can be activated by pressing on the reference Digit.
The Digit lights up more intensely to confirm the operation.
9. POWER LIMITATION
When connecting to the household
power supply for the first time, the in-
staller must set the power of the cooking
zones based on the actual capacity of
the household power supply.
If this is not necessary, the hob can be
turned on directly using , otherwise,
follow the operations below to access
the menu.
Before carrying out the procedure, it is
advisable to read the entire paragraph.
Connect the hob to the domestic mains
power.
1. All the digits light up for a few
seconds, then switch off and only
keeps flashing.
2. Press and hold : the digits in the
cooking area indicate .
3. While holding down , start press-
ing the zone digits, proceeding anti-
clockwise.
1
2
4
3
The rear left digit indicates and a
number indicating the type of menu. The
9
Bekijk gratis de handleiding van Faber Galileo Linear, stel vragen en lees de antwoorden op veelvoorkomende problemen, of gebruik onze assistent om sneller informatie in de handleiding te vinden of uitleg te krijgen over specifieke functies.
Productinformatie
| Merk | Faber |
| Model | Galileo Linear |
| Categorie | Fornuis |
| Taal | Nederlands |
| Grootte | 23239 MB |


