Elation TVL1000 II handleiding
Handleiding
Je bekijkt pagina 4 van 12
©Elation Professional® - www.elationlighting.com - TVL1000 II Instruction Manual Page 7
5-Pin XLR DMX Connectors.
Some manufactures use 5-pin XLR
connectors for DATA transmission in place of 3-pin. 5-pin XLR xtures
may be implemented in a 3-pin XLR DMX line. When inserting stan-
dard 5-pin XLR connectors in to a 3-pin line a cable adaptor must be
used, these adaptors are readily available at most electric stores. The
chart below details a proper cable conversion.
Conductor 5-Pin XLR Male (In)3-Pin XLR Female (Out)
Pin 1
Pin 5 - Do Not Use
Pin 4 - Do Not Use
Pin 3
Pin 2
Pin 1
Pin 3
Pin 2
Not Used
Not Used
Data True (+ signal)
Data Compliment (- signal)
Ground/Shield
3-Pin XLR to 5-Pin XLR Conversion
TVL1000 II Set Up
The TVL1000 II is fully operational in three dierent mounting posi-
tions, hanging upside-down from a ceiling, hanging sideways on
trussing, or set on a at level surface. The unit should be mounted
using a mounting clamp (not provided), axing it to the mounting
bracket that is provided with the unit. Always ensure that the unit is
rmly xed to avoid vibration and slipping while operating. Always
ensure that the structure to which you are attaching the unit is secure
and is able to support a weight of 10 times the unit’s weight. Also,
always use a safety cable that can hold 12 times the weight of the
unit when installing the xture.
The equipment must be installed by a professional, and it must be
installed in a place where it is out of the reach of people’s grasp.
TVL1000 II Installation
©Elation Professional® - www.elationlighting.com - TVL1000 II Instruction Manual Page 8
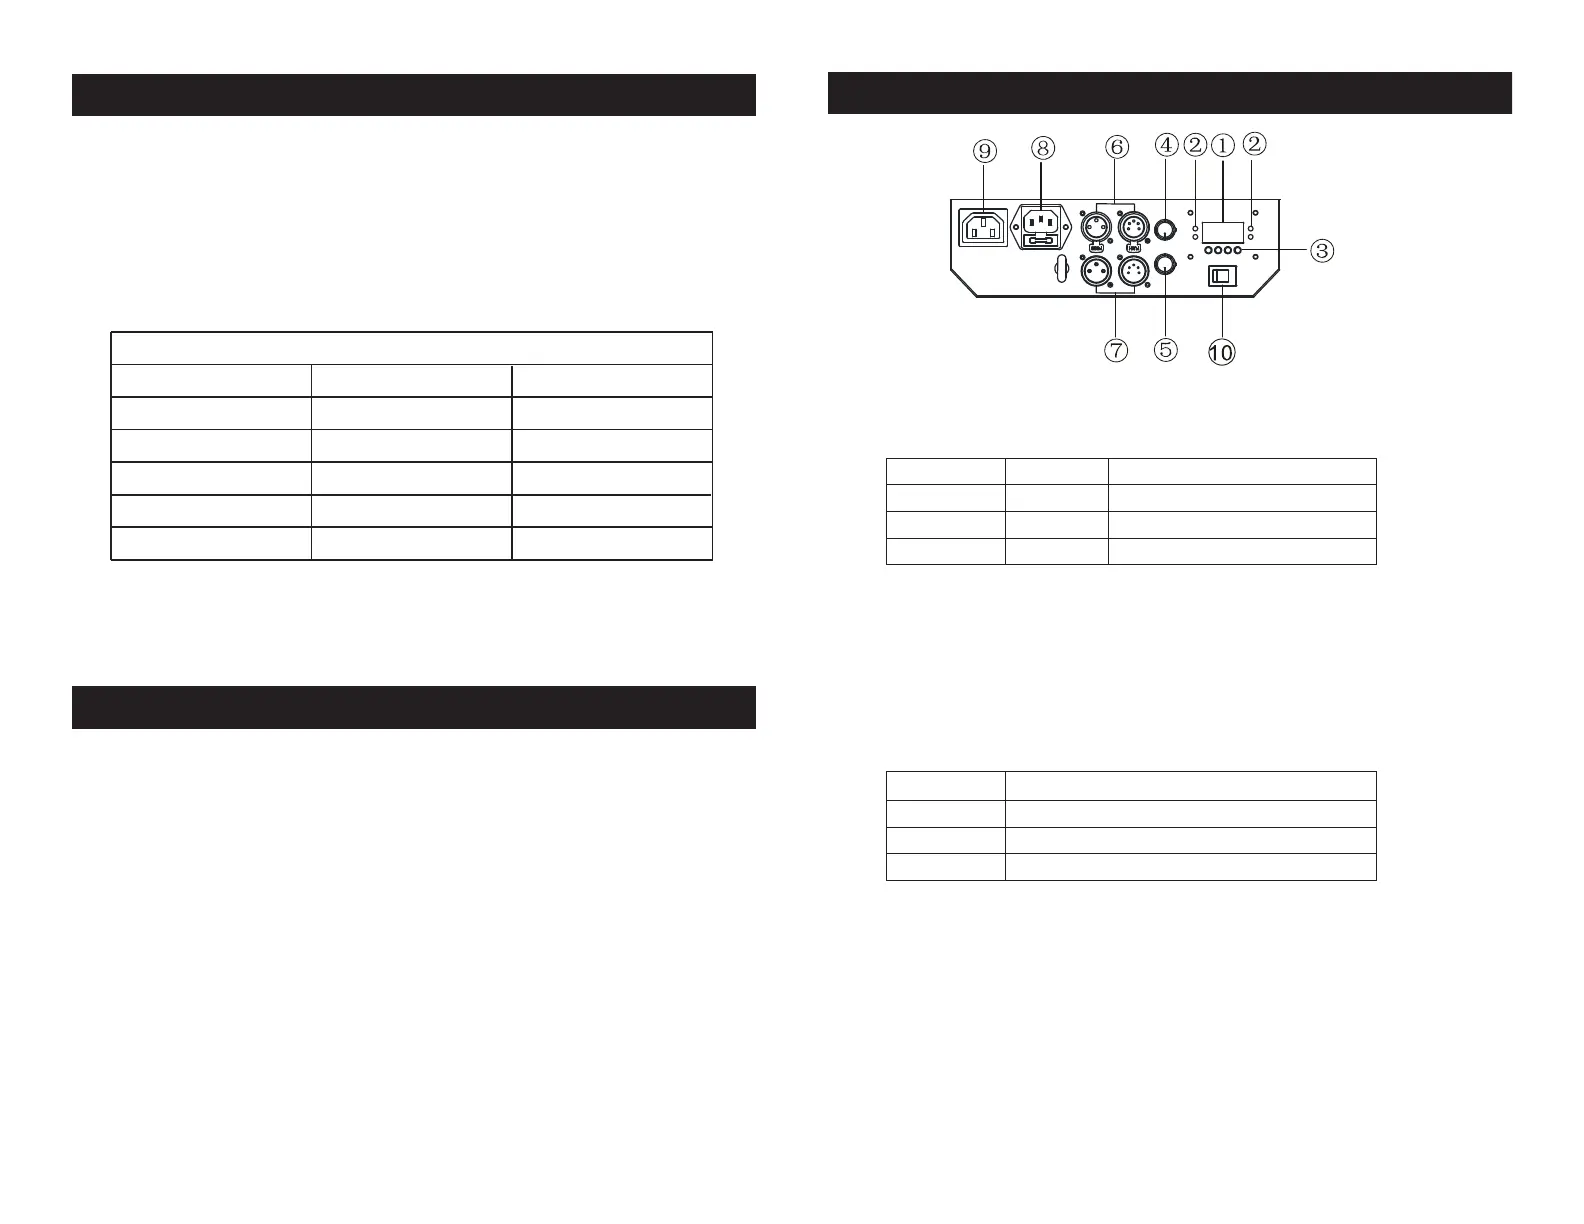
TVL1000 II Control Panel
1 Display: To show the various menus and the selected functions
2 Indicator LED: First make sure to turn on the battery switch.
DMX On DMX input present
MASTER
On Master Mode
SLAVE On Slave Mode
BATTERY On Battery is full
3 Button:
MENU To select the programming functions
DOWN
To go backward in the selected functions
UP To go forward in the selected functions
ENTER To confirm the selected functions
Note: Connect the fixture to a main power supply. If the battery indicator
blinks slowly, it means the battery is being charged. When the indicator
stops blinking and stays lit, it means the battery is at full charge.
When using the battery power, the indicator light will not bet lit. If the
remaining battery power is less then 16%, the indicator will blink fast
reminding you that the battery is low and that it needs to be charged.
4 Dimmer adjust knob: Adjust lightness for the unit from 0~100.
5 Color temperature adjustment: Adjust the color temperature from 3200k to 6500k,
25K as a step.
6 DMX output: For DMX512 link, use 3/5-pin XLR plug cable to link the next unit.
7 DMX input: For DMX512 link, use 3/5-pin XLR plug cable to input DMX signal
8 Main input: Connect to main power supply.
9 Main output: Connect to the main power ofthe next unit.
Battery switch: Turn on or turn off the switch for battery mode. This switch can only
control battery.
10
Bekijk gratis de handleiding van Elation TVL1000 II, stel vragen en lees de antwoorden op veelvoorkomende problemen, of gebruik onze assistent om sneller informatie in de handleiding te vinden of uitleg te krijgen over specifieke functies.
Productinformatie
| Merk | Elation |
| Model | TVL1000 II |
| Categorie | Verlichting |
| Taal | Nederlands |
| Grootte | 2352 MB |


