DS18 Hydro MRX1 handleiding
Handleiding
Je bekijkt pagina 4 van 16
3
1. This player should be installed by a professional
technician.
2. Please read the instructions and operation of
equipment carefully before installing.
3. Connect all wires before connecting your power.
4. To avoid short circuit; Please make sure all the
exposed wire are insulated.
5. Please secure all the wires after installation.
6. This player is designed for use with 12V DC
electric systems. Please ensure that your vehicle is
equipped with this type of cathode grounding
electrical system before installation.
7. Please make the connection to the head unit
according to the instruction manual provided.
Incorrect connections may result in severe damage.
1. Este reproductor debe ser instalado por un técnico
profesional.
2. Lea atentamente las instrucciones y el funcionamiento
del equipo antes de instalarlo.
3. Conecte todos los cables antes de conectar la
alimentación.
4. Para evitar cortocircuitos; Asegúrese de que todos los
cables expuestos estén aislados.
5. Asegure todos los cables después de la instalación.
6. This player is designed for use with 12V DC electric
systems. Please ensure that your vehicle is equipped
with this type of cathode grounding electrical system
before installation.
7. Realice la conexión a la unidad principal de acuerdo con
el manual de instrucciones proporcionado. Las
conexiones incorrectas pueden provocar daños graves.
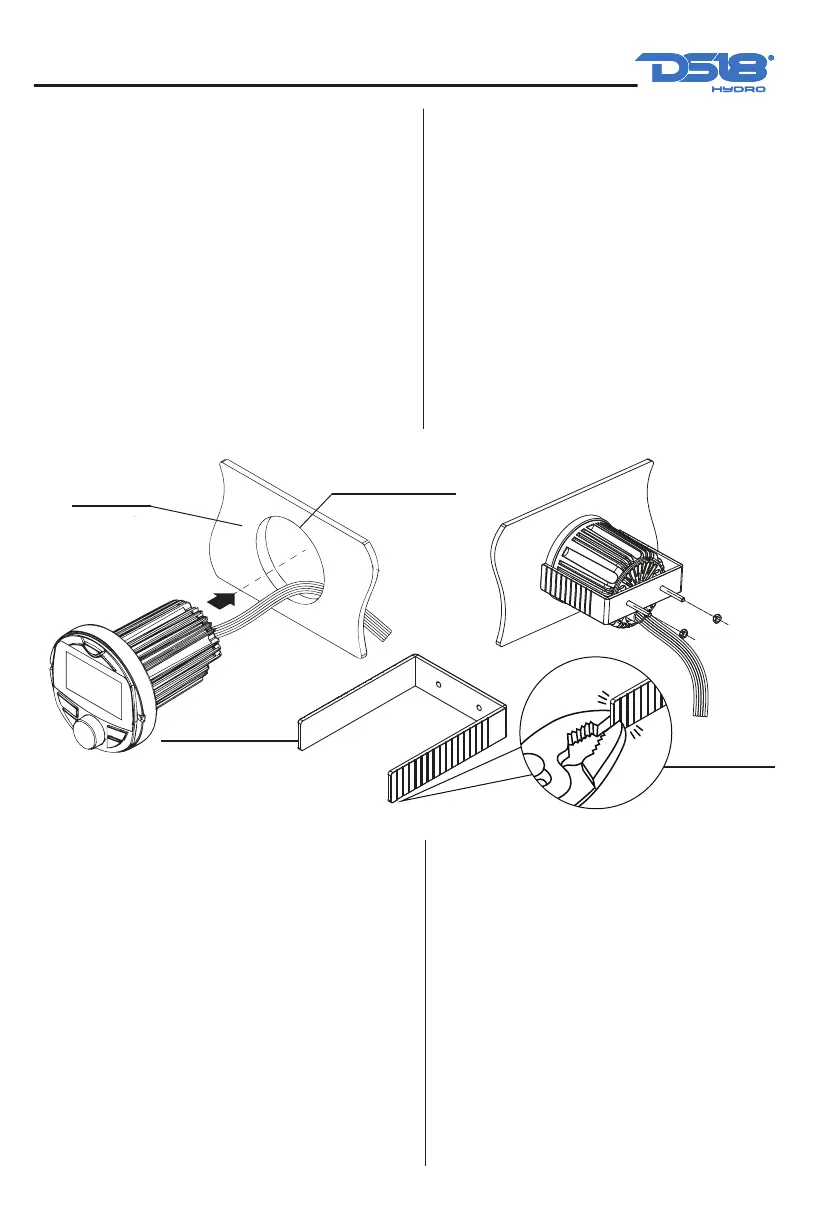
Mounting Bracket
Dashboard
Break Lines
Cutting size
Ø
3 1/8" / 80mm
Tamaño del Corte
Soporte de Montaje
Tablero
Líneas de Rotura
MOUNTING (USING U BRACKET)
MONTAJE (UTILIZANDO SOPORTE EN U)
To mount the unit, find a flat surface with adequate clearance
for the unit and all necessary wiring.
1. Once you have determined a mounting location, you will
need to cut a circular hole 3 1/8" (80mm) in diameter.
2. After the hole is cut place the two studs on the back
threaded holes.
3. Make all your wiring connections at this time and slide the
unit into the dashboard. Refer to the wiring connection
section in this manual.
4.Take the U bracket and slide over the two studs on the
back of the unit. Use a pair of pliers if you need to shorten the
U bracket by removing the breakaway segments, and then
place the supplied nuts the nuts and tighten them.
5. Secure all your wires and test your unit before wrapping
up the installation.
6. Now get out there and enjoy your new stereo upgrade.
Para montar la unidad, busque una superficie plana con espacio
suficiente para la unidad y todo el cableado necesario.
1. Una vez que haya determinado la ubicación de montaje,
deberá cortar un orificio circular de 3 1/8" (80mm) de diámetro.
2. Después de cortar el orificio, coloque los dos pernos en los
orificios roscados posteriores.
3. Realice todas las conexiones de cableado en este momento
y deslice la unidad en el tablero. Consulte la sección de conexión
del cableado en este manual.
4.Tome el soporte en U y deslícelo sobre los dos montantes en
la parte posterior de la unidad. Utilice un par de alicates si
necesita acortar el soporte en U quitando los segmentos
separables y luego coloque las tuercas suministradas y
apriételas.
5. Asegure todos los cables y pruebe su unidad antes de
finalizar la instalación.
6. Ahora sal y disfruta de tu nueva actualización de estéreo.
INSTALL METHOD 1 / METÓDO DE INSTALACIÓN 1
Bekijk gratis de handleiding van DS18 Hydro MRX1, stel vragen en lees de antwoorden op veelvoorkomende problemen, of gebruik onze assistent om sneller informatie in de handleiding te vinden of uitleg te krijgen over specifieke functies.
Productinformatie
| Merk | DS18 |
| Model | Hydro MRX1 |
| Categorie | Niet gecategoriseerd |
| Taal | Nederlands |
| Grootte | 2997 MB |


