Dreame H15 Mix handleiding
Handleiding
Je bekijkt pagina 6 van 28
9 109 10
EN EN
Display Screen
Smart Mode
fÓÁ§ĂĂçÖ§î·ÁĦÖçç½ÁĐÁ·ĐĐÓÁĉЧÖî
çÁĥÁç§î½ÖîĐÁççÖÍÁîĐçĬ§½áĕĉĐĐÓÁ
ĉĕ·ĐÖõîĂõĦÁą§î½Ħ§ĐÁąÌçõĦ
§··õą½ÖîÍçĬ潻
Turbo Mode
/Ìfĕą¶õDõ½ÁÖĉĉÁçÁ·ĐÁ½潼ĐÓÁ
§ĂĂçÖ§î·ÁĦÖçç·çÁ§îĐÓÁĉĐĕ¶¶õąî
ĉЧÖîĉõîĐÓÁÌçõõą潻
Suction Mode
ąĬĥ§·ĕĕìõîçĬ潻
Custom Mode
_ĕ·ĐÖõîĂõĦÁą潼Ħ§ĐÁąĥõçĕìÁ潼ÁĐ·潻
·§î¶Á§½áĕĉĐÁ½ĦÖĐÓÖîĐÓÁXX潻
fÓÁì§Öî¶õ½ĬĦÖççĉЧąĐĦõąäÖîÍ
§··õą½ÖîÍĐõĐÓÁĉÁĐĐÖîÍĉÖîĐÓÁ
XX潻
Self-Cleaning Mode
Drying Mode
Standard Mode (Vacuum)
DÁ½Öĕìĉĕ·ĐÖõîĂõĦÁąÌõąçÖÍÓĐ
çÁĥÁçìÁĉĉÁĉ潻
Turbo Mode (Vacuum)
DÖÍÓĐĬĉĕ·ĐÖõîĂõĦÁąÌõąÓÁ§ĥĬ
ìÁĉĉÁĉ潻
Dust Concentration Indicator /
Self-Cleaning & Drying Progress
Indicator
v
Ó§îÍÁĉ·õçõą¶§ĉÁ½õîĐÓÁÌçõõą瀢ĉ
½ÖąĐçÁĥÁçĉ½ĕąÖîÍĕĉÁ潻
澄/î½Ö·§ĐÁĉĂąõÍąÁĉĉ½ĕąÖîÍĉÁçÌ瀆
·çÁ§îÖîÍõą½ąĬÖîÍ潻
Charging Indicator
澅Ką§îÍÁąÁ§ĐÓÖîÍ潽§ĐĐÁąĬçÁĥÁç火
溢溠炀濎·Ó§ąÍÖîÍ濏
澅'ąÁÁîąÁ§ĐÓÖîÍ潽§ĐĐÁąĬçÁĥÁç炐
溢溠炀濎·Ó§ąÍÖîÍ濏
澅_õçÖ½'ąÁÁî潽&ĕççĬ·Ó§ąÍÁ½
澅_õçÖ½Ką§îÍÁ潽§ĐĐÁąĬçÁĥÁç火溢溠炀
Wi-Fi Indicator
澅ąÁ§ĐÓÖîÍ潽fõ¶Á·õîîÁ·ĐÁ½
澅çÖîäÖîÍ潽õîîÁ·ĐÖîÍ澦Kf
ĕĂÍą§½ÖîÍ
澅Kî潽õîîÁ·ĐÁ½
Insufficient water in the clean
water tank
&ÖççĐÓÁ·çÁ§îĦ§ĐÁąĐ§îä潻
The used water tank is full
ìĂĐĬĐÓÁĕĉÁ½Ħ§ĐÁąĐ§îä潻
Roller brush stuck
çÁ§îĐÓÁąõççÁą¶ąĕĉÓĦÖĐÓĐÓÁ
ĂąõĥÖ½Á½·çÁ§îÖîͶąĕĉÓ潻
Blocked tube
[ÁÌÁąĐõĐÓÁ§ąÁ煁D§ÖîĐÁî§î·Á
ĉÁ·ĐÖõîĐõ·çÁ§îĐÓÁĐĕ¶Á§î½
½ÖąĐĉÁîĉõą潻
The brush roller and tube are
dirty
X秷ÁĐÓÁ§ĂĂçÖ§î·Á¶§·äõîĐõĐÓÁ
¶§ĉÁÌõąĉÁçÌ瀐·çÁ§îÖîÍ潻
Fully charge the appliance before first use.
EõĐÁ澱
• fÓÁ§ĂĂçÖ§î·ÁĦÖççÁîĐÁąĉçÁÁĂìõ½ÁÖÌçÁÌĐÖ½çÁÌõą溡溠ìÖîĕĐÁĉ§ÌĐÁą§Ìĕçç·Ó§ąÍÁ潻
• fõÁīĐÁ§ĐĐÁąĬçÖÌÁ潼ĐÓÁ¶§ĐĐÁąĬĦÖçç·õõç½õĦî¶ÁÌõąÁąÁ·Ó§ąÍÖîͧÌĐÁąĂąõçõîÍÁ½ĕĉÁ潻
• õîõĐçÁ§ĥÁĐÓÁìõĐõąõą¶§ĐĐÁąĬç·äõîĐÓÁ§··ÁĉĉõąĬĉĐõą§ÍÁìõĕîĐÌõą§îÁīĐÁî½Á½
ĂÁąÖõ½ĐõĂąÁĥÁîĐ̧ççÖîͧ§ì§ÍÁ潻
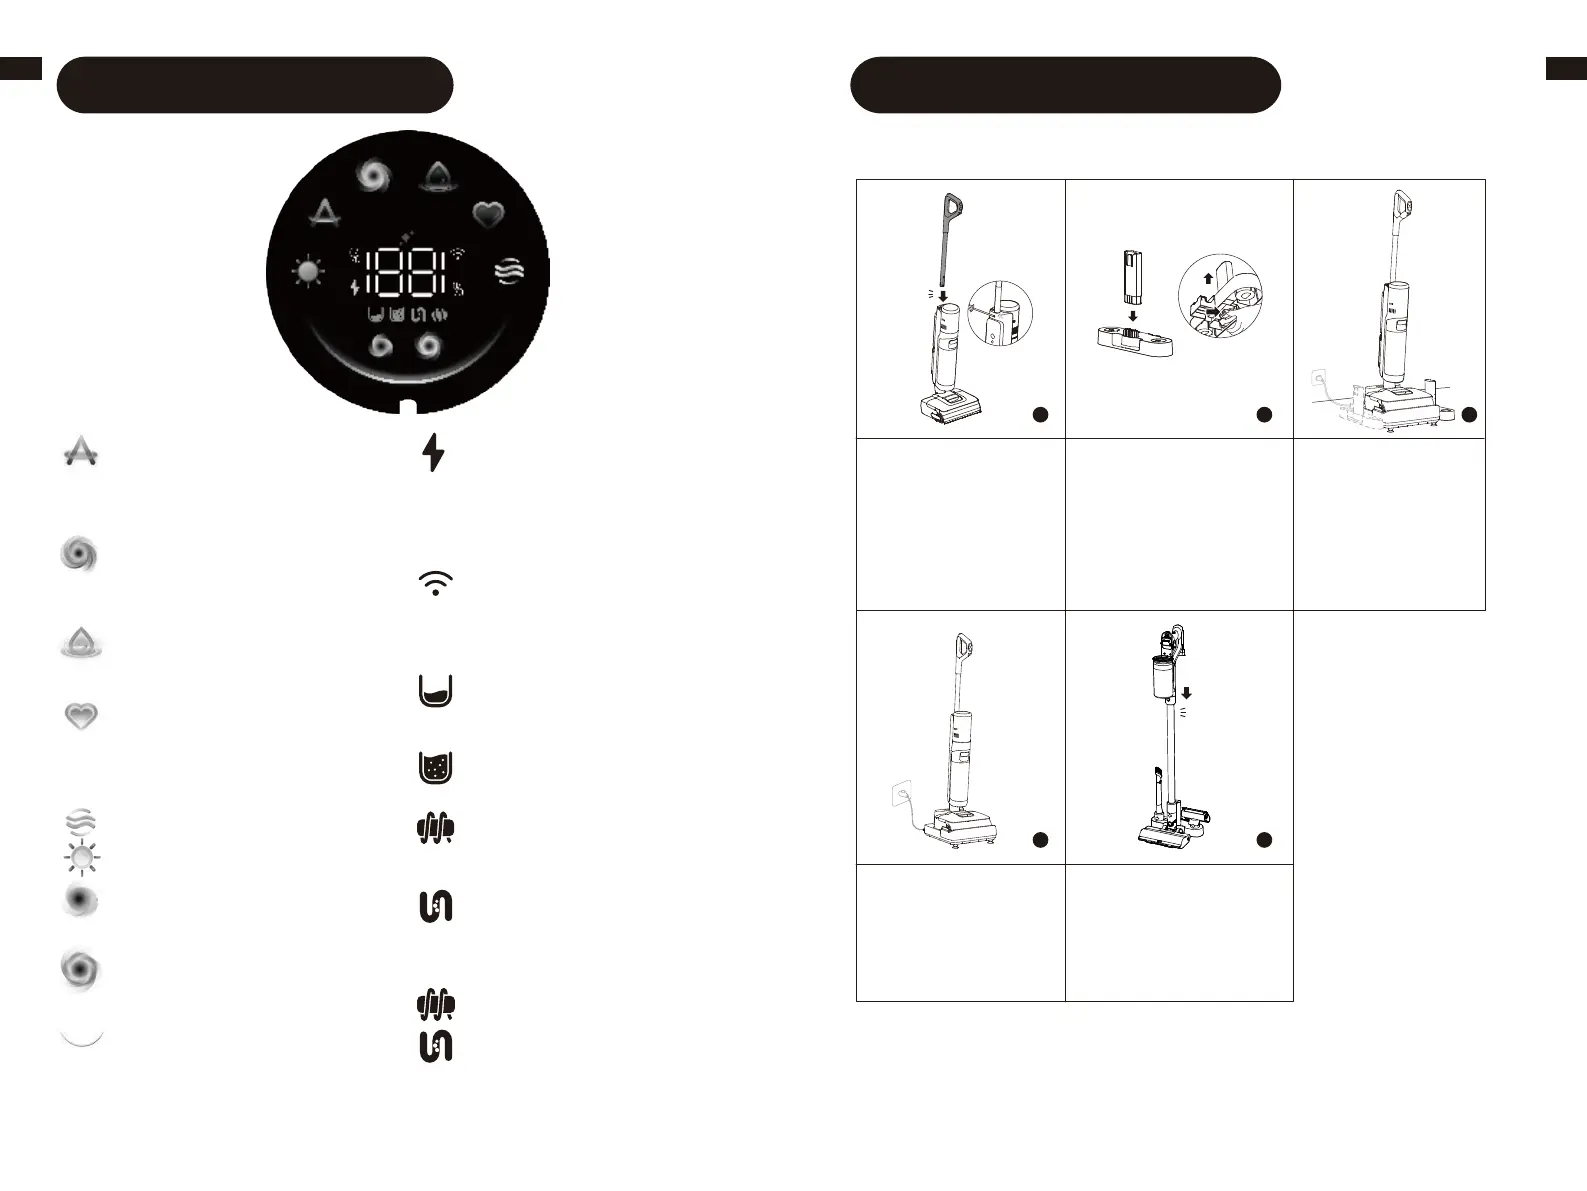
1. Insert the end of the
handle vertically into the
port on the top of the
appliance until it clicks.
To disassemble, insert a
suitable tool into the hole
as shown to press the
latch and pull the handle
upwards firmly.
2. Insert the storage rod
vertically into the storage
base to assemble the
accessory storage mount.
To disassemble, press the
latch at the bottom and pull
out the storage rod.
4. Place the appliance
on the charging base.
When the screen
reaches 100%, charging
is complete.
5. Insert extension rod
ÖîĐõìĕçĐÖ瀐ĉĕąÌ§·Á¶ąĕĉÓ潻
Insert motor handle into
extension rod. Store
vacuum attachments on
the accessory storage
mount as shown.
3. Place the charging
¶§ĉÁ瀵§Í§ÖîĉЧĦ§çç瀵
on level ground and
·õîîÁ·ĐÖĐĐõ§ĂõĦÁą瀵
source. Attach the
accessory storage mount
to either slot on both
sides at the bottom of
the charging base.
click
click
1 2
4 5
3
Product Overview
Installation & Charging
Bekijk gratis de handleiding van Dreame H15 Mix, stel vragen en lees de antwoorden op veelvoorkomende problemen, of gebruik onze assistent om sneller informatie in de handleiding te vinden of uitleg te krijgen over specifieke functies.
Productinformatie
| Merk | Dreame |
| Model | H15 Mix |
| Categorie | Stofzuiger |
| Taal | Nederlands |
| Grootte | 4960 MB |


