Dexibell Vivo S7 Pro M handleiding
Handleiding
Je bekijkt pagina 15 van 80
15
Panel Description
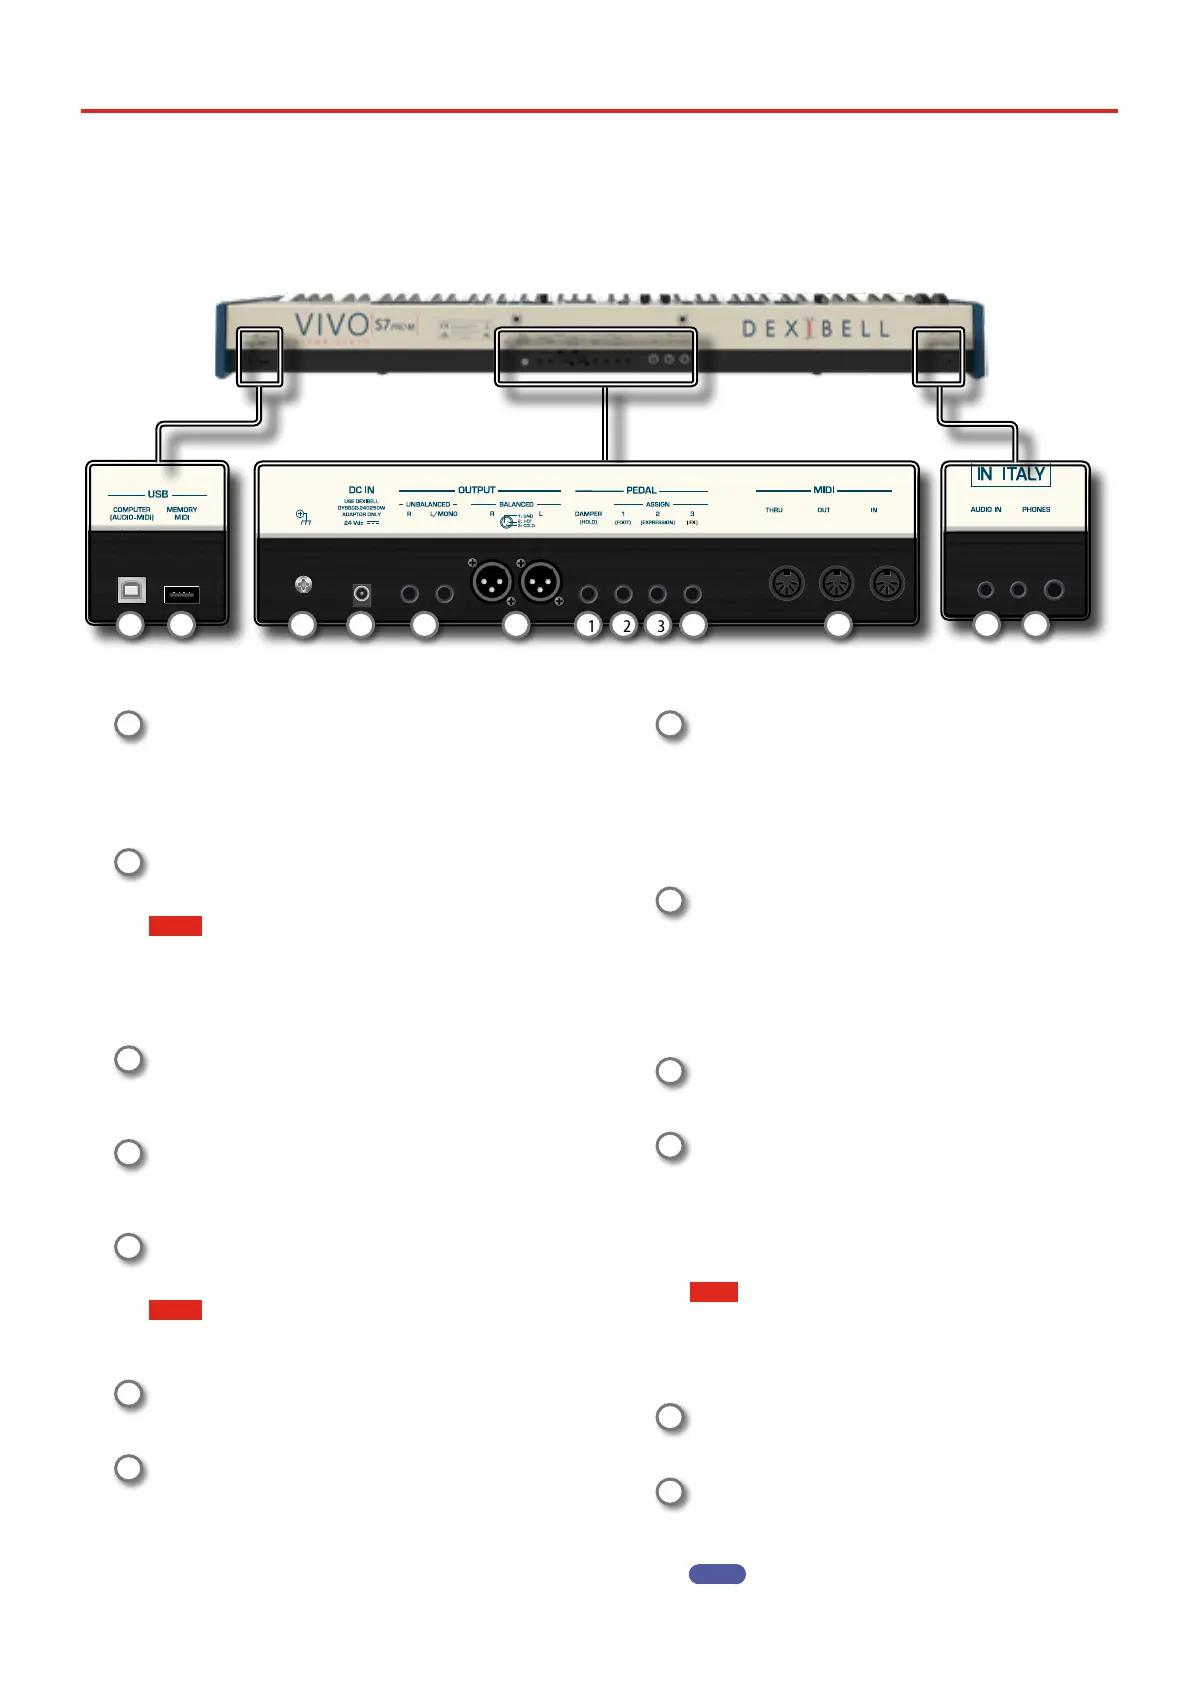
27 28 29 30 31 32
27
Ground terminal
Depending on the circumstances of a particular setup, you
could feel a tingling sensation at the point where you touch
this device.
You can eliminate this sensation connecting the ground
terminal with an external ground. For details see p. 24.
28
DC IN socket
Connect the supplied AC/DC adapter here (p. 21).
NOTE
Be sure to use only the AC adaptor (DEXIBELL DYS602-240250W)
supplied with the unit. Also, make sure the line voltage at the
installation matches the input voltage specied on the AC
adapter body. Other AC adapters may use a dierent polarity, or
be designed for a dierent voltage, so their use could result in
damage, malfunction, or electric shock.
29
UNBALANCED OUTPUT R, L/MONO sockets
These TS sockets allow you to connect powered speakers or
amp (p. 21). Both TS type and XLR (17) type jacks output
the same audio.
30
BALANCED OUTPUT R, L sockets
These XLR sockets allow you to connect mixer, powered
speakers or amp (p. 21). Both XLR type and TS (35) type
jacks output the same audio.
31
DAMPER (HOLD) pedal
Use this pedal to sustain the sound (p. 21).
NOTE
We suggest to connect at this socket a continuous pedal controller.
In this way you can appreciate all the musical nuances of a
continuos controller.
32
ASSIGN 1 [FOOT] pedal
Connecting an optional foot switch to this socket allows you
to control an assignable function by foot. See p. 21
33
ASSIGN 2 [EXPRESSION] pedal
Connecting a commercially available pedal to this socket
allows you to control an assignable function by foot (p.
63).
This socket automatically recognize an expression pedal
connected setting the Expression function, regardless of the
current function assigned.
34
ASSIGN 3 [FX] pedal
Connecting a commercially available expression pedal to
this socket allows you to control the "Manual" parameter of
the eector (default). See "FX PEDAL" (p. 63).
If you connect a commercially available foot-switches ON/
OFF type to this socket, the instrumnet recognizes the type
of pedal and allows you to control an assignable function by
foot (p. 63).
35
MIDI THRU/OUT/IN sockets
These sockets allow you to connect the S7 PRO M to external
MIDI devices to transmit and receive MIDI messages. See p.
23.
The IN socket allows you to connect a commercial available
pedal unit so as to play the pedal section with your feet. If
you connect a pedal unit here, the PEDAL section becomes
polyphonic.
36
USB Computer Port
Use an USB cable to connect the S7 PRO M to your computer
via this connector p. 22.
37
USB Memory Port
Connect an commercially available USB Memory here.
If you connect to this port an USB MIDI keyboard or modules
you can exchange MIDI data without a computer and without
using two MIDI cables. See "Connecting the S7/S3 PRO to an
USB MIDI Keyboard (USB host function)" (p. 23).
NOTE
* Carefully insert the USB Memory making sure that the connector
on the device is appropriate and that it is connected in the proper
direction.
* Dexibell does not recommend using USB hubs, irrespective of
whether they are active or passive.
38
AUDIO IN socket
This mini jack allows you to connect the audio outputs of an
external signal source (CD/mp3 player, etc.).
39
PHONES outputs
This is where you can connect one or two pairs of optional
headphones.
MEMO
Connecting a pair of headphones mutes the internal speakers.
S7 PRO M Rear Side
33 34 35 38 3936 37
Bekijk gratis de handleiding van Dexibell Vivo S7 Pro M, stel vragen en lees de antwoorden op veelvoorkomende problemen, of gebruik onze assistent om sneller informatie in de handleiding te vinden of uitleg te krijgen over specifieke functies.
Productinformatie
| Merk | Dexibell |
| Model | Vivo S7 Pro M |
| Categorie | Niet gecategoriseerd |
| Taal | Nederlands |
| Grootte | 19465 MB |


