Delfield F2975CP handleiding
Handleiding
Je bekijkt pagina 5 van 24
F2000/F17 Series Equipment Stand Service and Installation Manual
5
For customer service, call (800) 733-8829, (800) 733-8821, Fax (989) 773-3210, www.delfield.com
Delfield
™
®
Location
This unit is intended for indoor use only. Be sure the location chosen has
a floor strong enough to support the total weight of the cabinet, cooking
equipment and contents. Re in force the floor as necessary to provide for
maximum loading, for complete weight chart, please refer to page 7.
Good refrigeration is based on good air circulation inside and out.
Inside cabinet: Do not pack refrigerator so full that air cannot circulate.
Outside cabinet: Be sure that the unit has access to ample air to and from
the unit. If air flow is available to the rear of the unit that will help dissipate
exhaust air. In the event the unit is attached to the wall mount brackets,
it is important that air flow is available to the compressor compartment.
Allow air flow to the bottom of the unit as well, avoid hot corners when
possible. Allowing for the proper air flow and ventilation to the compressor
compartment will extend the life of the compressor as well as ensure proper
operation.
Cooking Equipment: WARNING! To assure proper
operation a 2" airspace must be maintained between
the bottom of any cooking equipment and the top of
this unit. Cooking equipment must have a barrier (i.e.
bottom, drip pan) between its heat source and the top
of the equipment stand. Failure to comply with this
could severely damage the equipment stand and void
all warranties.
Leveling
A level cabinet looks better and will perform better because the drain
pan will drain properly, the doors will line up with the frames properly,
and the cabinet will not be subject to undue strain.
A unit on legs will have an adjustable bullet foot on each leg, adjust
each for a level unit. A unit on casters will not be adjustable. Be sure
the unit is on a level floor, make necessary changes to the floor for
proper level.
Lock all front casters to ensure the stability of the unit.
Wall bracket installation
A wall bracket kit is supplied to secure the equipment stand to an interior
wall. Some models are supplied on optional casters. These units must
also have the wall bracket installed during use.
The wall bracket must be installed properly and the
equipment stand firmly secured to it before using this
unit! Failure to observe this warning may result in
damage to the equipment and/or injury to the operator!
Never use the drawers as steps!
Do not overload the drawers or drop or throw product into the drawer
pans.
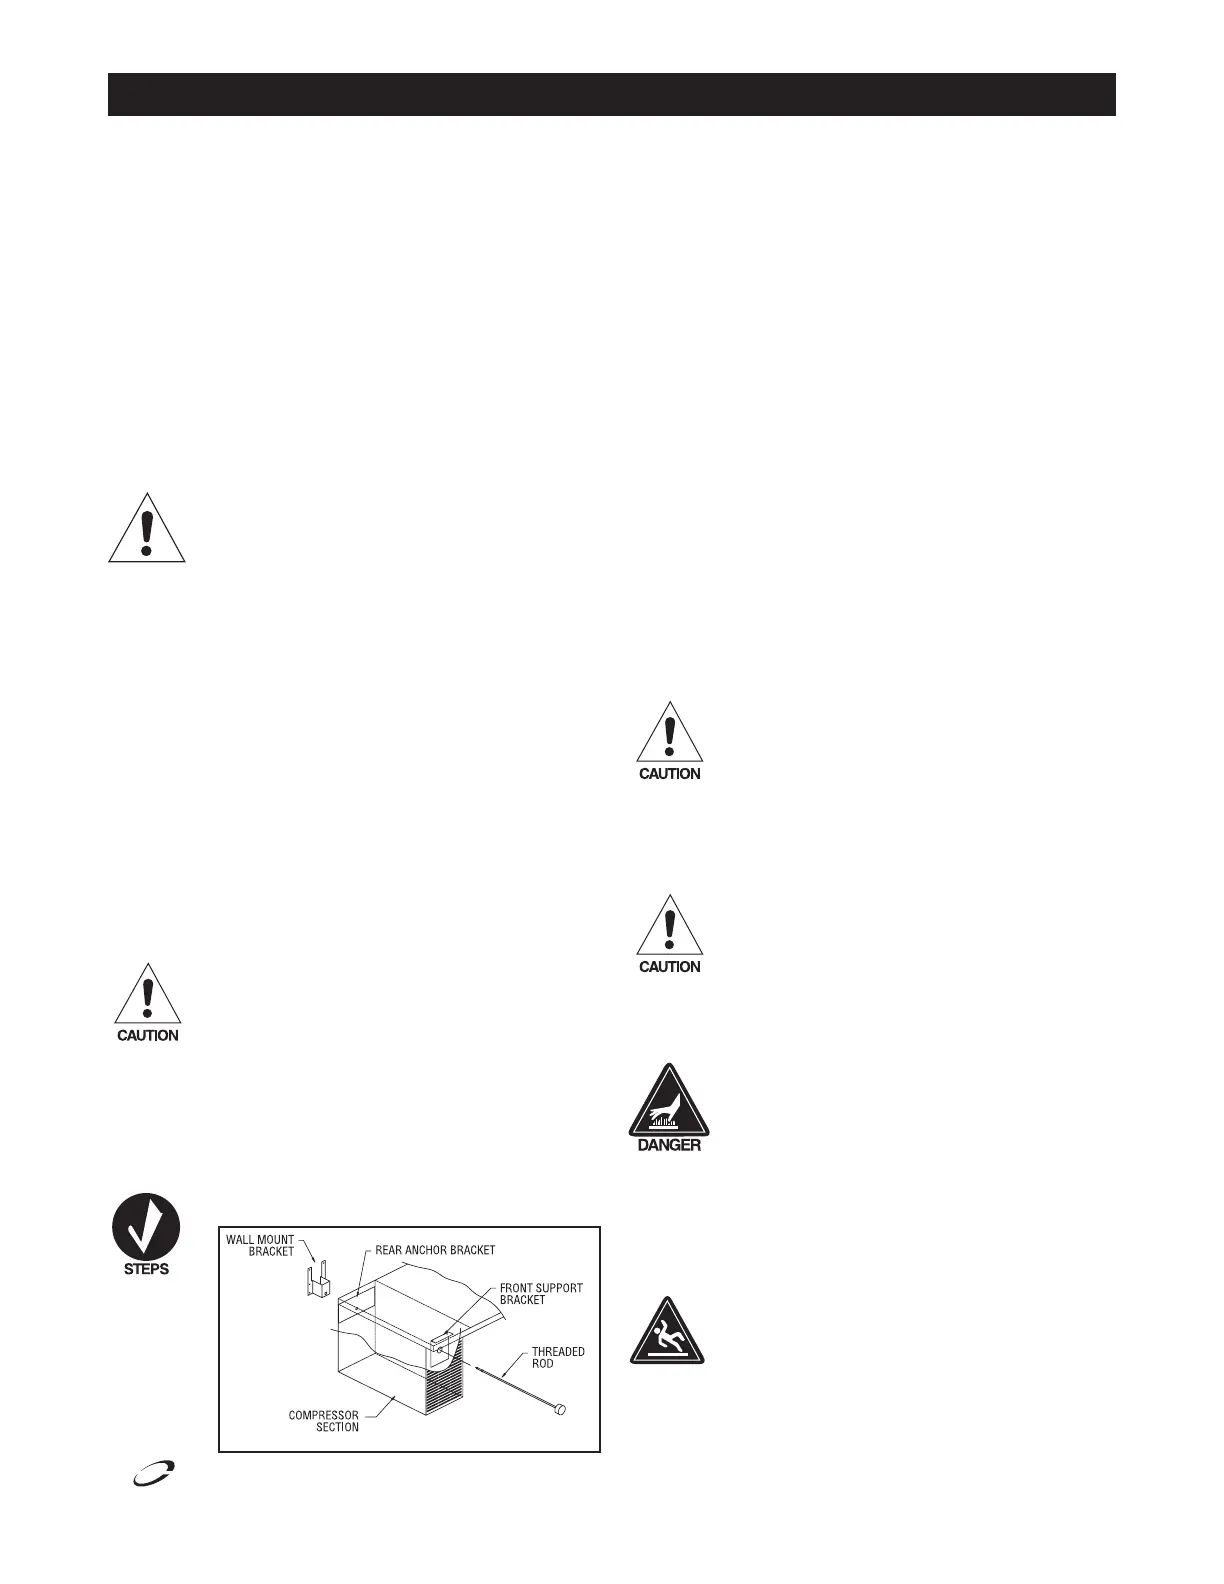
To install the wall bracket, follow these instructions:
1. Place the threaded rod through the front and rear
brackets in the compressor section. Thread the rod into
the wall bracket, making sure the longer bracket tabs
are above the height of the unit.
2. Tighten the rod until the bracket is held snug against the
back of the unit.
3. Move the unit against the wall at the desired location.
4. Secure the wall mount bracket to the wall using the top
two holes provided in the bracket tabs exposed above
the unit. The wall material must be capable of supporting
a minimum load of 300 pounds (136 kilograms) in the
vertical direction. All screws must be 1/4" diameter and
be capable of transferring the load from the bracket to
the wall.
5. Remove the threaded rod from the wall mount bracket
and move the unit away from the wall, leaving the bracket
attached to the wall.
6. Secure the bracket to the wall using the remaining four
holes.
7. Move the unit back into place and thread the rod back
into the wall mount bracket.
8. The unit should now be secured to the wall. Test the
mounting by pulling on the unit and checking that all
screws are tightened and the unit is firmly in place. If
the unit is secured, you may now place other equipment
on top of the stand and use the unit as required.
Never place any equipment on top of this unit without
first installing the wall bracket as shown above and
ensuring that the equipment is securely anchored and
stable.
9. To remove the unit in order to clean behind it,
first remove any equipment placed on top of the stand.
Then rotate the knob on the threaded rod counter-
clockwise to loosen and remove the rod from the bracket.
Before removing any cooking equipment
(including cooking oils) from the equipment stand,
allow time for the equipment to cool thoroughly.
Use extreme care in moving cooking equipment.
The threaded rod must be reinstalled and tightened
before returning the unit to service!
Be sure all cooking equipment resting on the equipment
stand is properly anchored. Consult the manufacturer’s
instructions for the cooking equipment to determine
the proper mounting technique. It is the owner’s and
operator’s responsibility to securely anchor cooking
equipment to the equipment stand.
Plumbing
Self-contained equipment stands come standard with a condensate
evaporator. If the condensate evaporator fails, the unit’s drain must
have an outlet to an appropriate drainage area or container.
Moisture collecting from improper drainage can create a
slippery surface on the floor and a hazard to employees.
It is the owner’s and operator’s responsibility to provide
a con tain er or outlet for drainage.
Installation
CAUTION
WARNING
Bekijk gratis de handleiding van Delfield F2975CP, stel vragen en lees de antwoorden op veelvoorkomende problemen, of gebruik onze assistent om sneller informatie in de handleiding te vinden of uitleg te krijgen over specifieke functies.
Productinformatie
| Merk | Delfield |
| Model | F2975CP |
| Categorie | Niet gecategoriseerd |
| Taal | Nederlands |
| Grootte | 4070 MB |


