Daikin RXYLQ28T7Y1B handleiding
Handleiding
Je bekijkt pagina 31 van 40
17 Commissioning
Installation and operation manual
31
RXMLQ8 + RXYLQ10~14T7Y1B*
VRV IV system air conditioner
4P543426-1C – 2025.01
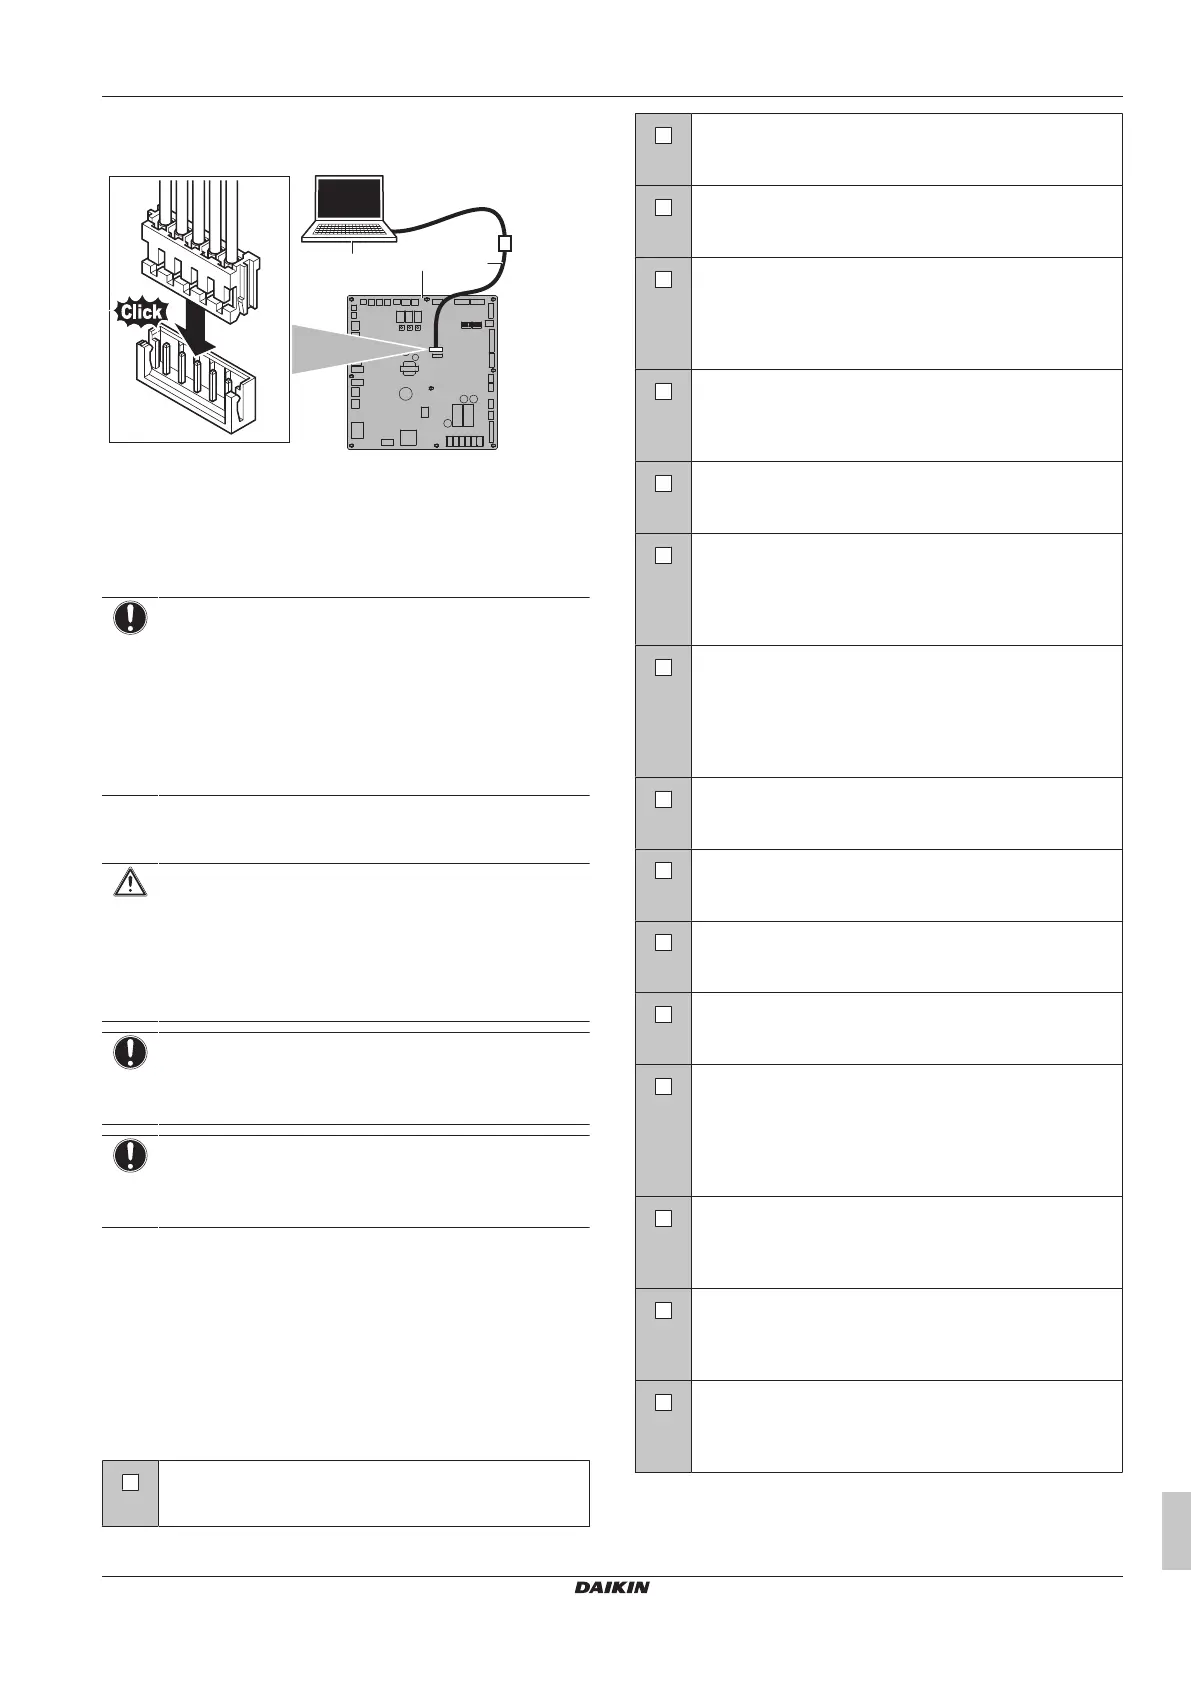
16.1.9 To connect the PC configurator to the
outdoor unit
X27A
a
b
c
2
345
H J S T
X27A
A1P
a PC
b Cable (EKPCCAB*)
c Outdoor unit main PCB
17 Commissioning
NOTICE
General commissioning checklist. Next to the
commissioning instructions in this chapter, a general
commissioning checklist is also available on the Daikin
Business Portal (authentication required).
The general commissioning checklist is complementary to
the instructions in this chapter and can be used as a
guideline and reporting template during commissioning and
hand-over to the user.
17.1 Precautions when commissioning
CAUTION
Do NOT perform the test operation while working on
the indoor unit(s).
When performing the test operation, NOT ONLY the
outdoor unit, but the connected indoor unit will operate as
well. Working on an indoor unit while performing a test
operation is dangerous.
NOTICE
Turn ON the power 6 hours before operation in order to
have power running to the crankcase heater and to protect
the compressor.
NOTICE
Test run is possible for ambient temperatures between
-10°CDB and 43°CDB and indoor temperatures between
10°CDB and 32°CDB.
During test operation, the outdoor unit and the indoor units will start
up. Make sure that the preparations of all indoor units are finished
(field piping, electrical wiring, air purge, ...). See installation manual
of the indoor units for details.
17.2 Checklist before commissioning
1 After the installation of the unit, check the items listed below.
2 Close the unit.
3 Power up the unit.
You have read the complete installation and operation
instructions described in the installer and user reference
guide.
Installation
Check that the unit is properly installed, to avoid abnormal
noises and vibrations when starting up the unit.
Transportation stay
Check that the outdoor unit's transportation stay is
removed.
Field wiring
Check that the field wiring has been carried out according
to the instructions described in the chapter "15 Electrical
installation" [4 25], according to the wiring diagrams and
according to the applicable national wiring regulation.
Power supply voltage
Check the power supply voltage on the local supply panel.
The voltage MUST correspond to the voltage on the
nameplate of the unit.
Earth wiring
Be sure that the earth wires have been connected
properly and that the earth terminals are tightened.
Insulation test of the main power circuit
Using a megatester for 500 V, check that the insulation
resistance of 2 MΩ or more is attained by applying a
voltage of 500VDC between power terminals and earth.
NEVER use the megatester for the interconnection wiring.
Fuses, circuit breakers, or protection devices
Check that the fuses, circuit breakers, or the locally
installed protection devices are of the size and type
specified in the chapter "15.2 Safety device
requirements" [4 25]. Be sure that neither a fuse nor a
protection device has been bypassed.
Internal wiring
Visually check the switch box and the inside of the unit for
loose connections or damaged electrical components.
Pipe size and pipe insulation
Be sure that correct pipe sizes are installed and that the
insulation work is properly executed.
Stop valves
Be sure that the stop valves are open on both liquid and
gas side.
Damaged equipment
Check the inside of the unit for damaged components or
squeezed pipes.
Refrigerant leak
Check the inside of the unit on refrigerant leakage. If there
is a refrigerant leak, try to repair the leak. If the repair is
unsuccessful, call your local dealer. Do not touch any
refrigerant which has leaked out from refrigerant piping
connections. This may result in frostbite.
Oil leak
Check the compressor for oil leakage. If there is an oil
leak, try to repair the leak. If the repairing is unsuccessful,
call your local dealer.
Air inlet/outlet
Check that the air inlet and outlet of the unit is NOT
obstructed by paper sheets, cardboard, or any other
material.
Additional refrigerant charge
The amount of refrigerant to be added to the unit shall be
written on the included "Added refrigerant" plate and
attached to the rear side of the front cover.
Bekijk gratis de handleiding van Daikin RXYLQ28T7Y1B, stel vragen en lees de antwoorden op veelvoorkomende problemen, of gebruik onze assistent om sneller informatie in de handleiding te vinden of uitleg te krijgen over specifieke functies.
Productinformatie
| Merk | Daikin |
| Model | RXYLQ28T7Y1B |
| Categorie | Niet gecategoriseerd |
| Taal | Nederlands |
| Grootte | 6679 MB |


