Daikin REYA16A7Y1B handleiding
Handleiding
Je bekijkt pagina 31 van 60
16 Charging refrigerant
Installation and operation manual
31
REMA5+REYA8~20A7Y1B
VRV 5 heat recovery
4P684060-1C – 2024.10
3 Should you fail to reach the target vacuum within 2 hours or
maintain the vacuum for 1 hour, the system may contain too
much moisture. In that case, break the vacuum by pressurising
with nitrogen gas to a gauge pressure of 0.05 MPa (0.5 bar)
and repeat steps 1 to 3 until all moisture has been removed.
4 Depending on whether you want to immediately charge
refrigerant through the refrigerant charge port or first pre-charge
a portion of refrigerant through the liquid line, either open the
outdoor unit stop valves, or keep them closed. See "16.2About
charging refrigerant"[432] for more information.
15.3.6 To insulate the refrigerant piping
After finishing the leak test and vacuum drying, the piping must be
insulated. Take into account the following points:
▪ Make sure to insulate the connection piping and refrigerant branch
kits entirely.
▪ Be sure to insulate the liquid and gas piping (for all units).
▪ Use heat resistant polyethylene foam which can withstand a
temperature of 70°C for liquid piping and polyethylene foam which
can withstand a temperature of 120°C for gas piping.
▪ Reinforce the insulation on the refrigerant piping according to the
installation environment.
Ambient
temperature
Humidity Minimum thickness
≤30°C 75% to 80% RH 15mm
>30°C ≥80% RH 20mm
Between outdoor and indoor unit
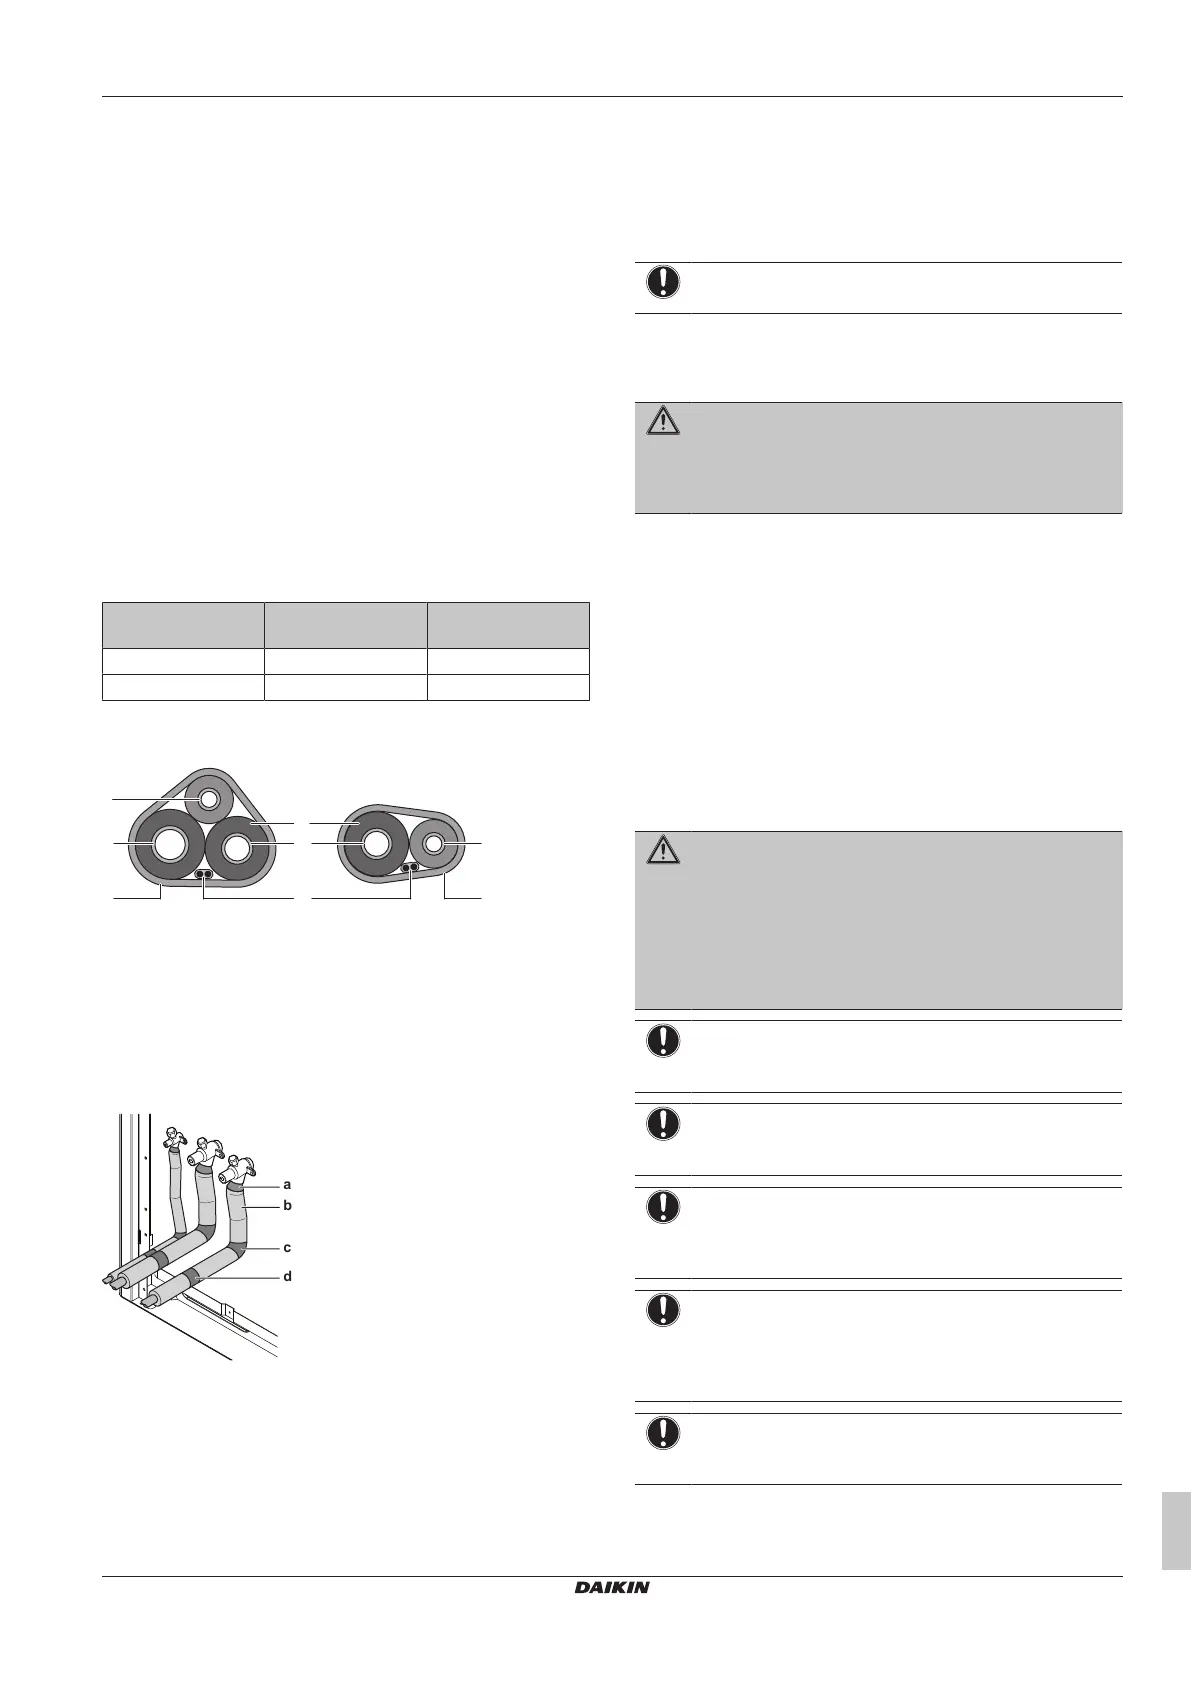
1 Insulate and fix the refrigerant piping and cables as follows:
d
b
e
a
d
a
c
f
a Liquid piping
b Gas piping
c High pressure / low pressure gas piping
d Finishing tape
e Interconnection cable (F1/F2)
f Insulation
2 Install the service cover.
Inside the outdoor unit
To insulate the refrigerant piping, proceed as follows:
b
a
c
d
a Sealant
b Insulation
c Vinyl tape around curves
d Vinyl tape against sharp edges
1 Insulate the liquid, gas and HP/LP piping.
2 Wind heat insulation around the curves, and then cover it with
vinyl tape (c, see above).
3 Make sure the field piping does not touch any compressor
components.
4 Seal the insulation ends (sealant etc.) (b, see above).
5 Wrap the field piping with vinyl tape (d, see above) to protect it
against sharp edges.
6 If the outdoor unit is installed above the indoor unit, cover the
stop valves with sealing material to prevent condensed water
on the stop valves from moving to the indoor unit.
NOTICE
Any exposed piping can cause condensation.
7 Reattach the service cover and the piping intake plate.
8 Seal all gaps to prevent snow and small animals from entering
the system.
WARNING
Provide adequate measures to prevent that the unit can be
used as a shelter by small animals. Small animals that
make contact with electrical parts can cause malfunctions,
smoke or fire.
15.3.7 To check for leaks after charging
refrigerant
After charging refrigerant in the system an additional leak test must
be performed. Refer to "16.9 To check refrigerant piping joints for
leaks after charging refrigerant"[436].
16 Charging refrigerant
16.1 Precautions when charging
refrigerant
WARNING
▪ Only use R32 as refrigerant. Other substances may
cause explosions and accidents.
▪ R32 contains fluorinated greenhouse gases. Its global
warming potential (GWP) value is 675. Do NOT vent
these gases into the atmosphere.
▪ When charging refrigerant, ALWAYS use protective
gloves and safety glasses.
NOTICE
If the power of some units is turned off, the charging
procedure cannot be finished properly.
NOTICE
In case of a multiple outdoor system, turn on the power of
all outdoor units.
NOTICE
Turn ON the power 6 hours before operation in order to
have power running to the crankcase heater and to protect
the compressor.
NOTICE
If operation is performed within 12 minutes after the indoor
and outdoor unit(s) are powered on, the compressor will
not operate before the communication is established in a
correct way between outdoor unit(s) and indoor unit(s).
NOTICE
Make sure all connected indoor units are recognised (see
[1‑10] in "18.1.7Mode 1: monitoring settings"[442]).
Bekijk gratis de handleiding van Daikin REYA16A7Y1B, stel vragen en lees de antwoorden op veelvoorkomende problemen, of gebruik onze assistent om sneller informatie in de handleiding te vinden of uitleg te krijgen over specifieke functies.
Productinformatie
| Merk | Daikin |
| Model | REYA16A7Y1B |
| Categorie | Niet gecategoriseerd |
| Taal | Nederlands |
| Grootte | 10147 MB |


