Handleiding
Je bekijkt pagina 7 van 20
EWLD120~540MBYNN
Condenserless water-cooled water chillers
4PW22686-1J
Installation manual
3
UNPACKING AND PLACING THE UNIT
1 Remove the wooden beams from the unit.
2 Install vibration mountings in case of an installation where noise
and vibration might be an impediment.
3 Set the unit on a solid and level foundation.
The unit should be installed on a solid base. It is recommended
to fix the unit on a concrete base with anchor bolts.
■ Fix anchor bolts into the concrete foundation. When finally fixing
the unit by means of these anchor bolts, make sure that the
washers for channel DIN434, and both field supplied rubber
plates and field supplied raw cork or rubber sheets for better
vibration protection, are installed as indicated.
■ The concrete foundation should approximately be 100 mm
higher than the floor level for ease of plumbing work and better
drain.
■ Make sure that the foundation surface is even and flat.
IMPORTANT INFORMATION REGARDING THE
REFRIGERANT USED
This product is factory charged with N2.
The refrigerant system will be charged with fluorinated greenhouse gases
covered by the Kyoto Protocol. Do not vent gases into the atmosphere.
Refrigerant type: R134a
GWP
(1)
value: 1300
(1)
GWP = global warming potential
Please fill in with indelible ink,
■ the total refrigerant charge
on the refrigerant charge label supplied with the product.
The filled out label must be adhered in the proximity of the product
charging port (e.g. onto the inside of the service cover).
CONNECTING THE REFRIGERANT CIRCUIT
Precautions when handling piping
If air, moisture or dust gets in the refrigerant circuit, problems may
occur. Therefore, always take into account the following when
connecting the refrigerant piping:
1. Use clean and dry pipes only.
2. Hold the pipe end downwards when removing burrs.
3. Cover the pipe end when inserting it through a wall so that no dust
and dirt enter.
Connecting the refrigerant circuit
The discharge and liquid line must be welded directly to the remote
condenser piping. For use of the correct pipe diameter see table
below:
Leak test and vacuum drying
The units were checked for leaks by the manufacturer.
After connection of the piping, a leak test must be performed and the
air in the refrigerant piping must be evacuated to a value of 4 mbars
absolute by means of a vacuum pump.
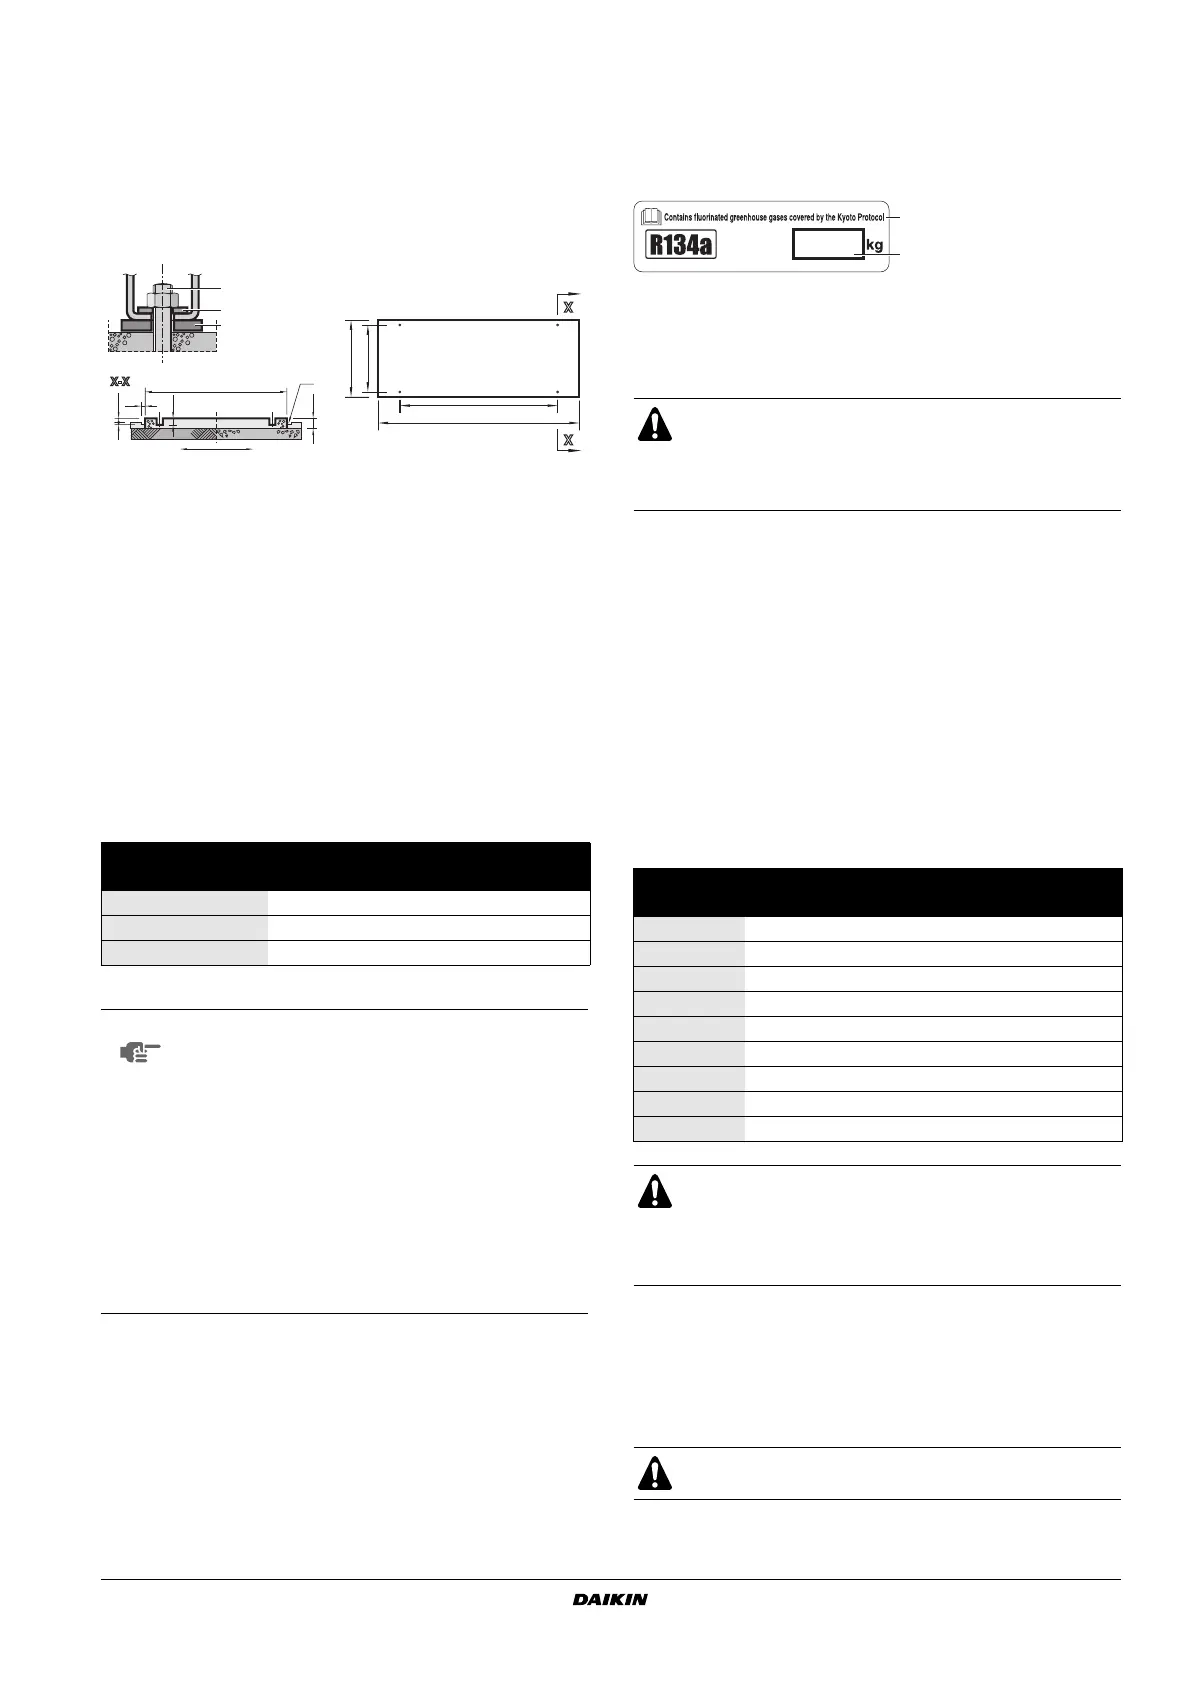
1 Anchor bolt
2 Washer
3 Rubber plate
4 Row cork or rubber sheet
5 Ground
6 Concrete floor
7 Ditch
Anchor bolt
Model A Size Qty
EWLD120+170 300 M20x200 4
EWLD240+260 350 M20x200 4
EWLD340~540 350 M20x270 4
NOTE
■ The measurement tabulated is based on the fact
the base is made in the ground or on a concrete
floor. In case the base is made on a rigid floor, it is
possible to include thickness of concrete floor in
that of the base.
■ In case a base is made on concrete floor, make
sure to provide a ditch as shown. It is important to
extract drainage regardless of whether a base is
made in the ground or on the concrete floor (ditch-
sewerage).
■ Ingredient ratio of the concrete is: cement 1, sand
2 and gravel 3. Insert iron bars of Ø10 at every
interval of 300 mm. The edge of the concrete
base should be planed.
>200
>A
100
>100
50
>930
1
2
3+4
56
7
1855
>930
808
>2371
The units are equipped with a refrigerant inlet (discharge
side) and a refrigerant outlet (liquid side) for the
connection to a remote condenser. This circuit must be
provided by a licensed technician and must comply with all
relevant European and national regulations.
connection (inch)
Model discharge liquid
EWLD120 2"1/8 7/8"
EWLD170 2"1/8 1"1/8
EWLD240 2"1/8 1"3/8
EWLD260 2"5/8 1"3/8
EWLD340 2x 2"1/8 2x 1"1/8
EWLD400 2x 2"1/8 1"1/8+1"3/8
EWLD480 2x 2"1/8 2x 1"3/8
EWLD500 2"1/8+2"5/8 2x 1"3/8
EWLD540 2x 2"5/8 2x 1"3/8
Make sure the pipes are filled with N
2
during welding in
order to protect the pipes against soot.
There should be no blockage (stopvalve, solenoid valve)
between the remote condenser and the provided liquid
injection of the compressor.
Do not purge the air with refrigerants. Use a vacuum pump
to vacuum the installation.
2
1
1 total refrigerant charge
2 Contains fluorinated
greenhouse gases
covered by the Kyoto
Protocol
Bekijk gratis de handleiding van Daikin EWLD-MBYNN, stel vragen en lees de antwoorden op veelvoorkomende problemen, of gebruik onze assistent om sneller informatie in de handleiding te vinden of uitleg te krijgen over specifieke functies.
Productinformatie
| Merk | Daikin |
| Model | EWLD-MBYNN |
| Categorie | Airco |
| Taal | Nederlands |
| Grootte | 3181 MB |


