Daikin ERSQ016AAY1 handleiding
Handleiding
Je bekijkt pagina 14 van 24
Installation manual
11
ERSQ+ERRQ011~016AAV1+Y1
Outdoor unit for air to water heat pump
4PW49635-1C
Leak test
The leak test must satisfy specification EN 378-2.
1 Vacuum leak test
1.1 Evacuate the system from the liquid and gas piping to
–100.7 kPa (5 Torr).
1.2 Once reached, turn off the vacuum pump and check that
the pressure does not rise for at least 1 minute.
1.3 Should the pressure rise, the system may either contain
moisture (see vacuum drying below) or have leaks.
2 Pressure leak test
2.1 Break the vacuum by pressurizing with nitrogen gas to a
minimum gauge pressure of 0.2 MPa (2 bar).
Never set the gauge pressure higher than the maximum
operation pressure of the unit, i.e. 4.0 MPa (40 bar).
2.2 Test for leaks by applying a bubble test solution to all piping
connections.
2.3 Discharge all nitrogen gas.
Vacuum drying
To remove all moisture from the system, proceed as follows:
1. Evacuate the system for at least 2 hours to a target vacuum of
–100.7 kPa.
2. Check that, with the vacuum pump turned off, the target vacuum
is maintained for at least 1 hour.
3. Should you fail to reach the target vacuum within 2 hours or
maintain the vacuum for 1 hour, the system may contain too
much moisture.
4. In that case, break the vacuum by pressurizing with nitrogen gas
to a gauge pressure of 0.05 MPa (0.5 bar) and repeat steps 1 to
3 until all moisture has been removed.
5. The stop valves can now be opened, and/or additional
refrigerant can be charged (see "8.3. Method for adding
refrigerant" on page 13).
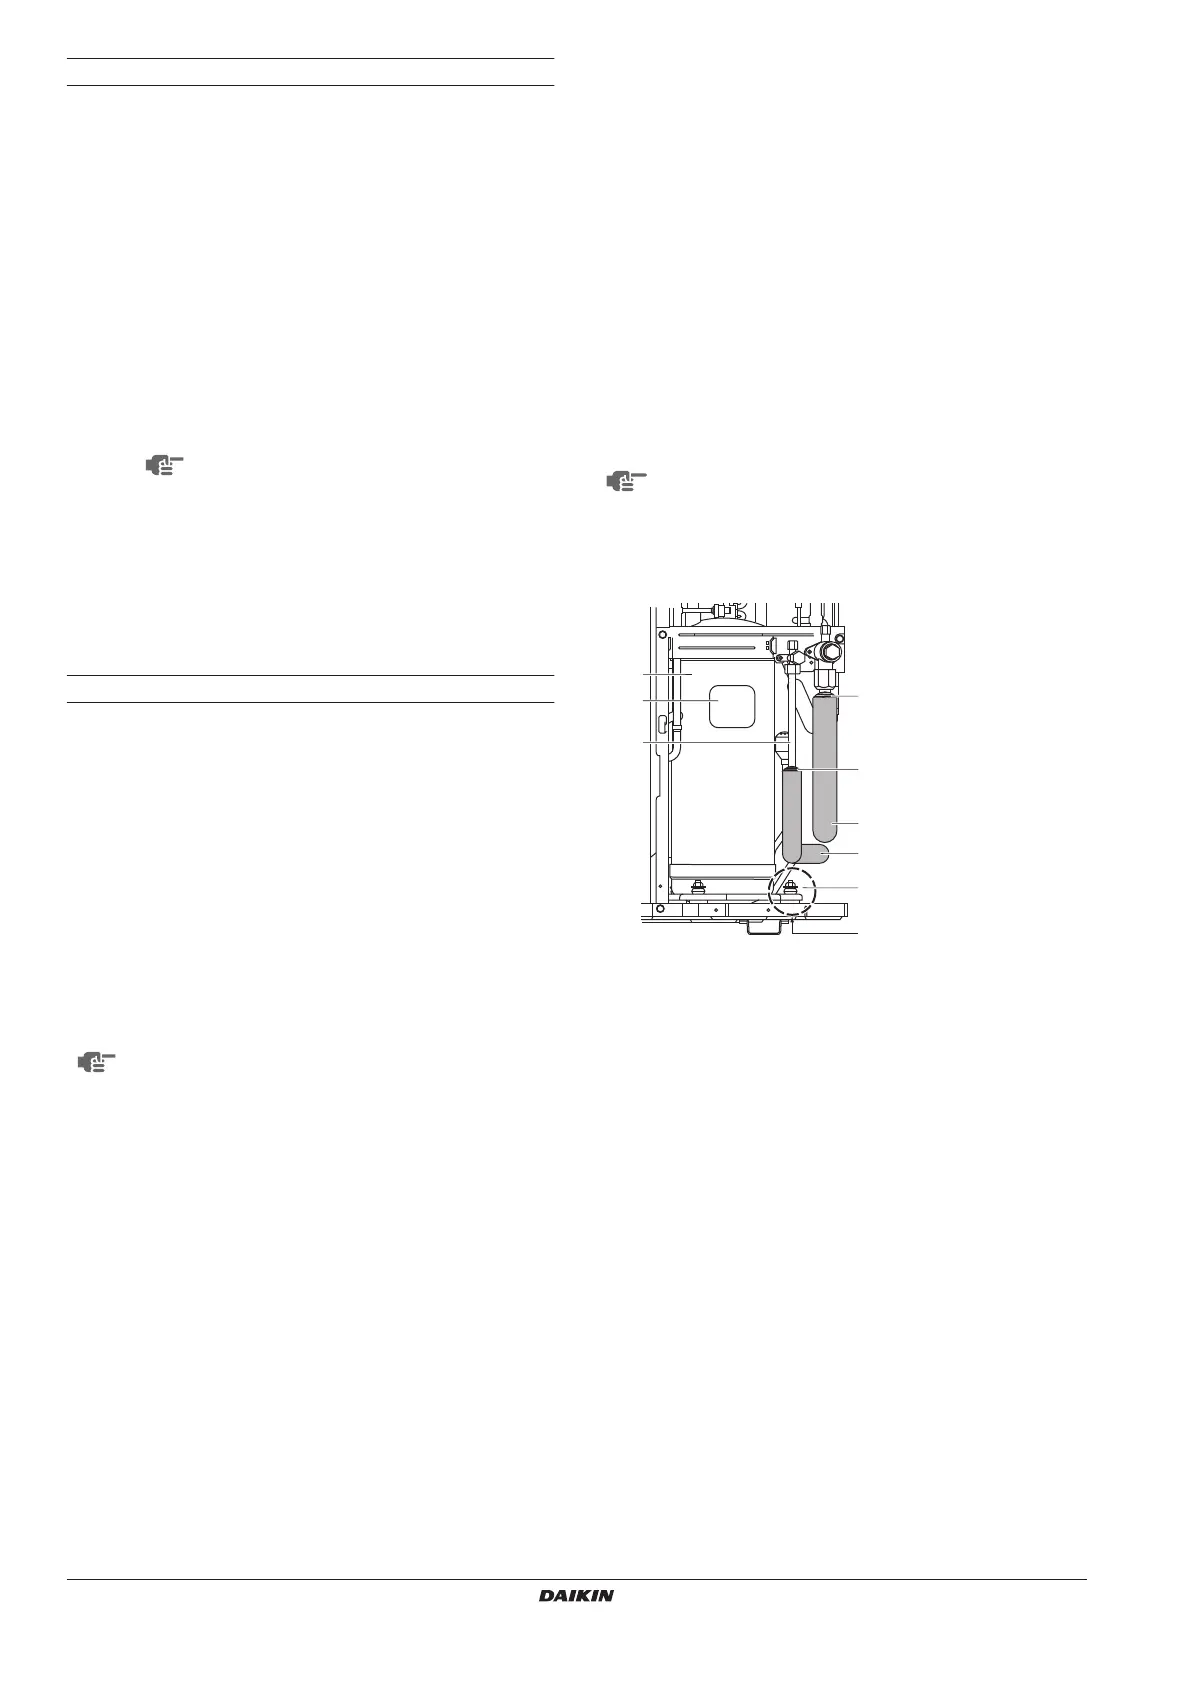
7.4. Precautions when connecting field piping and
regarding insulation
■ Be careful not to let the indoor and outdoor field piping come into
contact with the compressor terminal cover.
If the liquid-side piping insulation might come into contact with it,
adjust the height as shown in the figure below. Also, make sure
the field piping does not touch the bolts or outer panels of the
compressor.
■ When the outdoor unit is installed above the indoor unit the
following can occur:
The condensated water on the stop valve can move to the indoor
unit. To avoid this, please cover the stop valve with sealing
material.
■ If the temperature is higher than 30°C and the humidity is higher
than RH 80%, then the thickness of the sealing materials should
be at least 20 mm in order to avoid condensation on the surface
of the sealing.
■ Be sure to insulate the liquid and gas-side field piping.
(The highest temperature that the gas-side piping can reach is
around 120°C, so be sure to use insulating material which is
heat resistant.)
Make sure to use a recommended bubble test
solution from your wholesaler.
Do not use soap water, which may cause
cracking of flare nuts (soap water may contain
salt, which absorbs moisture that will freeze
when the piping gets cold), and/or lead to
corrosion of flared joints (soap water may contain
ammonia which causes a corrosive effect
between the brass flare nut and the copper flare).
After opening the stop valve, it is possible that the pressure
in the refrigerant piping does not rise. This might be
caused by e.g. the closed state of the expansion valve in
the outdoor unit circuit, but does not present any problem
for correct operation of the unit.
Any exposed piping may cause condensation or burns
if touched.
2
1
3
5
5
A
4
4
6
1 Compressor
2 Terminal cover
3 Indoor and outdoor
field piping
4 Corking, etc.
5 Insulation material
(field supply)
6 Bolts
A Be careful with pipe,
bolt and outer panel
connections
Bekijk gratis de handleiding van Daikin ERSQ016AAY1, stel vragen en lees de antwoorden op veelvoorkomende problemen, of gebruik onze assistent om sneller informatie in de handleiding te vinden of uitleg te krijgen over specifieke functies.
Productinformatie
| Merk | Daikin |
| Model | ERSQ016AAY1 |
| Categorie | Niet gecategoriseerd |
| Taal | Nederlands |
| Grootte | 3831 MB |


