Daikin ERA300AMYFB handleiding
Handleiding
Je bekijkt pagina 29 van 48
15 Piping installation
Installation and operation manual
29
ERA200~300AMYFB
Inverter outdoor unit for AHU option kit and air curtains
4P780153-1 – 2024.07
▪ Connect the gas piping accessories c and d (d: only for
ERA250 ). There are three possibilities:
To the front
cd
To the side
c d
Downwards
d
WARNING
Provide adequate measures to prevent that the unit can be
used as a shelter by small animals. Small animals that
make contact with electrical parts can cause malfunctions,
smoke or fire.
NOTICE
Make sure to open the stop valves after installing the
refrigerant piping and performing vacuum drying. Running
the system with the stop valves closed may break the
compressor.
NOTICE
▪ Be sure to use the supplied accessory pipes when
carrying out piping work in the field.
▪ Be sure that the field installed piping does not touch
other pipes, the bottom panel or side panel. Especially
for the bottom and side connection, be sure to protect
the piping with suitable insulation, to prevent it from
coming into contact with the casing.
The connections to the branch kits are the responsibility of the
installer (field piping).
15.3 Checking the refrigerant piping
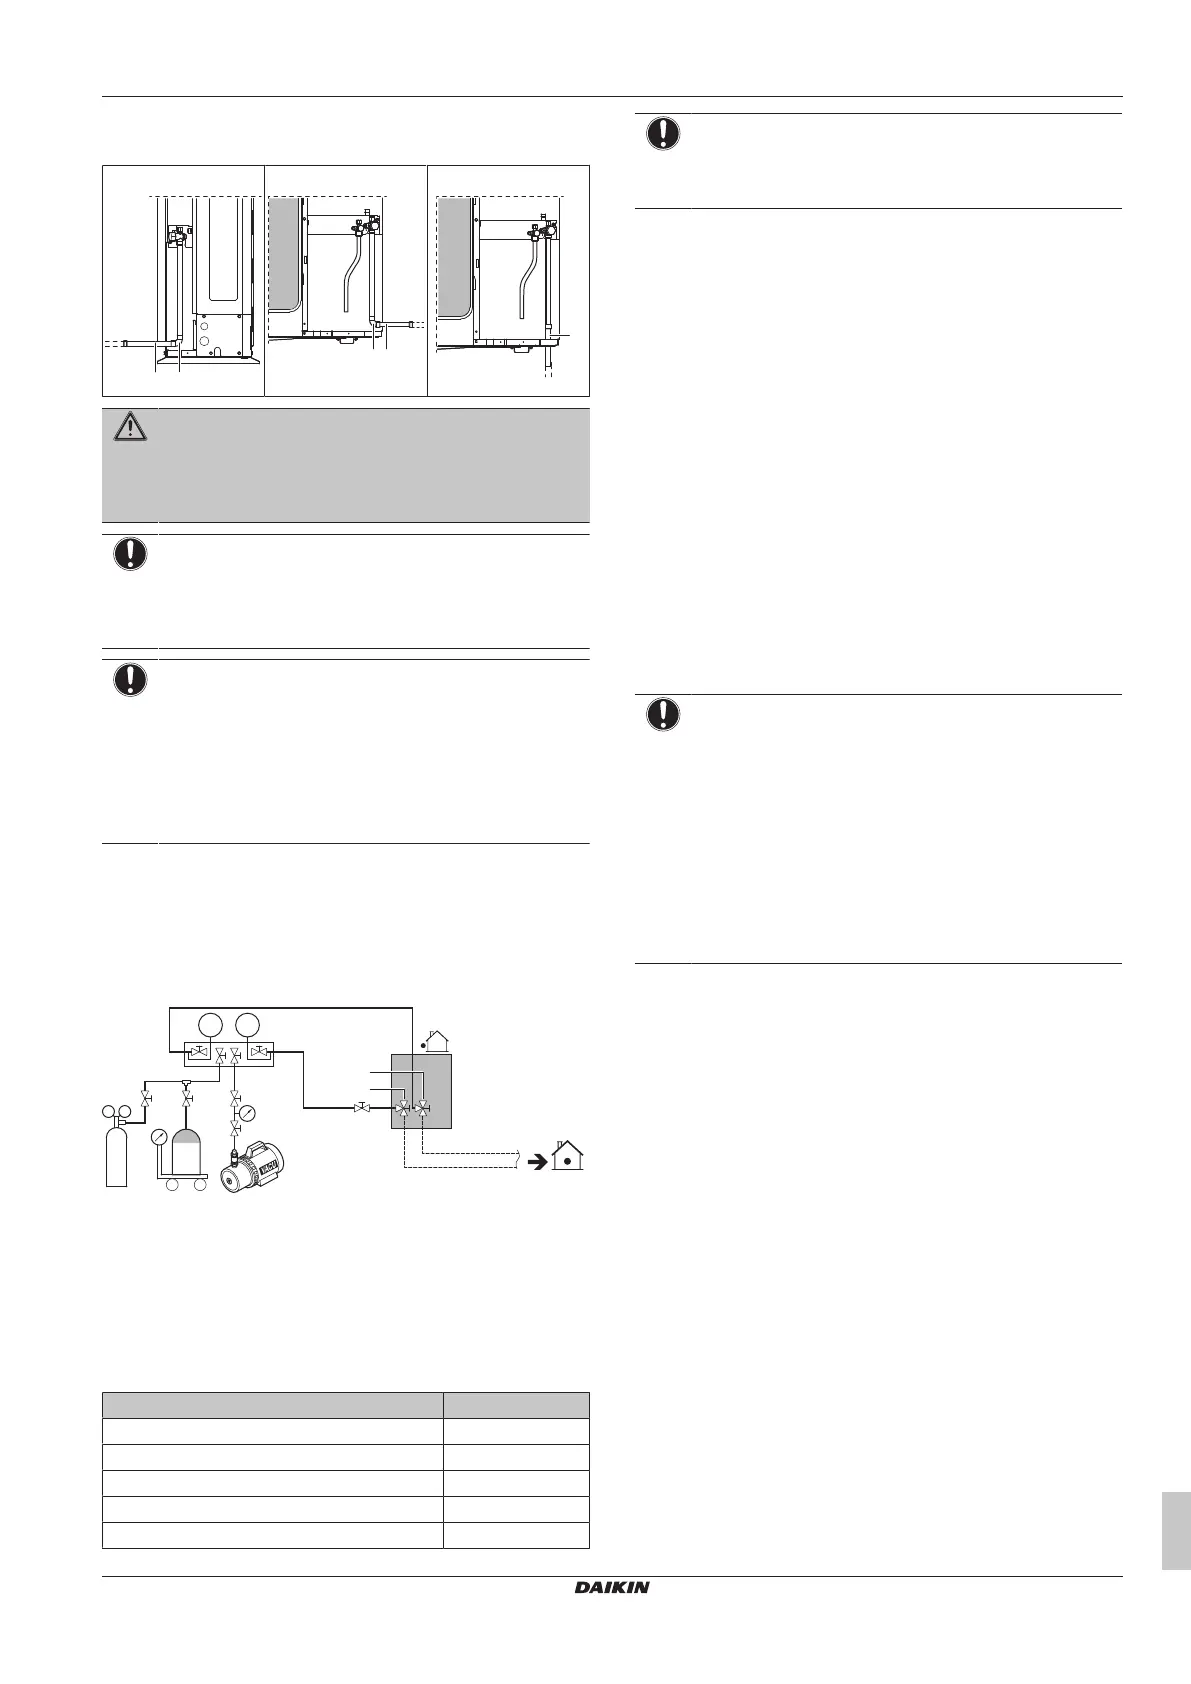
15.3.1 Checking refrigerant piping: Setup
p
<
p
>
C
b c e
a
g
f
d
A B
R32
N
2
a Pressure reducing valve
b Nitrogen
c Weighing scales
d Refrigerant R32 tank (siphon system)
e Vacuum pump
f Liquid line stop valve
g Gas line stop valve
A Valve A
B Valve B
C Valve C
Valve Status
Valve A Open
Valve B Open
Valve C Open
Liquid line stop valve Close
Gas line stop valve Close
NOTICE
Indoor units should also be leak and vacuum tested. Keep
any possible (field supplied) field piping valves open as
well.
15.3.2 To perform a leak test
The leak test must satisfy the specifications of EN378‑2.
Vacuum leak test
1 Evacuate the system from the liquid and gas piping to a gauge
pressure of –100.7kPa (–1.007bar) for more than 2 hours.
2 Once reached, turn off the vacuum pump and check that the
pressure does not rise for at least 1 minute.
3 Should the pressure rise, the system may either contain
moisture (see vacuum drying below) or have leaks.
Pressure leak test
1 Break the vacuum by pressurising with nitrogen gas to a
minimum gauge pressure of 0.2 MPa (2 bar). Never set the
gauge pressure higher than the maximum operation pressure of
the unit, i.e. 4.0MPa (40bar).
2 Test for leaks by applying a bubble test solution to all piping
connections.
3 Discharge all nitrogen gas.
NOTICE
ALWAYS use a recommended bubble test solution from
your wholesaler.
NEVER use soap water:
▪ Soap water may cause cracking of components, such
as flare nuts or stop valve caps.
▪ Soap water may contain salt, which absorbs moisture
that will freeze when the piping gets cold.
▪ Soap water contains ammonia which may lead to
corrosion of flared joints (between the brass flare nut
and the copper flare).
15.3.3 To perform vacuum drying
To remove all moisture from the system, proceed as follows:
1 Evacuate the system for at least 2 hours to a target vacuum of
–100.7kPa (–1.007bar)(5Torr absolute).
2 Check that, with the vacuum pump turned off, the target
vacuum is maintained for at least 1hour.
3 Should you fail to reach the target vacuum within 2 hours or
maintain the vacuum for 1 hour, the system may contain too
much moisture. In that case, break the vacuum by pressurising
with nitrogen gas to a gauge pressure of 0.05 MPa (0.5 bar)
and repeat steps 1 to 3 until all moisture has been removed.
4 Depending on whether you want to immediately charge
refrigerant through the refrigerant charge port or first pre-charge
a portion of refrigerant through the liquid line, either open the
outdoor unit stop valves, or keep them closed. See "16.3 To
charge refrigerant"[431] for more information.
15.3.4 To insulate the refrigerant piping
After finishing the leak test and vacuum drying, the piping must be
insulated. Take into account the following points:
▪ Make sure to insulate the connection piping entirely.
▪ Be sure to insulate the liquid and gas piping.
Bekijk gratis de handleiding van Daikin ERA300AMYFB, stel vragen en lees de antwoorden op veelvoorkomende problemen, of gebruik onze assistent om sneller informatie in de handleiding te vinden of uitleg te krijgen over specifieke functies.
Productinformatie
| Merk | Daikin |
| Model | ERA300AMYFB |
| Categorie | Ventilator |
| Taal | Nederlands |
| Grootte | 8144 MB |


