Daikin EMRQ14ABY1 handleiding
Handleiding
Je bekijkt pagina 29 van 36
EMRQ8~16ABY1
Daikin Altherma outdoor unit
4P501819-1 – 2017.08
Installation manual
26
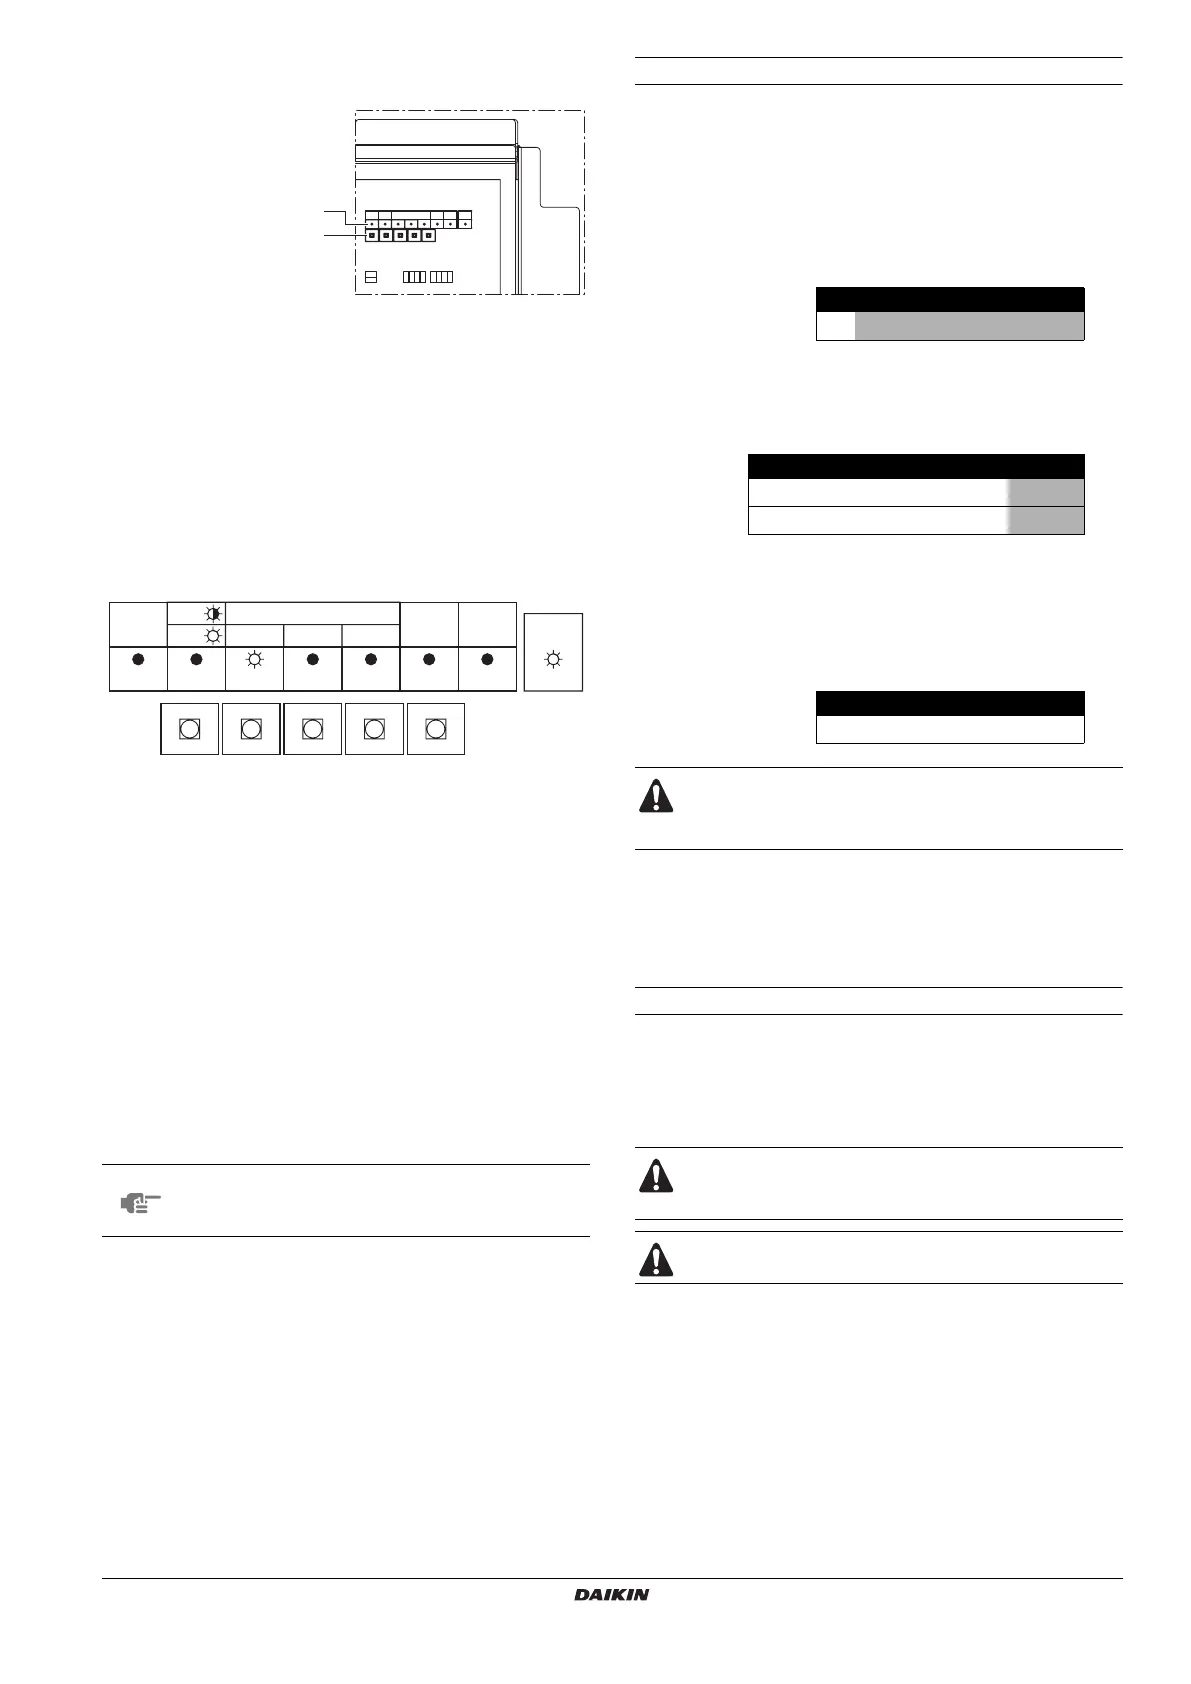
When opening the inspection cover (1), following LEDs and push
buttons are visible:
Different modes as explained below are set by pushing on the push
buttons BS1~BS5.
By pushing the push buttons, the LEDs will display the different
modes.
Throughout the manual, the status of the LEDs is indicated as
follows:
The functions of the push buttons are as follows:
Once the above is checked and confirmed, turn on the power supply
of the outdoor unit and all indoor units.
If the communication between indoor units and outdoor unit is
normal, the LED state will be as above.
Make sure the power supply of the outdoor unit is set 6 hours before
actual operation of the system to power the cranckcase heater.
Once the above is confirmed, the mode 2 can be set using
BS1 MODE button as explained below.
■ For setting mode 2: Press the BS1 MODE button for
5 seconds, the H1P LED is on
w.
Field settings by push buttons
The following setting can be set with push buttons as explained in
"How to operate the push buttons" on page 25.
■ High static pressure setting.
If the outdoor unit is installed indoors and the outdoor unit fan is
ducted, to guarantee enough airflow, the outdoor unit fan rpm
must be increased.
Once in mode 2 as explained above (H1P LED is on), push 18 times
on the BS2 SET button until following LED state is shown:
Push the BS3 RETURN button to define the required setting.
The setting can then be changed by pushing on the BS2 SET button.
The above mentioned setting can be set ON (ON) or OFF (OFF).
Following LED state is shown for the different settings:
Pushing the BS3 RETURN button defines the setting.
Finally, when pushing the BS3 RETURN button again the operation
starts according to the setting.
Pushing BS1 MODE button will get you back to the initial led start
point:
14.3. Test operation
After installation and once the field settings are defined, the installer
is obliged to verify correct operation. Therefore a test run must be
performed according to the procedures described below.
Precautions before starting test operation
During test operation, the outdoor unit and the indoor units will start
up.
■ Make sure that the preparations of all indoor units are finished
(field piping, electrical wiring, air purge,...). See installation
manual of the indoor units.
1 LED H1P~H8P
2 Push buttons
BS1~BS5
x
OFF
w
ON
c
Blinking
BS1 MODE For changing the set mode
BS2 SET For field setting
BS3 RETURN For field setting
BS4 TEST For test operation
BS5 RESET For resetting the address when the wiring is changed or
when an additional indoor unit is installed
NOTE
If you get confused in the middle of the setting
process, push the BS1 MODE button. This returns to
setting mode 1 (H1P LED is off).
1
2
BS2
SET
BS1
MODE
BS3
RETURN
BS4
TEST
BS5
RESET
H1P H2P H3P H4P H5P H6P H7P
MODE
TEST:
HWL: IND MASTER SLAVE
L.N.O.P DEMAND
C/H SELECT
H8P
MULTI
H1P H2P H3P H4P H5P H6P H7P
w x w x x w x
H1P H2P H3P H4P H5P H6P H7P
ON
wxxxxc x
OFF
(a)
(a) This setting = factory setting
wxxxxx c
H1P H2P H3P H4P H5P H6P H7P
xxwxxxx
WARNING
Settings which are familiar for VRV series may NOT be
applied to this Daikin Altherma outdoor unit.
Do not insert fingers, rods or other objects into the air
inlet or outlet. When the fan is rotating at high speed, it
will cause injury.
Do not perform the test operation while working on the
indoor units.
4PEN501819-1.book Page 26 Wednesday, September 13, 2017 12:52 PM
Bekijk gratis de handleiding van Daikin EMRQ14ABY1, stel vragen en lees de antwoorden op veelvoorkomende problemen, of gebruik onze assistent om sneller informatie in de handleiding te vinden of uitleg te krijgen over specifieke functies.
Productinformatie
| Merk | Daikin |
| Model | EMRQ14ABY1 |
| Categorie | Niet gecategoriseerd |
| Taal | Nederlands |
| Grootte | 6412 MB |


