Coxreels 15725 handleiding
Handleiding
Je bekijkt pagina 4 van 4
INSTALLATION AND MAINTENANCE MANUAL FORM #PM-108 REV B 12/09
Page 4 of 4
For assembly drawings, parts lists, or specific repair instructions, refer to web site at www.coxreels.com
or consult factory.
Coxreels, Inc., 5865 S. Ash Ave., Tempe, Arizona, USA, 85283 Tel: 1-800-269-7335
INSTALLATION
WARNING: READ THESE INSTRUCTIONS CAREFULLY BEFORE ATTEMPTING TO INSTALL, OPERATE, OR MAINTAIN THIS PRODUCT. ONLY QUALIFIED
PERSONNEL SHOULD UNDERTAKE THE INSTALLATION AND COMMISSIONING OF THIS PRODUCT. FAILURE TO COMPLY WITH INSTRUCTIONS COULD
RESULT IN PERSONAL INJURY AND/OR PROPERTY DAMAGE.
WARNING: REEL SHOULD NOT BE INSTALLED ABOVE 15 FEET MAXIMUM FROM THE FLOOR.
SAFETY
• Select an adequate vertical mounting surface (i.e. wall, pole, etc.) to install wall mounting bracket. Follow all local building codes and OSHA safety rules when
selecting location for bracket. Ensure surface is zero degrees vertical from general work area. This wall mount bracket is not for overhead mounting.
• In accordance with local and federal safety practices, install in an area with adequate clearance and protective measures to ensure operator does not have direct
access immediately beneath the reel.
• Select mounting hardware adequate for installation surface to meet all local and federal codes, OSHA compliance, and general safety practices.
• Ensure all hardware is adequately torqued to meet standard specifications.
• Ensure reel has a 7” x 8” mounting footprint and does not exceed a maximum weight of 120 pounds when fully loaded.
• Ensure inlet connection to reel is flexible and of adequate length to allow full range of motion without obstructions or undue stress.
• Routinely inspect immediate installation area, bracket, reel, fittings, hardware, hoses or cables for any wear. Replace or repair as deemed necessary.
INSTALLATION
• Install mounting bracket to vertical surface as shown, following all safety practices as listed above.
• Review reel to determine if roller bracket orientation is perpendicular to work area. If reel has arm guide and roller bracket as shown in Figure 1, you may need to
move the arm guide to desired location. Simply remove four bolts holding arm guide, re-position, re-attached bolts and torque to proper specifications.
• Carefully attach reel to mounting bracket using proper hardware. Two or more operators will be required to hold reel while installing hardware.
• While holding reel properly tighten and torque mounting hardware to safely secure reel in place.
• Install inlet connection using proper sealant (as necessary) and securely torque to meet standard specifications.
• Check reel for normal operation by pulling and retracting hose/cable in full range of motion.
• Refer to specific product manual supplied with reel for adjustments, operational information, and troubleshooting guide.
• Turn on supply line to reel.
• Re-check complete installation for any operational issues and correct as needed.
Technical Support: 1-800-269-7335
CAUTION: IT IS IMPORTANT TO USE A “FLEXIBLE” INLET HOSE. DO NOT
USE SOLID PIPING OR RESTRAIN INLET HOSE AS TO
CAUSE ANY SIDE FORCE ON SWIVEL JOINT. THE WARRANTY IS VOID IF NOT PROPERLY INSTALLED.
CAUTION: DO NOT
ALLOW HOSE/CABLE TO RETRACT WITHOUT RESTRAINING RECOIL SPEED. NEVER LET GO OF THE
HOSE/CABLE WHEN REWINDING. NOTE: EZ-COIL™ MODELS ARE DESIGNED TO RETRACT AT A SLOW CONTROLLED SPEED.
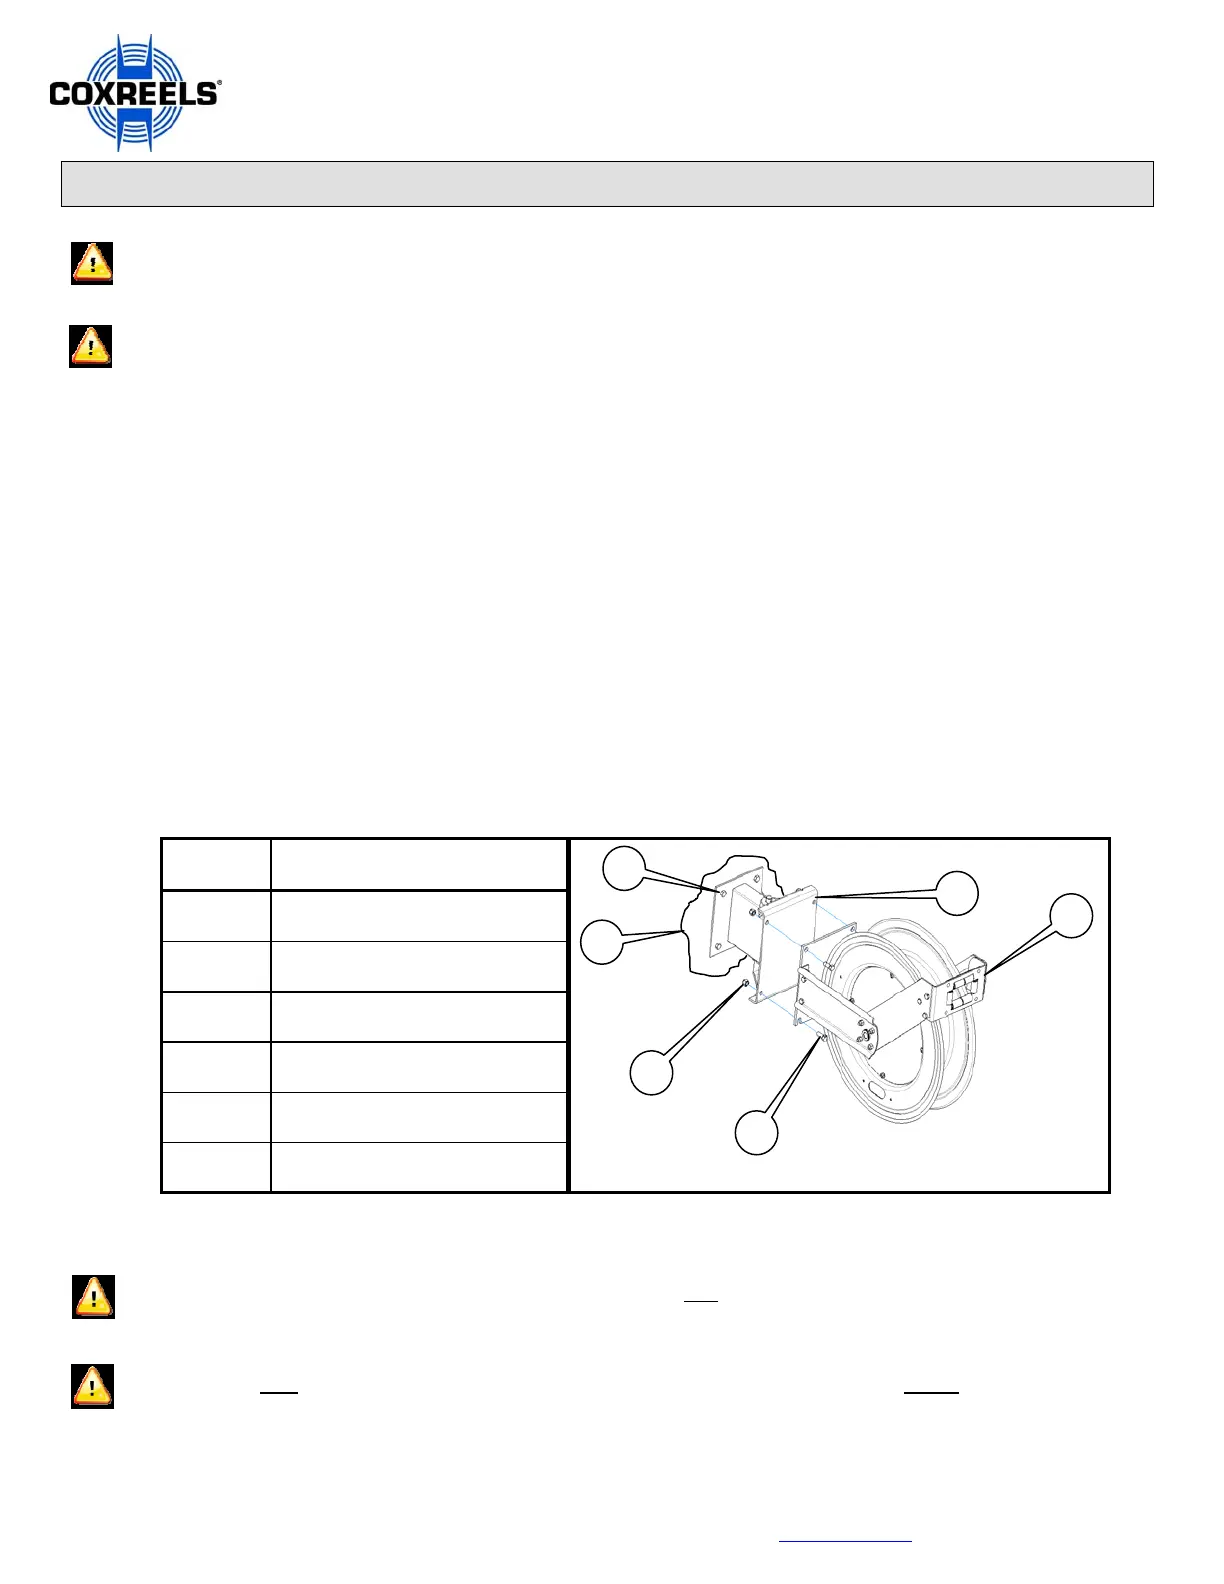
Item
Number
Description
1 Reel Assembly
2 Bracket, #15725, 15725-SS
3 Hex Nut (Not supplied)
4 Hex Bolt (Not supplied)
5 Wall
6 Wall Mounting Bolts (Not supplied)
FIGURE 1
6
5
3
4
2
1
Bekijk gratis de handleiding van Coxreels 15725, stel vragen en lees de antwoorden op veelvoorkomende problemen, of gebruik onze assistent om sneller informatie in de handleiding te vinden of uitleg te krijgen over specifieke functies.
Productinformatie
| Merk | Coxreels |
| Model | 15725 |
| Categorie | Niet gecategoriseerd |
| Taal | Nederlands |
| Grootte | 639 MB |

