Continental CPA60 handleiding
Handleiding
Je bekijkt pagina 19 van 28
19
OPERATIONS MANUAL
REFRIGERATED BASES & PIZZA PREP TABLES
on the lower left corner of the front face to decrease the tem-
perature displayed, or press on the upper left section to increase
the temperature displayed.
For example, if the sensing device in the cabinet reads 38° and
the thermometer display reads 40°, press on the lower left cor-
ner twice so that “-2” appears on the display. After adjusting the
offset, press on the right center of the display again to exit cali-
bration mode. Wait 10 to 15 seconds for the cabinet temperature
to be displayed and recheck the calibration.
NOTE: The buttons need to be pressed without delay
between actions. Contact the factory with any questions.
REMOTE SET-UP AND INSTALLATION GUIDELINES
All remote refrigerators and freezers are shipped with an expan-
sion valve, thermostat and defrost timer (freezer only), installed
from the factory. The installer is responsible for connecting all
refrigerant lines, liquid line drier, sight glass, solenoid, head
pressure control, hi/low pressure safety, crankcase heater, con-
densing unit and any other accessories as well as wiring. The
evaporator section has been factory leak checked with helium,
however; due to vibration in transit, the entire system must be
thoroughly leak checked after installation and prior to start-up.
The final leak inspection of the entire completed refrigeration
system and all of its components as well as start-up and the
operation of the refrigeration system is the sole responsibility
of the installer.
The CFC-Free refrigerant used in standard remote and self-
contained models is R-134a for refrigerators and R-404A for
freezers. All compressors and systems designed for these
refrigerants utilize polyolester oil as their main lubricant, which
absorbs moisture from the ambient surroundings extremely fast
and in much greater quantity than conventional mineral oils.
DIAL THERMOMETER AND CALIBRATION
Your NSF-approved dial thermometer has a remote sensing
bulb, located in the refrigerated compartment. The display fea-
tures a large 2” diameter face, with an easy-to-read scale that
shows the internal cabinet temperature in Fahrenheit (°F) and
Celsius (°C). Blue (safe) and red (caution) color bands provide a
quick, visual indication of the temperature inside your refrigera-
tor or freezer. The thermometer is pre-calibrated at the factory,
to accurately show the cabinet temperature.
To check the accuracy of your thermometer, place a pre-cali-
brated temperature sensing device in the center of the refrig-
erated compartment and keep the door closed for at least 10
minutes. The thermometer should read the same temperature
as the sensing device, within +/-2°F
(+/- 1°C). If it does not, use a small
straight-blade screwdriver to care-
fully pry the clear lens cover from the
thermometer body as shown (see
Photo A).
Use a small straight-blade screw-
driver and place on center slotted
hub of thermometer. Carefully hold
the needle and turn the center screw
clockwise to lower and counterclock-
wise to increase the desired tem-
perature, as shown (see Photo B).
Replace the lens cover and recheck
the calibration.
DIGITAL THERMOMETER AND CALIBRATION
Your NSF-approved digital thermometer has a remote sensing
bulb, with an FDA-approved coating, located in the refrigerated
compartment on the left-hand wall. The unit features a large,
easy to read, LED display that shows the internal cabinet tem-
perature.
To check the calibration of your thermometer, place a pre-
calibrated temperature sensing device in the center of the refrig-
erated compartment and keep the door closed for at least 15
minutes. The digital thermometer display should read the same
temperature as the sensing device within +/-2°F (+/- 1°C).
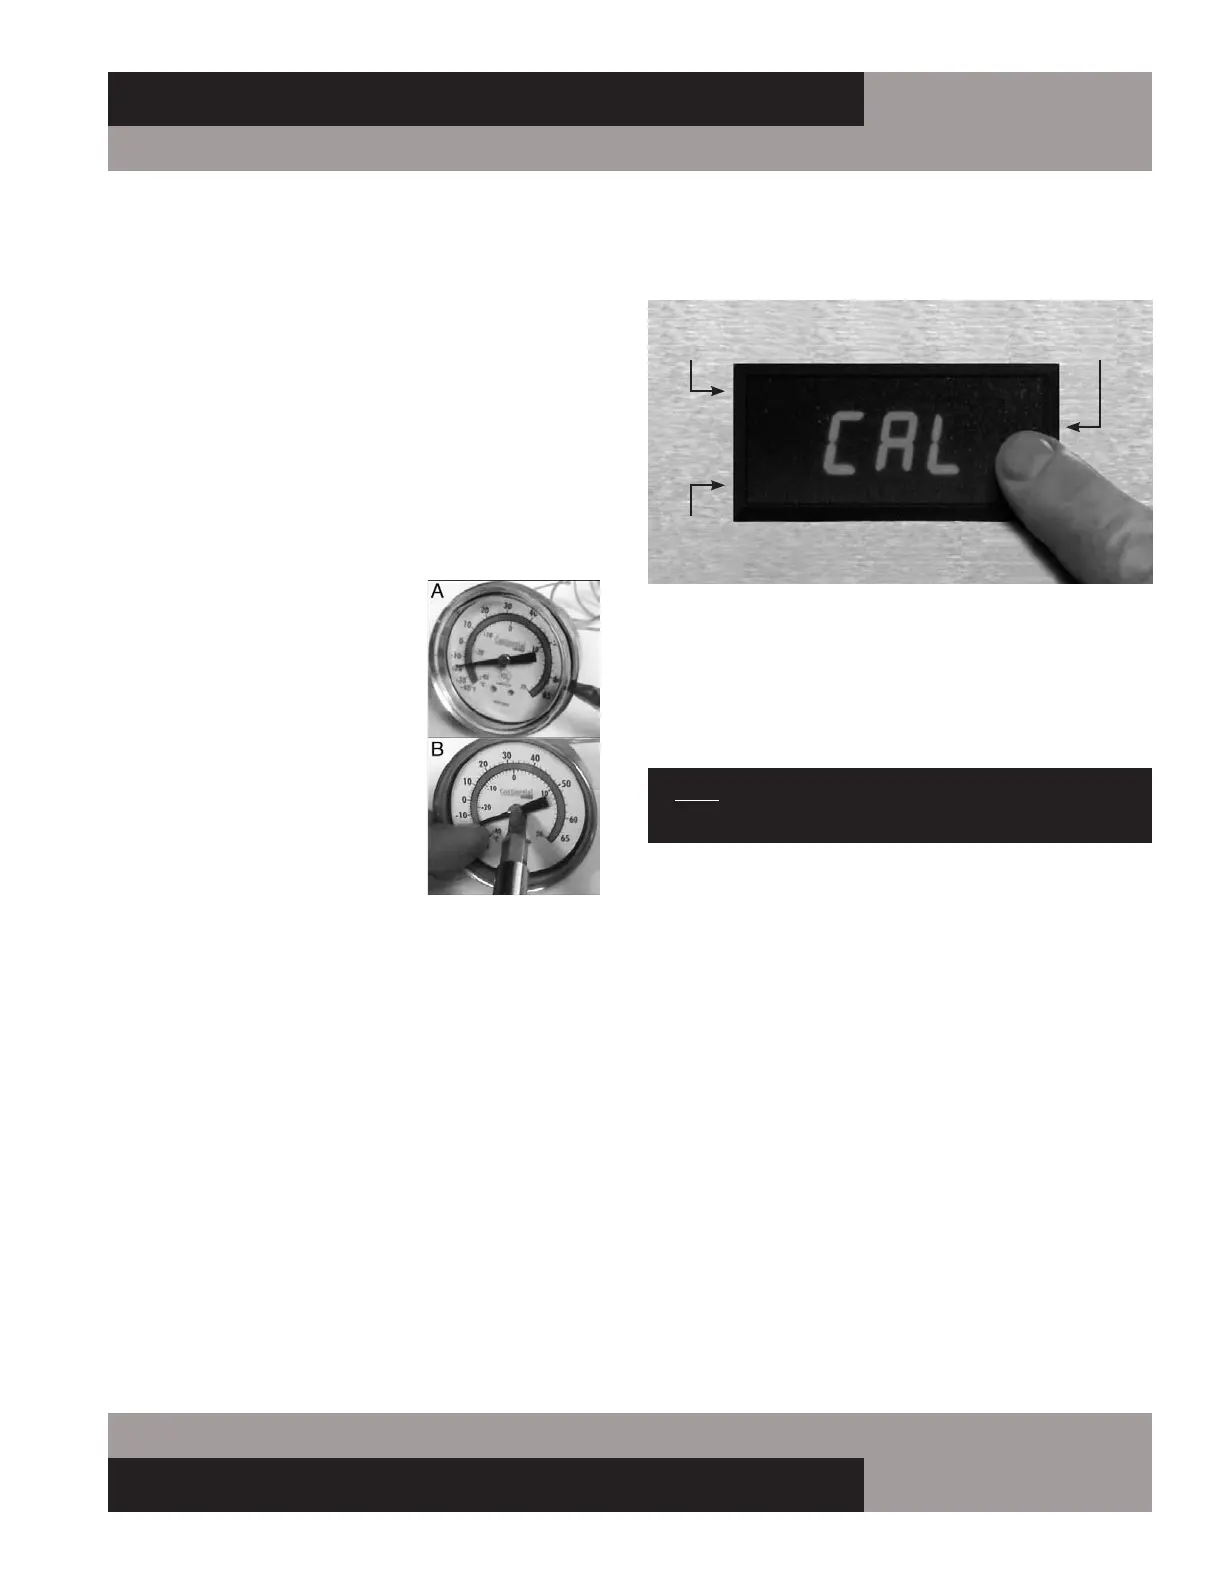
If it does not, press the right, center section of the front display
(see Photo) twice. After the first press, the letters “CAL” will
appear on the screen (to show the unit is in calibration mode).
After the second press, the number of degrees (-25 to 25) that
the display offset is set for will appear. Once you see this, press
Press here to decrease temp.
Press here for
calibration modePress here to increase temp.
Bekijk gratis de handleiding van Continental CPA60, stel vragen en lees de antwoorden op veelvoorkomende problemen, of gebruik onze assistent om sneller informatie in de handleiding te vinden of uitleg te krijgen over specifieke functies.
Productinformatie
| Merk | Continental |
| Model | CPA60 |
| Categorie | Niet gecategoriseerd |
| Taal | Nederlands |
| Grootte | 5819 MB |


