Chapin 63950 handleiding
Handleiding
Je bekijkt pagina 11 van 44
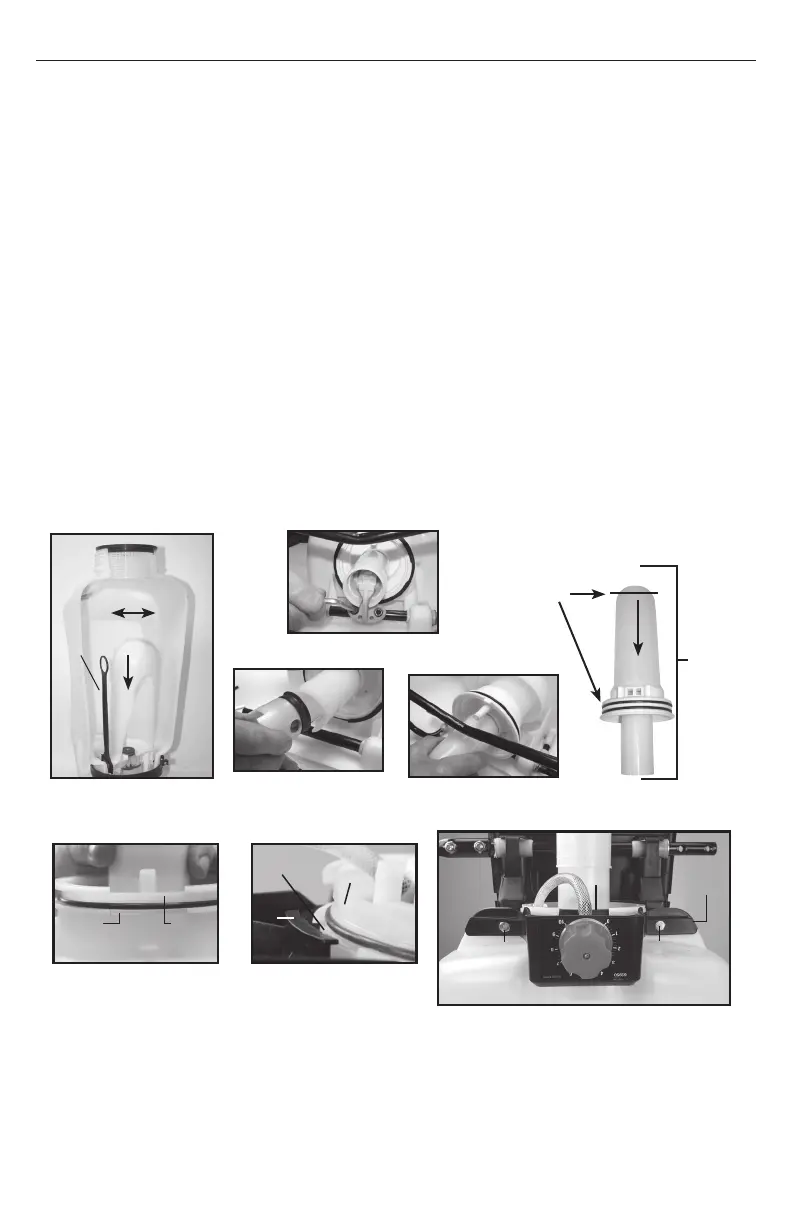
Figure 1
Figure 3a Figure 3b
Figure 2b
Figure 2a
Pressure
Chamber o-ring
In-Tank
Filter
DISASSEMBLING AND REPAIRING THE PUMP ASSEMBLY
1. Release the pressure from the sprayer and remove all liquid from both the pressure chamber and tank.
2. Loosen hose clamp and remove hose.
3. Remove the In-tank filter from the pressure chamber.
4. Remove 2 bolts attaching the pivot lever to the pump shaft and remove piston assembly (fig. 2a & 2b).
5. Remove large clamp holding the pressure chamber and tank together (fig 1).
6. Rock the pressure chamber back and forth and push down to free it from the tank (fig 1).
7. Once freed the entire pump assembly can be removed by maneuvering it through the base frame
(fig 3a & 3b).
8. The pressure chamber o-ring can also be replaced. DO NOT stretch the o-ring over the bottom flange.
Assemble the o-ring over the top of the chamber. Apply petroleum jelly to the o-ring before reinstalling pump
asembly into the tank (fig. 3b).
9. Reassemble by attaching components in reverse order.
NOTE: When attaching frame assembly, align tank groove and pump groove ( Fig. 4).
Lock in place with frame tab (Fig. 5) to secure all 3 components. Secure frame assembly with 2 bolts (Fig. 6).
Pump
Assembly
10E
Figure 4
Tank
Groove
Pump
Groove
Frame
tab
Figure 5
Tank
Groove
Pump
Groove
Figure 6
Clamp
Bolt Bolt
Frame
tab
Chapin Backpack Sprayer Operator’s Manual - English
Bekijk gratis de handleiding van Chapin 63950, stel vragen en lees de antwoorden op veelvoorkomende problemen, of gebruik onze assistent om sneller informatie in de handleiding te vinden of uitleg te krijgen over specifieke functies.
Productinformatie
| Merk | Chapin |
| Model | 63950 |
| Categorie | Niet gecategoriseerd |
| Taal | Nederlands |
| Grootte | 9533 MB |


