Casio DZ-S50 handleiding
Handleiding
Je bekijkt pagina 1 van 2
Component Names
Front
Polarizing selector
button
• Pressing the
polarizing selector
button toggles the
LED light between
polarized and non-
polarized.
[
p
] (Power)
button
• Pressing the
button turns the
dermoscope on
or off.
Battery level LED
• Shows the status
of the rechargeable
battery. Refer to
“Battery Level LED
Display”.
Lens
Rear
LED light [DC IN] jack
Strap mount
Charging the Dermoscope
• With the dermoscope switched off, connect the cable in the sequence
shown in
1
and
2
.
Charging time: Approx. 160 minutes
Battery level LED
Lit orange: Charging
Off: Charging completed
AC adaptor for
dermoscope charging
Cable
[DC IN] jack
To mains
power outlet
• When disconnecting the AC adaptor for dermoscope charging from the
device, always disconnect the dermoscope end of the cable (
2
in the
above diagram) first.
• Use a unified polarity type (JEITA standard) plug. Using an AC adaptor
with a different type of plug could cause a fault.
(JEITA unified polarity type)
Battery Level LED Display
The LED lights or flashes orange to show the dermoscope state.
Off
Normal state. The battery level indicator LED is off if
the dermoscope is switched on and operating normally.
Flashing slowly
(approx. 2 second
intervals)
The battery level is low. Recharge the battery.
Lit Charging.
The LED goes off once charging is completed.
Flashing rapidly
(approx. 0.5 second
intervals)
Indicates that the battery cannot be charged. See
“When the Battery Level LED Flashes Orange
During Charging”.
When the Battery Level LED Flashes
Orange During Charging
• When the battery level LED flashes rapidly at approx. 0.5 second
intervals, this indicates that the battery cannot be charged because the
ambient temperature or the battery temperature is too high or too low.
Disconnect the cable and leave the dermoscope at room temperature
for some time. Then resume charging within the operating temperature
requirements.
• If you take the above steps and the battery level LED is still flashing, the
battery may be defective. Refer to the contact information in “Inquiries
Regarding Repairs”.
Other Important Notes on Charging
• Charge the dermoscope using the methods specified in this manual.
• If the battery has become hot after being used, it may not be possible to
fully charge it. Allow the battery to cool down before recharging it.
• The battery will self-discharge even when it is not being used. Always
charge the battery before use.
• Charging may produce interference with a TV or radio. In this event, use a
mains power socket that is as far away as possible from the TV or radio.
• Charging times will vary somewhat depending on the battery capacity,
its remaining charge and the operating environment.
• Do not use the AC adaptor for dermoscope charging with products other
than this dermoscope.
• For charging, use the device specified in this manual. The use of any
other device could make it impossible to correctly charge the battery.
• To cut off power to this dermoscope, unplug the AC adaptor from the
mains power socket.
• Do not place this dermoscope in a location that interferes with
connecting or disconnecting the AC adaptor.
• Use the AC adaptor for dermoscope charging to charge this dermoscope.
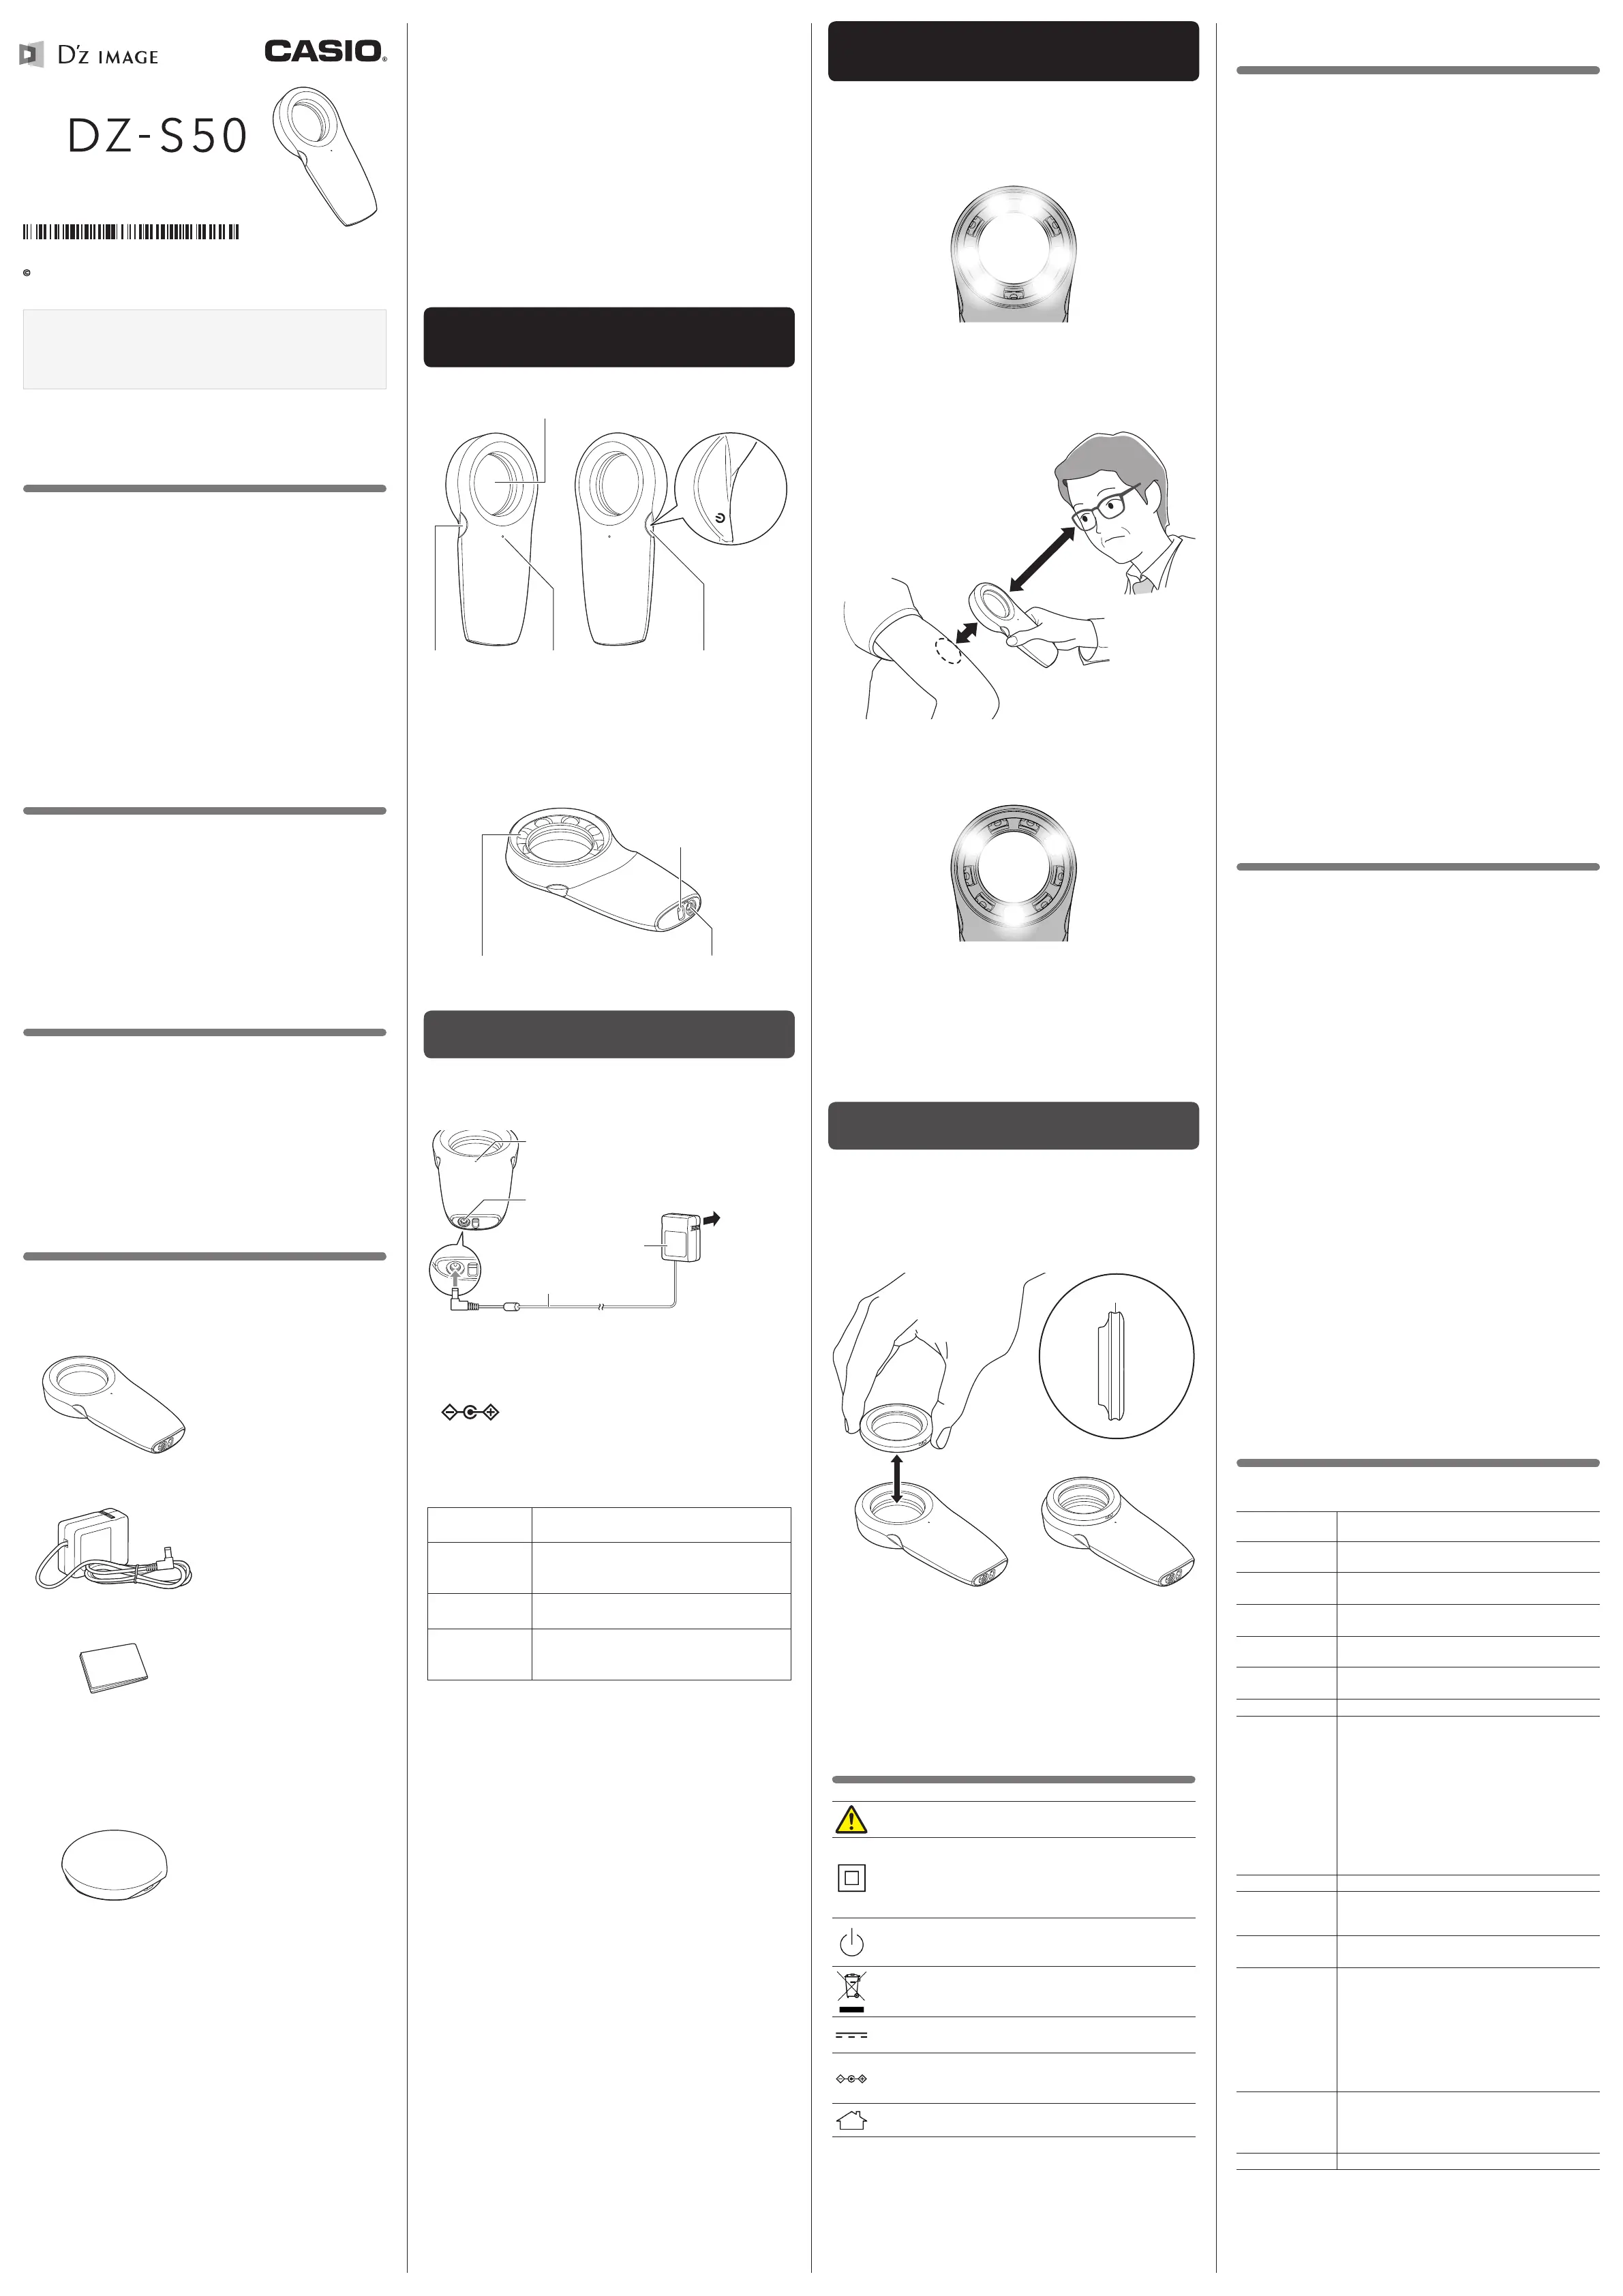
Using the Dermoscope
This dermoscope enables you to view the affected area at 6x magnification.
1
Press the [
p
] (Power) button
• The dermoscope LED lights turn on in polarized mode.
With LED lights lit in polarized mode
2
Adjust the position of the dermoscope
• Position the dermoscope to give the best view of the area to be
observed.
3
Observe the affected area
• Press the polarizing selector button to select either polarized or
non-polarized LED light.
With LED lights lit in non-polarized mode
• Approximately 3 minutes after it is switched on, the dermoscope
automatically shuts down (Auto Power Off function).
• When the dermoscope is switched on and the battery level LED flashes
slowly at approx. 2 second intervals, this indicates that the battery level
is low. Recharge the battery.
Attaching the Conversion Lens
Attaching the optional Conversion Lens (DSL-50M) enables you to view the
affected area at 9x magnification.
• Remove the cap provided with the lens and attach the lens to the front
of the dermoscope.
• The conversion lens attaches magnetically.
Hold with your
fingers against
the groove
With the Conversion Lens attached
Dermo-
scope
side
Operator
side
Groove
• After completing the observation, remove the conversion lens from the
dermoscope and store it with the cap re-attached, taking care not to
scratch the lens.
Icons & Symbols
Warning
icon
ISO7010-W001
Indicates a general, non-specific warning
Class II
equipment
icon
IEC60417-5172
A mark given to ME equipment that is designed
such that it has functioning double insulation or
reinforced insulation composed of both basic
insulation and supplementary insulation for Class II
Power
(ON/OFF)
icon
IEC60417-5009
Power (standby)
WEEE
Directive
icon
IEC60417-6414
A mark indicating that this product is subject to the
WEEE Directive
DC icon
IEC60417-5031
A mark indicating direct current (DC)
AC plug
icon
JEITA CP-1104B-01030
A mark applied to equipment that complies
with JEITA unified polarity
Indoor use
icon
A mark indicating that the equipment is specified for
indoor use only
Troubleshooting
I can’t charge the dermoscope
• Check that the AC adaptor for dermoscope charging is connected to an
AC power outlet.
• Disconnect and reconnect the cable for the AC adaptor for dermoscope
charging.
The dermoscope won’t switch on
• You might be pressing the polarizing selector button. Press the button
on the opposite side and check that the LED lights turn on.
• The battery may be fully discharged. In this event, recharge the battery.
• If the battery immediately runs flat after charging, the battery has
reached the end of its service life. Refer to the contact information in
“Inquiries Regarding Repairs”.
The affected area being observed is difficult to see
• Check that there is no dirt or dust on the lens. If you find dirt or dust on
the lens, remove it using a blower.
• Any soiling that cannot be blown off should be wiped off using a clean
gauze or soft cloth soaked in ethanol for disinfection at the appropriate
dilution.
• Check that there are no chips or cracks in the lens. If any chips or cracks
are found, refrain from using the dermoscope and refer to the contact
information in “Inquiries Regarding Repairs”.
The dermoscope switched itself off for no reason
• The Auto Power Off function may have been triggered. Press the Power
button again.
• You may have pressed the Power button while the dermoscope was
starting up. Press the Power button again.
• The battery may be fully discharged. In this event, recharge the battery.
The battery level LED is flashing
• If the dermoscope is in use and the battery level LED flashes slowly at
approx. 2 second intervals, this indicates that the battery level is less
than 20%. In this event, recharge the battery.
• If the battery level LED flashes rapidly at approx. 0.5 second intervals
during charging, this indicates that the battery cannot be charged.
Disconnect the cable and leave the dermoscope at room temperature
for some time. Then resume charging within the operating temperature
requirements.
If you resume charging and the battery level LED is still flashing, the
battery may be defective. Refer to the contact information in “Inquiries
Regarding Repairs”.
Notes on Using the Dermoscope
• Note that this product is not a diagnostic device. It should only be used
for observing skin lesions.
• The dermoscope is a medical device for dermal observations and
consists of components including a lens and LEDs for illumination.
• The distance between the dermoscope and the operator should be no
greater than 40 cm (15.7").
• Do not press the Power button on the dermoscope unnecessarily. Doing
so could inadvertently shine light from the LEDs directly into someone’s
eyes.
• Do not bring the dermoscope into direct contact with the affected area
during use.
• In cold locations, the characteristics of the battery are such that the time
for which the battery can be used when fully charged may be shorter.
• Charge the battery within the operating temperature requirements.
At temperatures outside the recommended range, charging may take
longer or it may not be possible to charge the battery fully.
• Do not damage or peel the outer seal off a battery that has been
removed for disposal.
• If the time for which the battery can be used is significantly shorter even
immediately after charging, the battery may have reached the end of
its service life. Refer to the contact information in “Inquiries Regarding
Repairs”.
• Do not directly touch the lens or LED lights.
• Attach a third-party strap to the dermoscope to avoid dropping it during
use.
• Before and after use, check that there is no soiling, chipping or splitting
in the dermoscope body and lens.
• Do not use the dermoscope when it is damaged.
• Do not attempt to clean or maintain the dermoscope while the LED light
is on.
Specifications
DERMOSCOPE (DZ-S50)
Size 67.5 × 140.2 × 23.1 mm
(2.7" × 5.5" × 0.9") (W x H x D)
Weight
Approx. 125 g (4.4 oz) or 145 g (5.1 oz)
(with optional Conversion Lens attached)
Lens
magnification
6x
9x
(
with optional Conversion Lens attached
)
Focal distance f = 50 mm
f = 31.25 mm
(with optional Conversion Lens attached)
Maximum
effective diameter
40.5 mm (1.6")
No. of LED lights Polarized: 6
Non-polarized: 3
Power supply Lithium-ion battery (built-in)
Battery life Approx. 120 min. (LED lights lit continuously)
• The battery life figures are an approximate guide
to how long the battery will last when used at a
temperature of 23°C (73.4°F) and constitute no
guarantee of operating time. Battery life will be
shorter at lower temperatures.
• These figures are for a new, fully charged battery.
Battery life will gradually shorten with repeated
charging.
• These figures are not guaranteed for battery life in
actual use.
Service life 5 years
Operating
temperature
requirements
10°C to 35°C (50°F to 95°F)
Applicable
standards
IEC60601-1
IEC60601-1-2
Applicable
emissions class/
Group immunity
test level
CISPR11 group 1, class B
IEC61000-4-3
Radiated RF electromagnetic field
Residential healthcare environments
IEC61000-4-6
Conducted disturbance caused by RF
electromagnetic fields
Residential healthcare environments
Medical electrical
equipment
safety standards
ME equipment with internal power supply (AC
adaptor not used)
Class II ME equipment (AC adaptor used)
ME equipment with no applied parts
Operating mode Continuous operation (running)
Thank you for purchasing this CASIO product.
• Be sure to keep all user documentation handy for future reference.
• Read the “Safety Precautions” before using this product to ensure
that you use it correctly.
Read this first!
• The contents of this manual are subject to change without notice.
• The contents of this manual have been checked at each step of the
production process. Feel free to contact us if you notice anything that is
questionable, erroneous, etc.
• Any copying of the contents of this manual, either in part or its entirety,
is forbidden. Except for your own personal use, any other use of the
contents of this manual without the permission of CASIO COMPUTER
CO., LTD. is forbidden under copyright laws.
• CASIO COMPUTER CO., LTD. shall not be held liable for any damages
or lost profits suffered by you or any third party due to the use or
malfunction of this product.
• The illustrations shown in this manual may differ from the actual product.
Operating Principle
When you turn the dermoscope on, the LED lights around the lens on the
rear of the dermoscope light. Look through the lens from the front while
these lights illuminate the patient’s skin to observe the affected area without
touching the skin.
Pressing the polarizing selector button toggles the emitted LED light
between polarized and non-polarized.
Intended Purpose
This dermoscope should only be used for observing skin lesions.
It is intended for observing the surface of the skin over the entire body.
No restrictions apply to the age or gender of the patient being observed.
Use of this dermoscope is restricted to physicians and other healthcare
professionals.
It should not be used by patients themselves.
Items Included
When you open the package, check that it contains all the items listed
below. If any items are missing, refer to the contact information provided in
“Inquiries Regarding Functioning, Operation or Purchase”.
DERMOSCOPE (DZ-S50)
AC adaptor for dermoscope charging
User’s Guide
Optional Products
Conversion Lens (DSL-50M)
• The conversion lens is packaged
with a cap fitted as shown at left.
EN
Model
DERMOSCOPE
User’s Guide
MA2005-B
2020 YAMAGATA CASIO CO., LTD.
B
ME2000FCM2PMJ
Bekijk gratis de handleiding van Casio DZ-S50, stel vragen en lees de antwoorden op veelvoorkomende problemen, of gebruik onze assistent om sneller informatie in de handleiding te vinden of uitleg te krijgen over specifieke functies.
Productinformatie
| Merk | Casio |
| Model | DZ-S50 |
| Categorie | Niet gecategoriseerd |
| Taal | Nederlands |
| Grootte | 981 MB |


