Cambro VBRTL5519 handleiding
Handleiding
Je bekijkt pagina 2 van 4
2
Section I - Versa Food Bar™ and Work Table Assembly Instructions
Tools Needed For Assembly: Crescent Wrench Base Parts List
A. 1 - Food Bar Body
B. 2 - Legs with Pre-installed Casters w/ Brakes
C. 1 - Faucet
D. 2 - Brushed Metal Finish Panels for the Legs
E. 20 - 1
1
/2" (3,81 cm) Bolts - 10 per leg
F. 20 -
1
/2" (1,27 cm) Flat Washers - 10 per leg
G. 4 or 5 Well Covers: 4 well covers for 5' (152 cm) Versa Work Table,
5 Well Covers for 6' (183 cm) Versa Work Table
H. 1 - Asset Management Label
I. 20 -
1
/2" Internal Star Lock Washers – 10 per leg
Sneeze Guard Parts List
A. 1 - Top Shelf
B. 2 - Clear Sneeze Guard Top Panels
C. 2 - Upright Assemblies
D. 4 - Sneeze Guard End Panels
E. 2 - Top Shelf Black Thumb Screws with Finish Washers
F. 4 - White Nylon Thumbscrews
G. 4 - 1
1
/4" (3,18 cm) Black Rubber Flat Washers
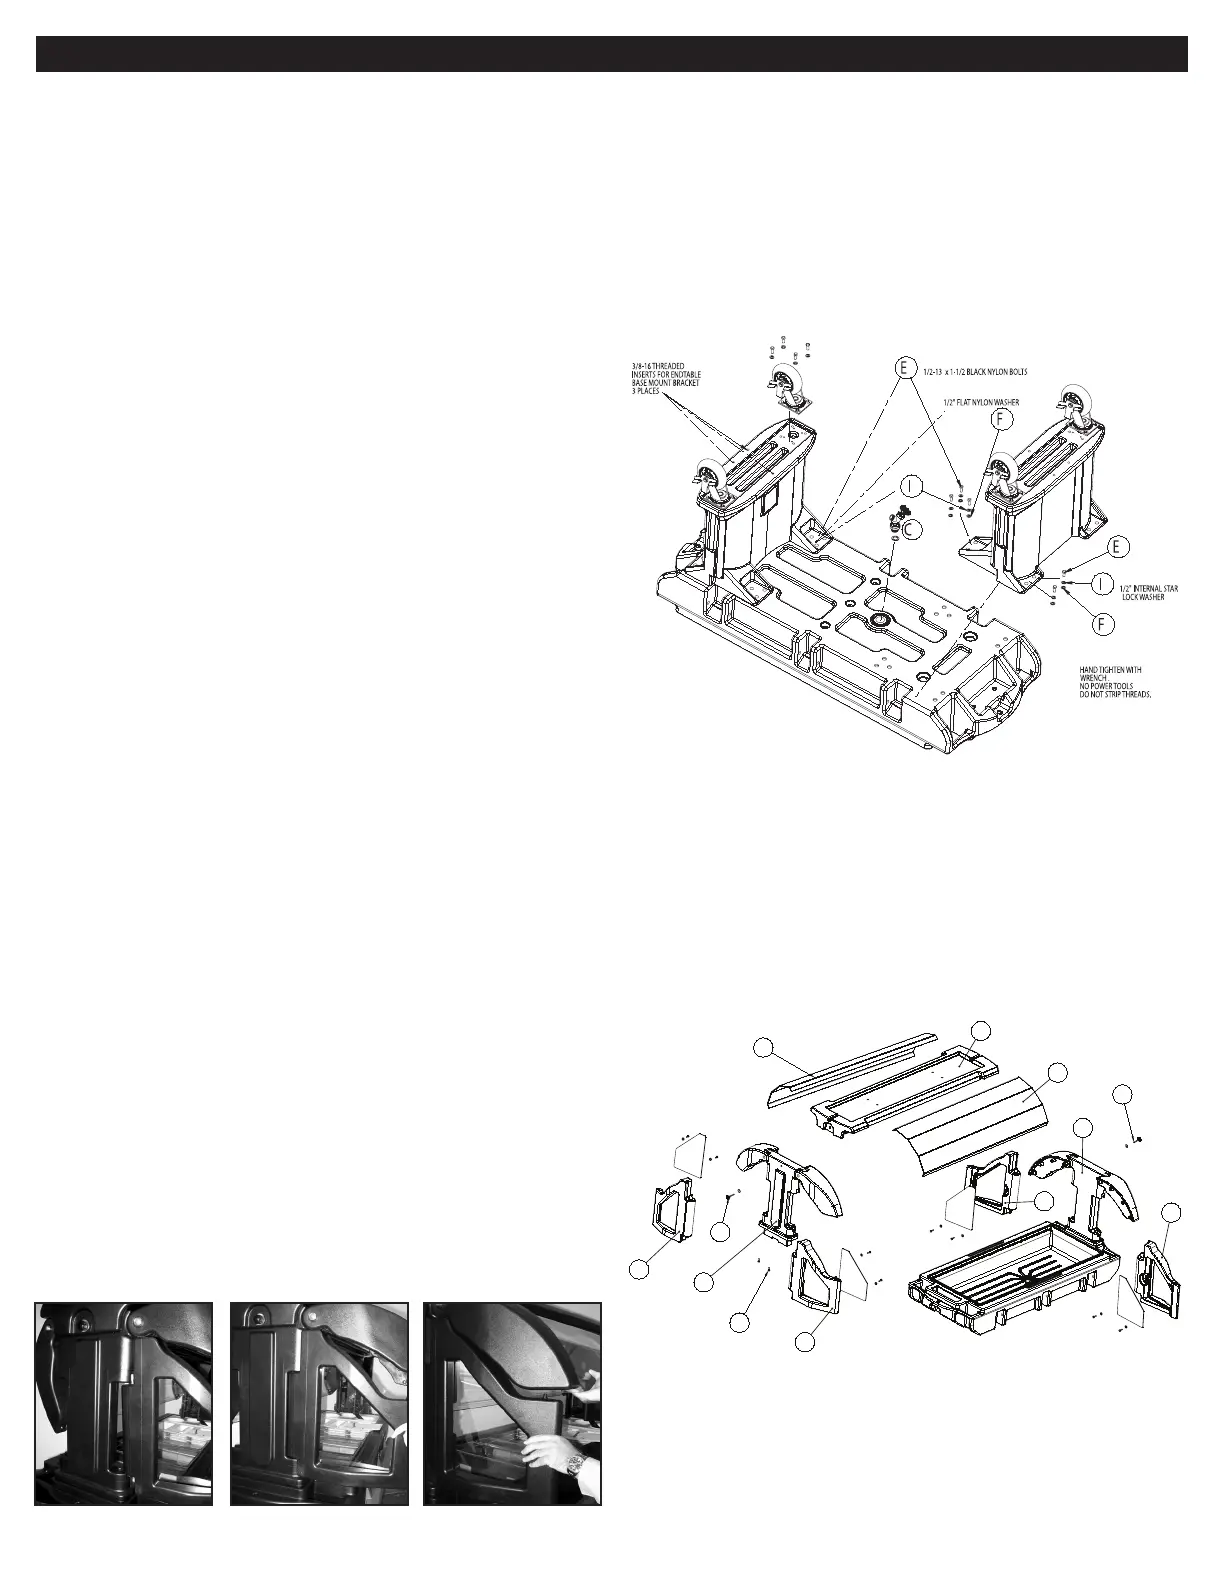
Base Assembly Instructions
1� Place Food Bar body (part A) upside down as shown�
2� Make sure Teflon
®
tape is on faucet thread� Screw faucet (part C) into bottom of
Food Bar body� Drain faucet has "O" ring pre-installed�
3� Unpack the two decorative leg panels�
4� Place one panel to fit into the panel holders on the legs� The panel should slide
into the holders� The panel can also slightly bend to fit into the holders�
5� Before attaching legs to food bar body, ensure that the side with the decorative
panel is facing outward� Attach legs (part B) to body using 1
1
/2" (3,81 cm) bolts
with
1
/2" (1,27 cm) flat washers (10 ea� per leg section) along with
1
/2" (1,27 cm)
internal star lock washers (10 ea� per leg section) on top of the flat washers� Hand
tighten bolts initially� Use crescent wrench for final tightening� Do not use power
tools or impact to tighten� Over-tightening will cause stripped threads�
6� The Asset Management label will adhere best to a smooth surface on the Versa
Food Bar/Work Table� If possible, avoid placing the label on a textured surface�
NOTE: With well covers removed, the Versa Work Table well can be used for self serve
bottled or canned beverages or packaged food products only�
WARNING: Open well should not be used to hold ice for human consumption� When well
covers are in place, work table is not acceptable for direct food contact�
WARNING: A sneeze guard is required by law for service of unpackaged or bulk foods�
Sneeze Guard Assembly Instructions
1� Place uprights (part C) in the recesses at both ends of the food bar body� The
sneeze guard positioning pins in each upright should be facing inward to the food
bar body well�
2� Place nylon thumbscrews through holes located on the bottom of each side
of the food bar body and thread the thumbscrews into the base of each upright
until tight�
3� Remove the blue protective cover from all sneeze guard panels�
4� Slide the ends of a clear sneeze guard panel between the two uprights so that
each panel end rests on top of the positioning points or pins� Repeat with the
second clear sneeze guard panel being careful not to spread the uprights so as to
cause the first panel to drop out of position�
5� Place the top shelf so that it fits on top of both uprights� With the top shelf in
place, install the black knob thumbscrew and finish washer into each upright to
tighten the top shelf in place�
6� Place one 1
1
/4" (3,18 cm) Black Rubber Flat Washer on the bottom pivot pin of each
clear sneeze guard end panel�
6� Lift each end of each clear sneeze guard panel assembly and position a sneeze
guard end panel so that the tallest edge lines up with the side of the upright�
7� Firmly snap the end panel into the upright� Repeat with an end panel on the other
upright� See photos A, B, and C below�
8� Position the end panels to allow the clear sneeze guard panel assembly to fit
smoothly onto the sneeze guard end panels� Use the location cone as a guide to fit
the parts together� See photo C below�
Base Assembly Instructions applies to the following models:
VBR5 VBR6 VBRT5 VBRT6VBRL5 VBRL6 VBRTL5
VBRTL6 VBRHD5 VBRHD6 VBRTHD5 VBRTHD6
VBRLHD5 VBRLHD6 VBRTLHD5 VBRTLHD6
Sneeze Guard Assembly Instructions applies to the following models:
VBR5 VBR6 VBRL5 VBRL6
VBRHD5 VBRHD6 VBRLHD5 VBRLHD6
B
A
B
E
C
D
C
F
D
D
E
D
a B C
Bekijk gratis de handleiding van Cambro VBRTL5519, stel vragen en lees de antwoorden op veelvoorkomende problemen, of gebruik onze assistent om sneller informatie in de handleiding te vinden of uitleg te krijgen over specifieke functies.
Productinformatie
| Merk | Cambro |
| Model | VBRTL5519 |
| Categorie | Niet gecategoriseerd |
| Taal | Nederlands |
| Grootte | 1030 MB |


