Brother PS-55 handleiding
Handleiding
Je bekijkt pagina 79 van 111
67
Step 2
(Left side)
Step 4
(Right side)
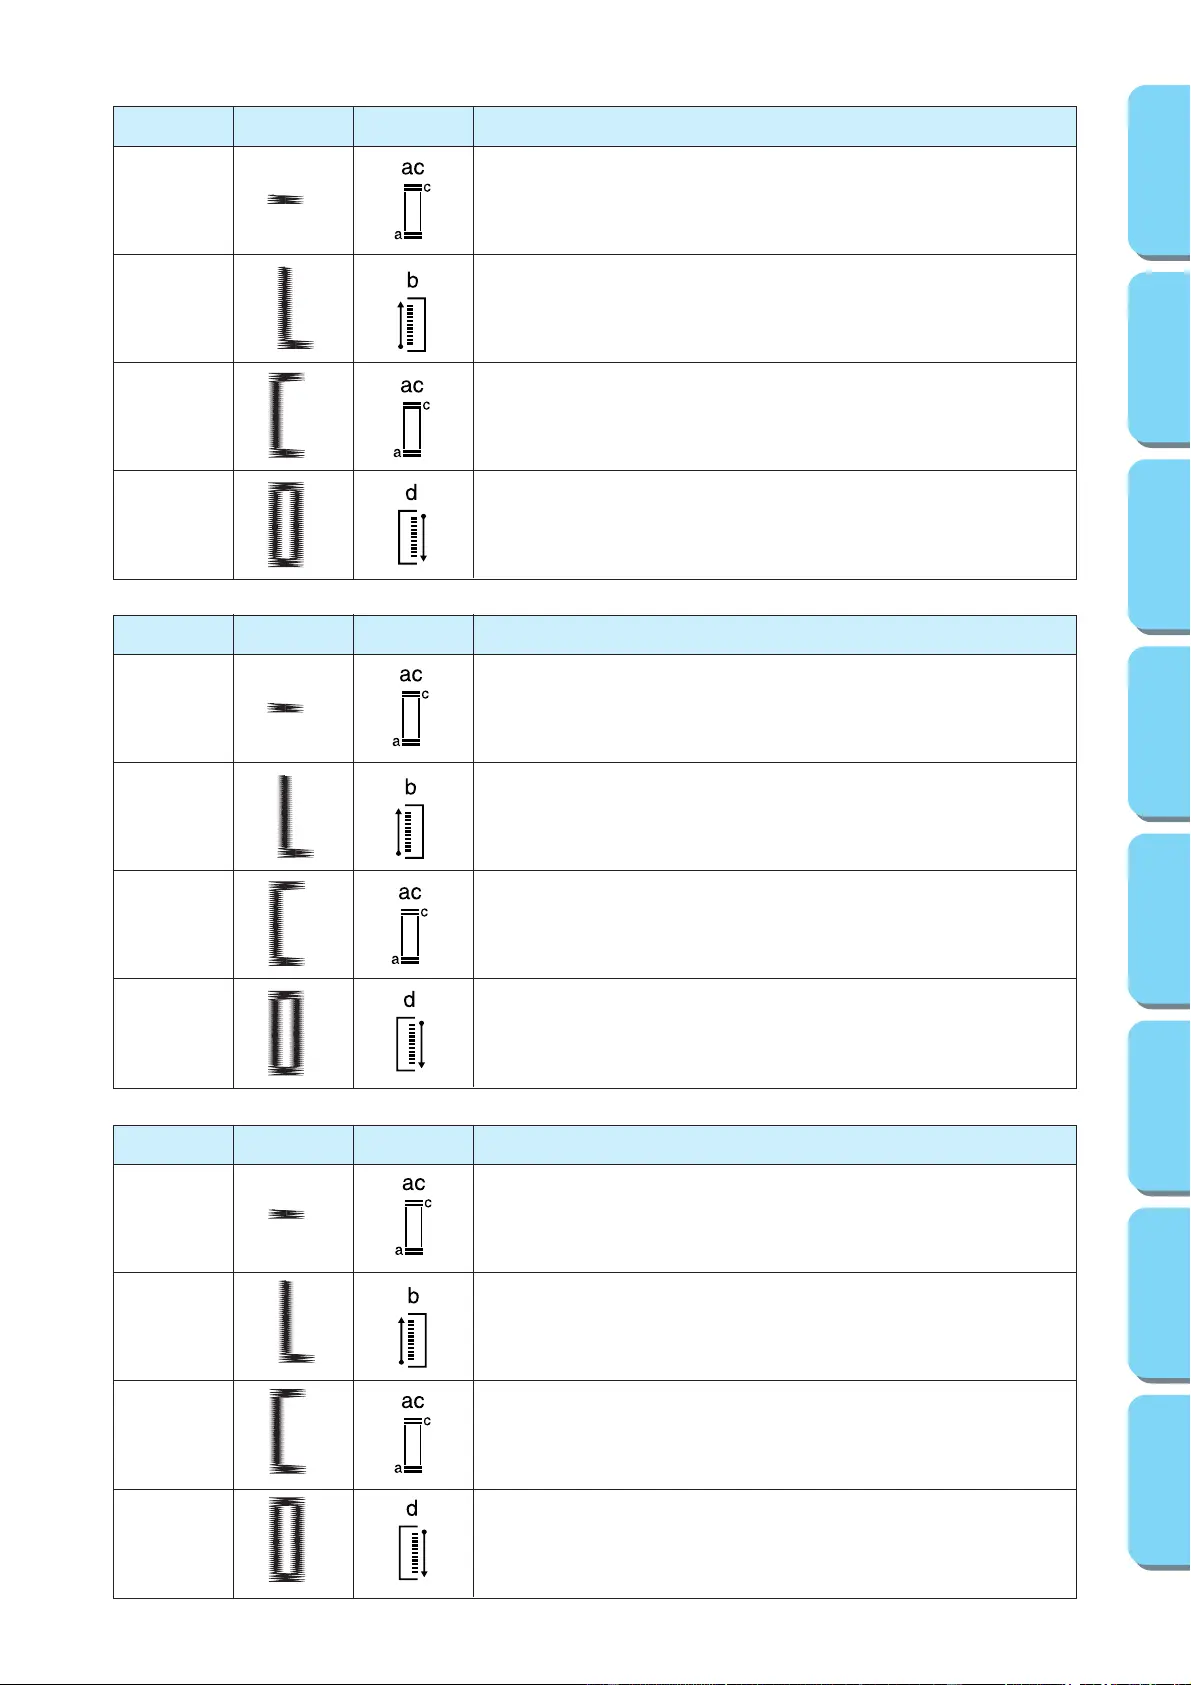
MAKING A BUTTONHOLE
Step Sewn Portion Pattern How to Sew
1. Set the pattern selection dial to “a”.
2. Lower the presser foot and sew 5 to 6 stitches.
3. Stop the machine when the needle is at the left side of the stitches, then raise
the needle from the material.
1. Turn the pattern selection dial to “b”.
2. Sew the predetermined length of the tailor’s chalk line.
3. Stop the machine when the needle is at the left side of the stitch, then raise the
needle.
1. Turn the pattern selection dial to “c” (same position as in step 1).
2. Sew 5 to 6 stitches.
3. Stop the machine when the needle is at the right side of the stitch, then raise the
needle from the material.
1. Set the pattern selection dial to “d”.
2. Sew the right side until the needle reaches the stitches sewn in step 1.
Step 1
(Front bar
tack)
Step 3
(Back bar
tack)
a
b
c
d
PARA COSER OJALES
Pasos Parte Cosida
Número de puntada
Como Coser
1. Ponga el selector de puntada en “a”.
2. Baje el prensatelas y cosa de 5 a 6 puntadas.
3. Pare la máquina cuando la aguja esté a la izquierda de las puntadas, luego levante la
aguja del tejido.
1. Gire el selector de puntada en “b”.
2. Cosa la línea del jaboncillo de la longitud predeterminada.
3. Pare la máquina cuando la aguja esté a la izquierda de la puntada y luego levante la
aguja.
1. Gire el selector de puntada en “c” (en la misma posición que en el a paso 1).
2. Cosa 5 ó 6 puntadas.
3. Pare la máquina cuando la aguja esté a la derecha de la puntada y luego levante la aguja
del tejido.
1. Ponga el selector de puntada en “d”.
2. Cosa la parte derecha hasta que la aguja llegue a las puntadas cosidas en el Paso 1.
a
b
c
d
Paso 1
(Remate de la
parte
delantera)
Paso 2
(Lado
izquierdo)
Paso 3
(Remate de la
parte trasera)
Paso 4
(Lado
derecho)
ESECUZIONE DI UN OCCHIELLO
Fase Lato cucito Punto Come cucire
1. Disporre il selettore dei punti su “a”.
2. Abbassare il piedino per asole ed eseguire 5 o 6 punti.
3. Quando l’ago si trova a sinistra della cucitura, arrestare la macchina e alzare l’ago
dal tessuto.
1. Disporre il selettore dei punti su “b”.
2. Cucire per la lunghezza prestabilita della linea segnata col gesso.
3. Quando l’ago si trova a sinistra della cucitura, arrestare la macchina e alzare l’ago
dal tessuto.
1. Disporre il selettore dei punti su “c” (stessa posizione della fase 1).
2. Eseguire 5 o 6 punti.
3. Quando l’ago si trova a destra della cucitura, arrestare la macchina e alzare l’ago
dal tessuto.
1. Disporre il selettore dei punti su “d”.
2. Cucire il lato destro dell’asola finché l’ago non incontra la cucitura eseguita nella
fase 1.
Fase 1
(barretta
frontale)
Fase 2
(lato sinistro)
Fase 3
(barretta
posteriore)
Fase 4
(lato destro)
a
b
c
d
TABLE OF CONTENTS
KNOWING YOUR
SEWING MACHINE
STRAIGHT AND
ZIGZAG STITCHING
BUILT-IN STITCHES
BUTTONHOLE AND
BUTTON SEWING
USING ATTACHMENTS
AND APPLICATIONS
MAINTENANCE
INDEX
Bekijk gratis de handleiding van Brother PS-55, stel vragen en lees de antwoorden op veelvoorkomende problemen, of gebruik onze assistent om sneller informatie in de handleiding te vinden of uitleg te krijgen over specifieke functies.
Productinformatie
| Merk | Brother |
| Model | PS-55 |
| Categorie | Naaimachine |
| Taal | Nederlands |
| Grootte | 15592 MB |


