Handleiding
Je bekijkt pagina 42 van 211
INSTALLATIONINSTALLATION
14
EN
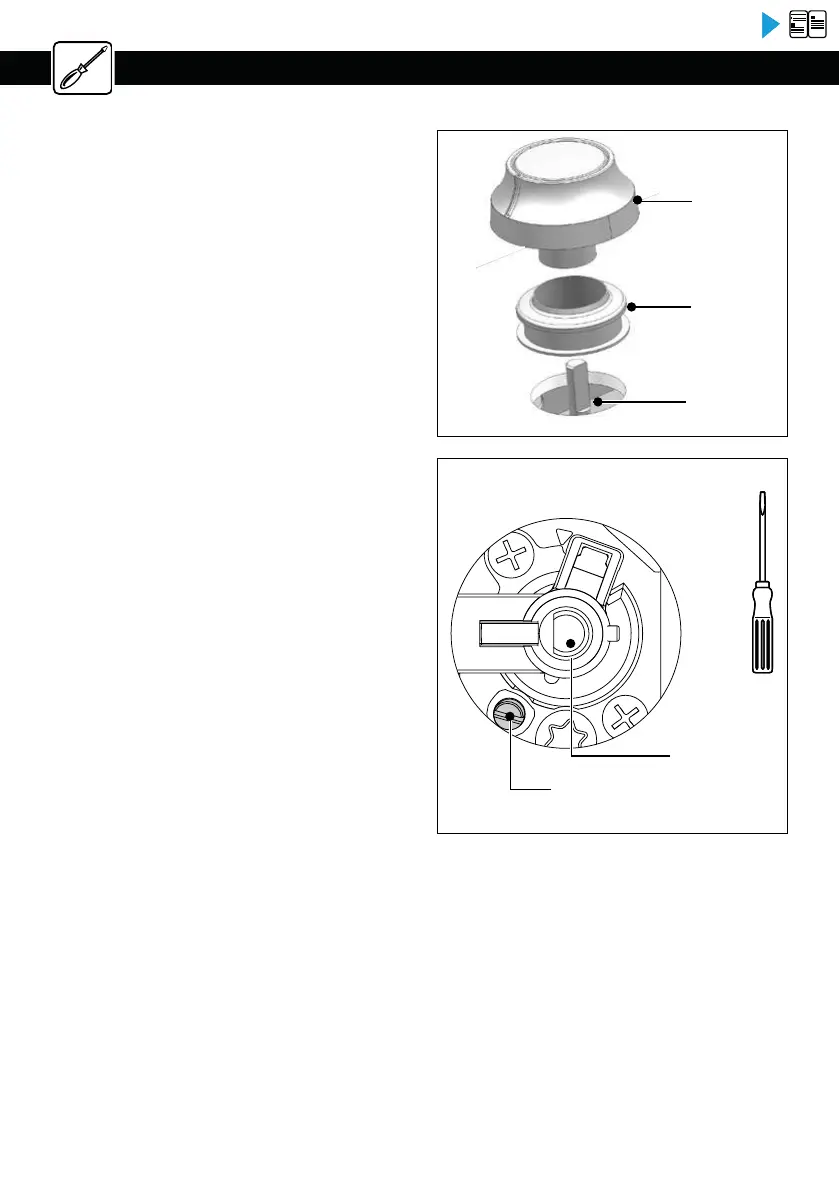
Fig. 05
Knob
Ring gasket
Tap
Fig. 04
They are located underneath the knobs (Fig. 04).
— Proceed one tap at a time.
— Remove the knobs and the gaskets by pulling
them up.
-
switChing from natural gas to butane/propane
gas
- With a small at-head screwdriver, screw in
all the way the brass (yellow) burner power
screws(Fig. 05), in a clockwise direction.
- Replace the gaskets and the knobs, paying
careful attention to their direction and ensuring
that the knobs are pushed in all the way.
- switChing from butane/propane gas to natural
gas
- Unscrew the brass (yellow) burner power
screws (Fig. 05), using a small at-head
screwdriver, turn twice counterclockwise.
- Replace the knob.
- Light the burner in maximum heat mode, then
turn down to reduced heat mode.
- Remove the knob again, then turn the burner
power screws clockwise until it reaches the
lowest possible setting that does not extinguish
the ame.
- Replace the gasket and knob.
- Make several attempts to shift from the
maximum ow rate to the minimum: the ame
should not go out; if it does, unscrew the burner
power screw so as to obtain good ame retention
during these position switches.
- Reposition the burner heads, burner covers and
pan supports on the hob.
Burner power
adjustment screw
Tap axis
Adjust the hob connections:
Bekijk gratis de handleiding van Brandt BPG6413BM, stel vragen en lees de antwoorden op veelvoorkomende problemen, of gebruik onze assistent om sneller informatie in de handleiding te vinden of uitleg te krijgen over specifieke functies.
Productinformatie
| Merk | Brandt |
| Model | BPG6413BM |
| Categorie | Fornuis |
| Taal | Nederlands |
| Grootte | 33548 MB |
Caratteristiche Prodotto
| Apparaatplaatsing | Ingebouwd |
| Soort bediening | Draaiknop |
| Kleur van het product | Zwart |
| Ingebouwd display | Nee |
| Timer | Nee |


