Bolin Technology EXU230H handleiding
Handleiding
Je bekijkt pagina 19 van 47
2. Conguring the Camera’s Network Settings: Adjust the camera’s IP address and related network settings to ensure proper communication with the network and
PTZ Controller.
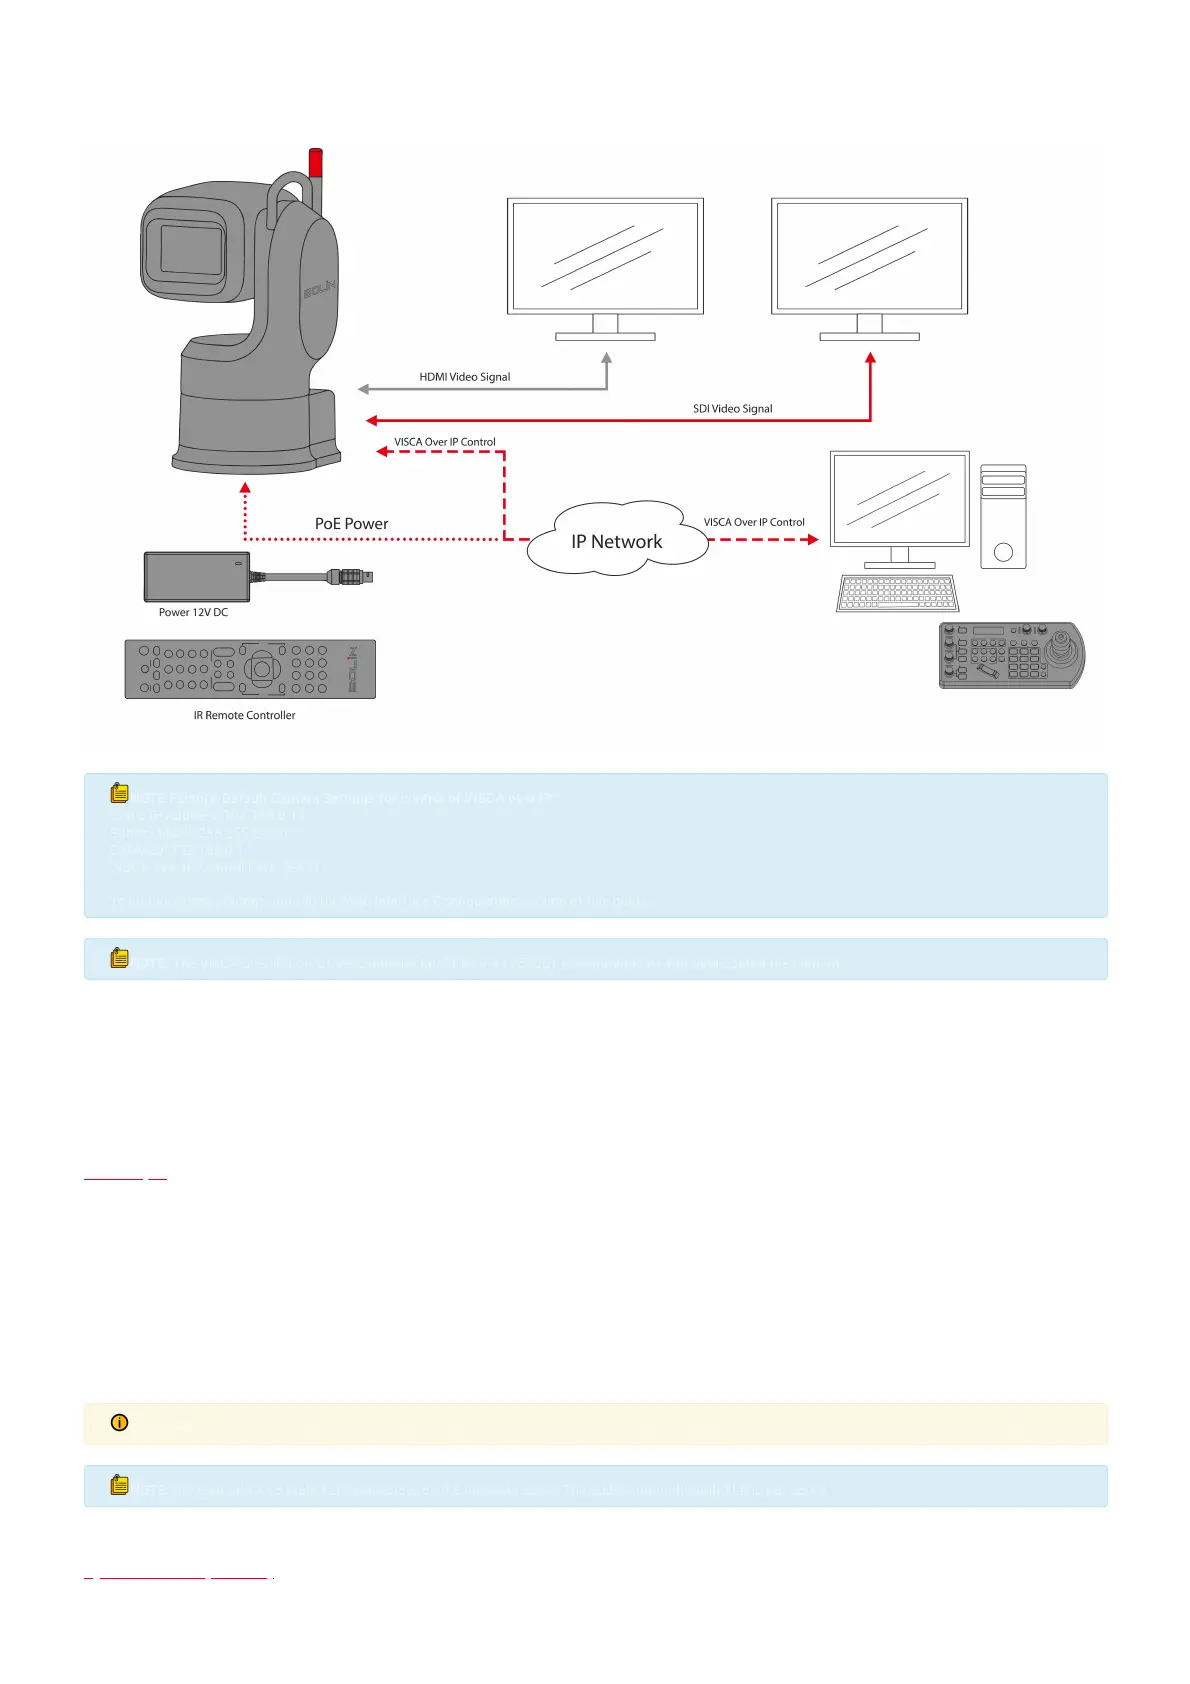
3. Connecting the PTZ Controller to the Network: Connect a PTZ Controller that supports VISCA over IP to the network using a CAT6 cable.
4. Conguring the Controller’s Network Settings: Adjust the controller’s IP address and related network settings to ensure proper communication with the network
and PTZ camera. Then, input the camera’s IP address and VISCA over IP port settings into the controller to access the camera.
NOTE:
NOTE:
Factory-Default Camera Settings for control of VISCA over IP
Factory-Default Camera Settings for control of VISCA over IP
Static IP Address: 192.168.0.13
Static IP Address: 192.168.0.13
Subnet Mask: 255.255.255.0
Subnet Mask: 255.255.255.0
Gateway: 192.168.0.1
Gateway: 192.168.0.1
VISCA over IP Control Port: 52831
VISCA over IP Control Port: 52831
To change these settings, refer to the
To change these settings, refer to the
Web Interface Conguration
Web Interface Conguration
section of this guide.
section of this guide.
NOTE:
NOTE:
The VISCA over IP port of the controller MUST be set to 52381 to communicate with and control the camera.
The VISCA over IP port of the controller MUST be set to 52381 to communicate with and control the camera.
ONVIF Protocol
Can be easily integrated with other ONVIF-compliant devices and systems. This allows for greater exibility and ease of use, especially withsetups that involve
multiple devices and systems.
ONVIF 2.4 (Prole S/G/T)
ONVIF Port: 2000
Audio Input
The camera features an industry-standard 10-pin LEMO connector to embed balanced audio. Users can choose to use a third-party breakout cable or purchase Bolin's
10-Pin LEMO to XLR breakout cable (BLA-10). Once connected and activated from the Web Interface or OSD Menu, the audio will be embedded into the camera's
HDMI, SDI, and IP streams. To connect an audio source to the camera, follow these steps:
1. Obtain a 10-pin LEMO to XLR breakout cable. Plug the male LEMO connector of the breakout cable into the female LEMO connector that is labeled as "Balanced
Audio In/Out" on the back of the camera.
2. Using XLR cables, connect the output of the audio source (microphone, audio mixer, speaker, etc...) into the two female XLR connectors of the breakout cable.
3. To enable the audio and congure the audio levels, log into the camera's web interface or open the OSD menu.
CAUTION:
CAUTION:
It is crucial to enable the audio input through the Web Interface or OSD Menu. Failing to do so will result in video streams without audio.
It is crucial to enable the audio input through the Web Interface or OSD Menu. Failing to do so will result in video streams without audio.
NOTE:
NOTE:
Disregard the two male XLR connectors on the breakout cable. The audio output through XLR is not active.
Disregard the two male XLR connectors on the breakout cable. The audio output through XLR is not active.
Synchronization (Genlock)
Genlock (Generator Locking) is anexternal synchronizationsignal input, whichsupports BBS (Black Burst Sync) and tri-level synchronization.External
synchronization (genlock) can be applied to achieve precisefrequency-locked video signals where every device (audio and video)knows when a frame starts and
ends. Genlock is an industry standard and conforms to SMPTE standards.
Bekijk gratis de handleiding van Bolin Technology EXU230H, stel vragen en lees de antwoorden op veelvoorkomende problemen, of gebruik onze assistent om sneller informatie in de handleiding te vinden of uitleg te krijgen over specifieke functies.
Productinformatie
| Merk | Bolin Technology |
| Model | EXU230H |
| Categorie | Bewakingscamera |
| Taal | Nederlands |
| Grootte | 12525 MB |


