Bolin Technology Blue Line B7-220 handleiding
Handleiding
Je bekijkt pagina 8 van 33
2. Once the channel has been selected, the camera should be powered on.
3. On the IR remote, the “Camera IR ID” that corresponds with the selected channel on the camera should be chosen. The remote is now ready to be used to
congure or control the camera.
NOTE
NOTE
:
:
When you’re using the IR Remote, make sure to either power off any nearby cameras or set them to a different IR ID. If there are cameras
When you’re using the IR Remote, make sure to either power off any nearby cameras or set them to a different IR ID. If there are cameras
within range that are set to the same IR ID, their settings might be altered.
within range that are set to the same IR ID, their settings might be altered.
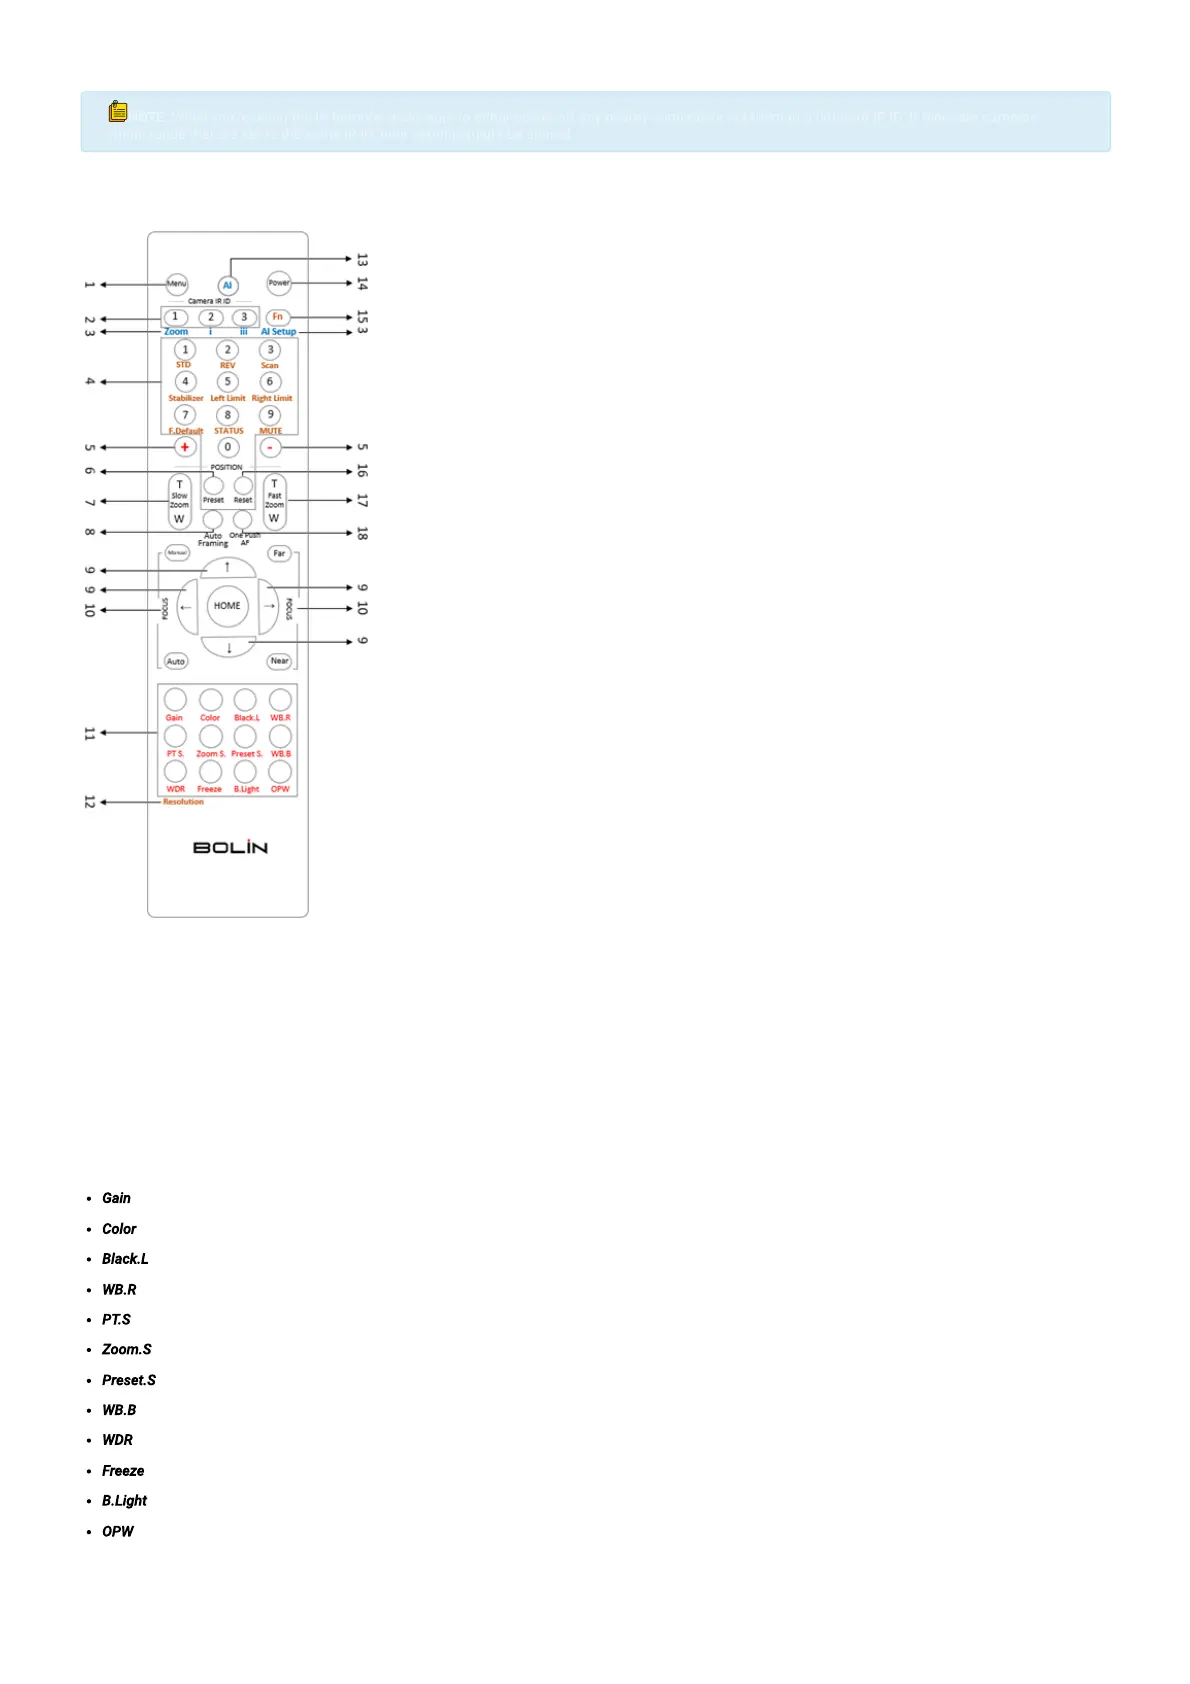
Functions of the IR Controller:
Menu- On-Screen Display (OSD) Toggle
IR ID Selector- Select which IR Channel (Camera) to be controlled
AI Function Buttons- Disabled
Buttons 1-9- Used to set & recall corresponding presets. (See #6 to set a preset and#16 to erase a preset)
+ & - Buttons- Used in conjunction with image adjustment buttons (11) to increase or decrease parameters.
Preset- To save a preset, hold down the "Preset" buttonand the preset number you would like to assign it to.
Slow Zoom- Zoom's the camera in or out in a slow speed.
Auto Framing- Disabled
Direction Arrows- Pan and Tilt the camera in the corresponding direction. Navigate the OSD Menu when open.
Focus Adjustments- Use the "Auto" button to enable auto-focus. To make manual focus adjustments, press the "Manual" button rst, followed by the "Far" or
"Near" buttons to adjust.
Image Adjustments- Select the property you would like to adjust, followed by the + and - buttons (5) to make the appropriate adjustment, unless otherwise noted
below. The selected function and corresponding options will glow when selected.
Gain- Image gain settings
Color- Color saturation settings
Black.L- Image black level settings
WB.R- White Balance, Red settings
PT.S- Pan/Tilt speed settings
Zoom.S- Zoom speed settings
Preset.S- Preset speed settings
WB.B- White Balance, Blue settings
WDR- Wide Dynamic Range Settings
Freeze- Freeze the video on the current frame. (Doesn't use + and - buttons)
B.Light- Back light compensation
OPW- One Push White Balance (Hold the button down while pointing the camera at a gray card to set white balance.)
Resolution- Used to change the video format/resolution. Press and hold the Fn button (15) and Resolution button to select the desired format. The image block
will restart after the format is changed, and the screen will go black for a few seconds.
AI Button- Disabled
Power- Press and hold for three seconds to turn the camera on/off.
Fn Button- Press and hold in conjunction with other buttons in dark brown text (Stabilizer, Mute, Scan, etc...) to adjust parameters.
Bekijk gratis de handleiding van Bolin Technology Blue Line B7-220, stel vragen en lees de antwoorden op veelvoorkomende problemen, of gebruik onze assistent om sneller informatie in de handleiding te vinden of uitleg te krijgen over specifieke functies.
Productinformatie
| Merk | Bolin Technology |
| Model | Blue Line B7-220 |
| Categorie | Bewakingscamera |
| Taal | Nederlands |
| Grootte | 9556 MB |


