Biltema 84-0058 handleiding
Handleiding
Je bekijkt pagina 4 van 24
Art. 84-0058
4
© 2024-10-17 Biltema Nordic Services AB
SE
skada motorn och eventuella skador
täcks inte av garantin.
• Använd ej dammsugaren i utrymmen
med hög luftfuktighet!
• Dammsug aldrig utan fi lter i dammsuga-
ren!
• Dammsug aldrig hår, kläder eller någon
del av kroppen!
• Håll dammsugaren ifrån värmekällor
som element, ugnar etc.!
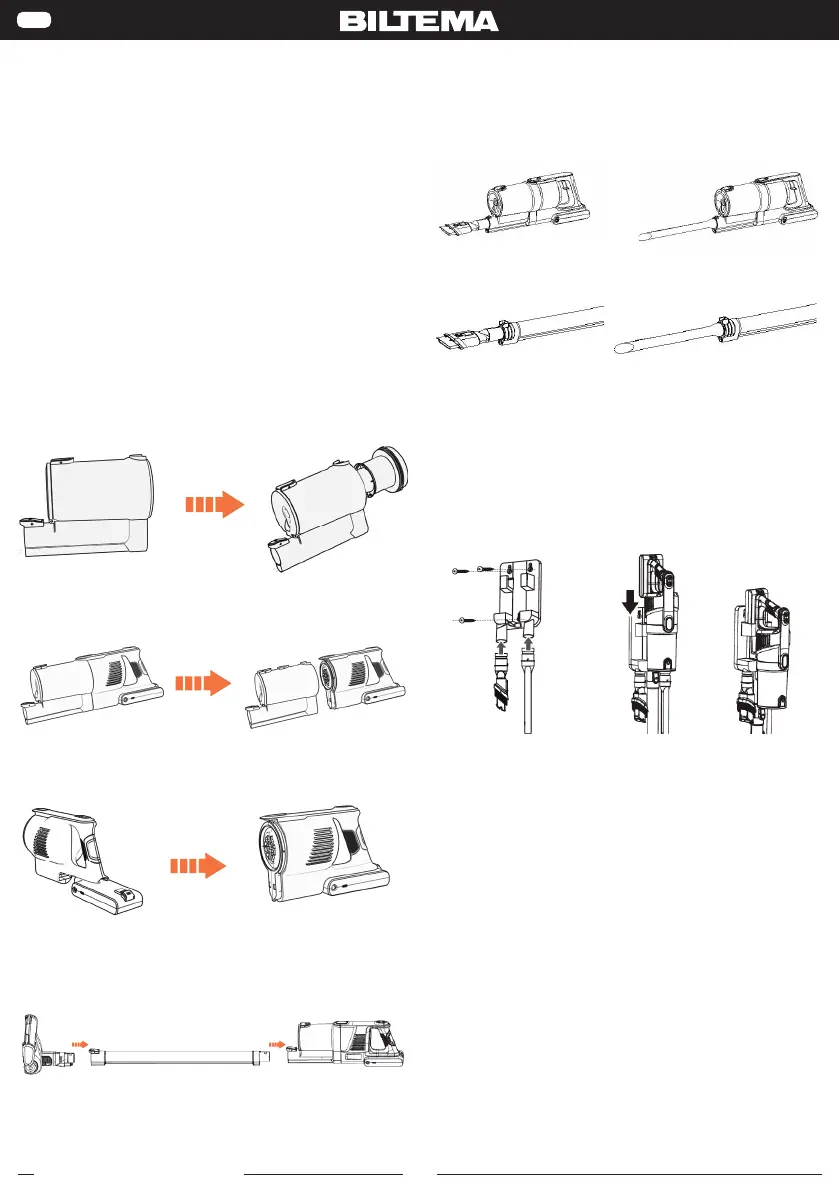
7. MONTERING
Sätt i cyklonen och HEPA ltret i dammbehållaren.
Linjera urtagen i cyklonen med taggarna i dammbe-
hållaren.
▋Packing Details
Dust cup
motor
assembly
Battery
pack
Conductive
tube
Electric
floor brush
Accessories
Suction
head
1 1 1 1 2
Charger Hanger
Iinstructions
Certificate
of
conformity
——
1 1 1 1 ——
▋Installation of components
·Installation of dust cup assembly
Screw the inner cone of the cyclone cone into the outer cone in the direction of the
arrow, and then install the cyclone cone and HEPA into the dust cup (rotate the
Montera dammsugarmotorn på dammbehållaren. Vik
in motorn underifrån och tryck ihop tills ett ”klick”
hörs.
·The connection between the dust cup assembly and the motor assembly
Align the lower edge bayonet slot of the dust cup assembly with the lower edge
bayonet of the motor assembly and sleeve it tightly, and then you can hear the
"click" lock sound of the dust cup release button. (As shown below)
· Connection of dust cup motor assembly and battery pack assembly
Aim the front end of the battery pack at the groove at the lower part behind the dust cup motor
assembly, and then keep the battery pack parallel to the lower part of the dust cup motor
assembly. Insert the pin at the upper end of the battery pack into the groove at the lower part
behind the dust cup motor assembly and push it flat forward. The lock sound of the release
button of the battery pack can be heard.(as shown below)
· Connection of electric ground brush, conductive tube and body components
Connect the electric brush: insert one end of the electric brush into one end of the
conductive tube, and then insert the other end of the conductive tube into the host
interface, and then hear the locking sound of the "cut".(as shown below)
Montera batteripacken på motorn. Linjera batteriet
mot motorn och tryck ihop tills ett ”klick” hörs.
·The connection between the dust cup assembly and the motor assembly
Align the lower edge bayonet slot of the dust cup assembly with the lower edge
bayonet of the motor assembly and sleeve it tightly, and then you can hear the
"click" lock sound of the dust cup release button. (As shown below)
· Connection of dust cup motor assembly and battery pack assembly
Aim the front end of the battery pack at the groove at the lower part behind the dust cup motor
assembly, and then keep the battery pack parallel to the lower part of the dust cup motor
assembly. Insert the pin at the upper end of the battery pack into the groove at the lower part
behind the dust cup motor assembly and push it flat forward. The lock sound of the release
button of the battery pack can be heard.(as shown below)
· Connection of electric ground brush, conductive tube and body components
Connect the electric brush: insert one end of the electric brush into one end of the
conductive tube, and then insert the other end of the conductive tube into the host
interface, and then hear the locking sound of the "cut".(as shown below)
Montera dammsugarröret med munstycket och
dammsugarkroppen genom att trycka ihop dem.
Tryck till ett ”klick” hörs.
·The connection between the dust cup assembly and the motor assembly
Align the lower edge bayonet slot of the dust cup assembly with the lower edge
bayonet of the motor assembly and sleeve it tightly, and then you can hear the
"click" lock sound of the dust cup release button. (As shown below)
· Connection of dust cup m otor assembly and battery pack assembly
Aim the front end of the battery pack at the groove at the lower part behind the dust cup motor
assembly, and then keep the battery pack parallel to the lower part of the dust cup motor
assembly. Insert the pin at the upper end of the battery pack into the groove at the lower part
behind the dust cup motor assembly and push it flat forward. The lock sound of the release
button of the battery pack can be heard.(as shown below)
· Connection of electric ground brush, conductive tube and body components
Connect the electric brush: insert one end of the electric brush into one end of the
conductive tube, and then insert the other end of the conductive tube into the host
interface, and then hear the locking sound of the "cut".(as shown below)
Montera tillbehör:
Montera önskat munstycke direkt mot maskinen eller
med röret.
Munstycke monterat direkt på maskinen:
▋Installation of components
·Accessory and host connection
Insert the accessory into the host interface and insert it tightly. (As shown below)
·Connection between accessories and conductive tube
Insert the accessory socket into one end of the conductive tube and insert it tightly.
After inserting it, insert the other end of the conductive tube into the host interface.
Just hear the "click" lock sound. (As shown below)
· Use of the rack
Remove and expand the screws to attach the rack to the wall, then insert the small
attachment, and finally put the whole machine on.
Munstycke monterat på röret:
▋Installation of components
·Accessory and host connection
Insert the accessory into the host interface and insert it tightly. (As shown below)
·Connection between accessories and conductive tube
Insert the accessory socket into one end of the conductive tube and insert it tightly.
After inserting it, insert the other end of the conductive tube into the host interface.
Just hear the "click" lock sound. (As shown below)
· Use of the rack
Remove and expand the screws to attach the rack to the wall, then insert the small
attachment, and finally put the whole machine on.
Montera väggfästet:
Mät ut och montera väggfästet med medföljande
skruv och plugg beroende på väggmaterial.
Fästet har även plats att hålla de två extra medföl-
jande munstyckena.
Tänk på att p4-ha ett vägguttag i närheten för att kunna
koppla in adaptorn.
▋Installation of components
·Accessory and host connection
Insert the accessory into the host interface and insert it tightly. (As shown below)
·Connection between accessories and conductive tube
Insert the accessory socket into one end of the conductive tube and insert it tightly.
After inserting it, insert the other end of the conductive tube into the host interface.
Just hear the "click" lock sound. (As shown below)
· Use of the rack
Remove and expand the screws to attach the rack to the wall, then insert the small
attachment, and finally put the whole machine on.
8. ANVÄNDNING
Laddning
Koppla in adaptorns DC kontakt till uttaget på bat-
teriet och anslut adaptern till ett 230 V uttag.
Medan batteriet laddas blinkar lampan rött, när bat-
teriet är fulladdat lyser det blått. Koppla ur adaptorn
från både vägguttaget och batteriet när detta är
fulladdat.
Använd endast medföljande adapter för att ladda
batteriet.
Batteriet kan laddas både när det sitter installerat i
dammsugaren och när det är urtaget.
Dammsugning
Slå på dammsugaren med ON/OFF knappen.
Bekijk gratis de handleiding van Biltema 84-0058, stel vragen en lees de antwoorden op veelvoorkomende problemen, of gebruik onze assistent om sneller informatie in de handleiding te vinden of uitleg te krijgen over specifieke functies.
Productinformatie
| Merk | Biltema |
| Model | 84-0058 |
| Categorie | Stofzuiger |
| Taal | Nederlands |
| Grootte | 3444 MB |