Handleiding
Je bekijkt pagina 37 van 108
108108
Split type air conditioner / User Manual 37 / 108 EN
36 / 112 EN
Split Type Air Conditioner / User Manual
5 Refrigerant piping connection
Torque requirements
Outer Diameter of
Pipe (mm)
Tightening Torque (N•m) Flare dimension(B) (mm)
Flare shape
Ø 6.35 (Ø 0.25”) 18~20 (180~200kgf.cm) 8.4~8.7 (0.33~0.34”)
Ø 9.52 (Ø 0.375”) 32~39 (320~390kgf.cm) 13.2~13.5 (0.52~0.53”)
Ø 12.7 (Ø 0.5”) 49~59 (490~590kgf.cm) 16.2~16.5 (0.64~0.65”)
Ø 16 (Ø 0.63”) 57~7 1(570~710kgf.cm) 19.2~19.7 (0.76~0.78”)
Ø 19 (Ø 0.75”) 67~101 (670~1010kgf.cm) 23.2~23.7 (0.91~0.93”)
WARNING! Excessive force can
break the nut or damage the
refrigerant piping. You must not
exceed torque requirements shown
in the table above.
5.3 Instructions for connecting
piping to outdoor unit
1. Unscrew the cover from the packed valve on the
side of the outdoor unit.
2. Remove protective caps from ends of valves.
3. Align flared pipe end with each valve, and
tighten the flare nut as tightly as possible by
hand.
4. Using a spanner, grip the body of the valve. Do
not grip the nut that seals the service valve.
Valve cover
Valve cover
5. While firmly gripping the body of the valve,
use a torque wrench to tighten the flare nut
according to the correct torque values.
6. Loosen the flaring nut slightly, then tighten
again.
7. Repeat Steps 3 to 6 for the remaining pipe.
A
CAUTION! Torque from
tightening the flare nut can snap
off other parts of valve.
37 / 112 EN
Split Type Air Conditioner / User Manual
6 Air evacuation
6.1 Preparations and precautions
Air and foreign matter in the refrigerant circuit
can cause abnormal rises in pressure, which
can damage the air conditioner, reduce its
efficiency, and cause injury. Use a vacuum pump
and manifold gauge to evacuate the refrigerant
circuit, removing any non-condensable gas and
moisture from the system.
Evacuation should be performed upon initial
installation and when unit is relocated.
6.1.1 Before performing evacuation
• Check to make sure the connective pipes
between the indoor and outdoor units are
connected properly .
• Check to make sure all wiring is connected
properly.
6.1.2 Evacuation instructions
1. connect the charge hose of the manifold
gauge to service port on the outdoor unit’s low
pressure valve.
2. Connect another charge hose from the
manifold gauge to the vacuum pump.
3. Open the Low Pressure side of the manifold
gauge. Keep the High Pressure side closed.
4. Turn on the vacuum pump to evacuate the
system.
5. Run the vacuum for at least 15 minutes, or until
the Compound Meter reads -76cmHG (-10
5
Pa).
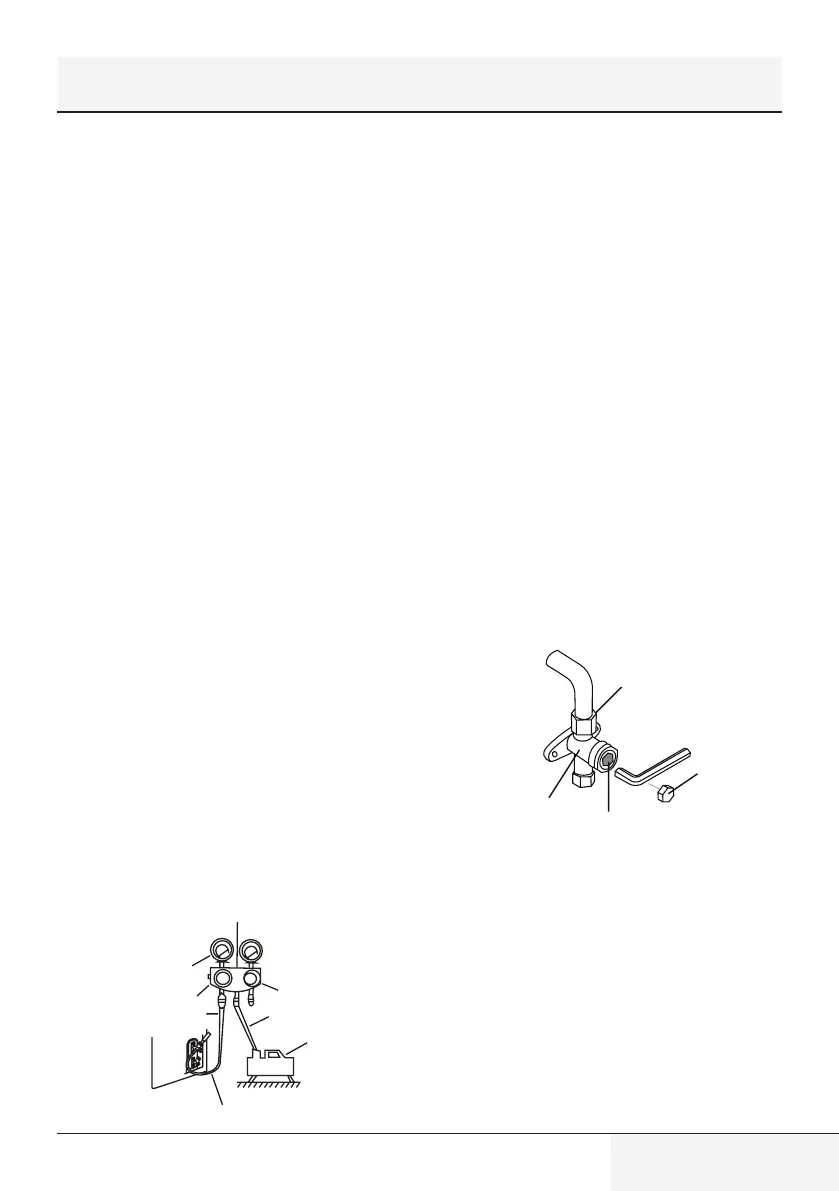
Manifold Gauge
Compound
gauge
-76cmHg
Low pressure
valve
High pressure
valve
Pressure hose /
Charge hose
Charge hose
V
acuum
pump
Pressure gauge
Low pressure valve
Manifold gauge
Compound gauge
-76cmHg
Low pressure valve
Pressure hose/Charge
hose
High pressure valve
Charge hose
Vacuum
pump
Low pressure valve
Pressure gauge
6. Close the Low Pressure side of the manifold
gauge, and turn off the vacuum pump.
7. Wait for 5 minutes, then check that there has
been no change in system pressure.
8. If there is a change in system pressure, refer
to Gas Leak Check section for information on
how to check for leaks. If there is no change
in system pressure, unscrew the cap from the
packed valve (high pressure valve).
9. Insert hexagonal wrench into the packed valve
(high pressure valve) and open the valve by
turning the wrench in a 1/4 counterclockwise
turn. Listen for gas to exit the system, then
close the valve after 5 seconds.
10. Watch the Pressure Gauge for one minute
to make sure that there is no change in
pressure. The Pressure Gauge should read
slightly higher than atmospheric pressure.
11. Remove the charge hose from the service
port.
Flare nut
Cap
valve body
valve stem
Flare nut
valve stem
valve body
Cap
12. Using hexagonal wrench, fully open both the
high pressure and low pressure valves.
13. Tighten valve caps on all three valves (service
port, high pressure, low pressure) by hand.
You may tighten it further using a torque
wrench if needed.
Bekijk gratis de handleiding van BEKO BRVPF095, stel vragen en lees de antwoorden op veelvoorkomende problemen, of gebruik onze assistent om sneller informatie in de handleiding te vinden of uitleg te krijgen over specifieke functies.
Productinformatie
| Merk | BEKO |
| Model | BRVPF095 |
| Categorie | Airco |
| Taal | Nederlands |
| Grootte | 10539 MB |


