Avidsen 103954 handleiding
Handleiding
Je bekijkt pagina 2 van 8
DIGITAL CHRONOTHERMOSTAT
Réf. 103954
GB
V5
www.avidsen.com
11
7
13
9
12
4
14
2 1
14
3
5
10
6
8
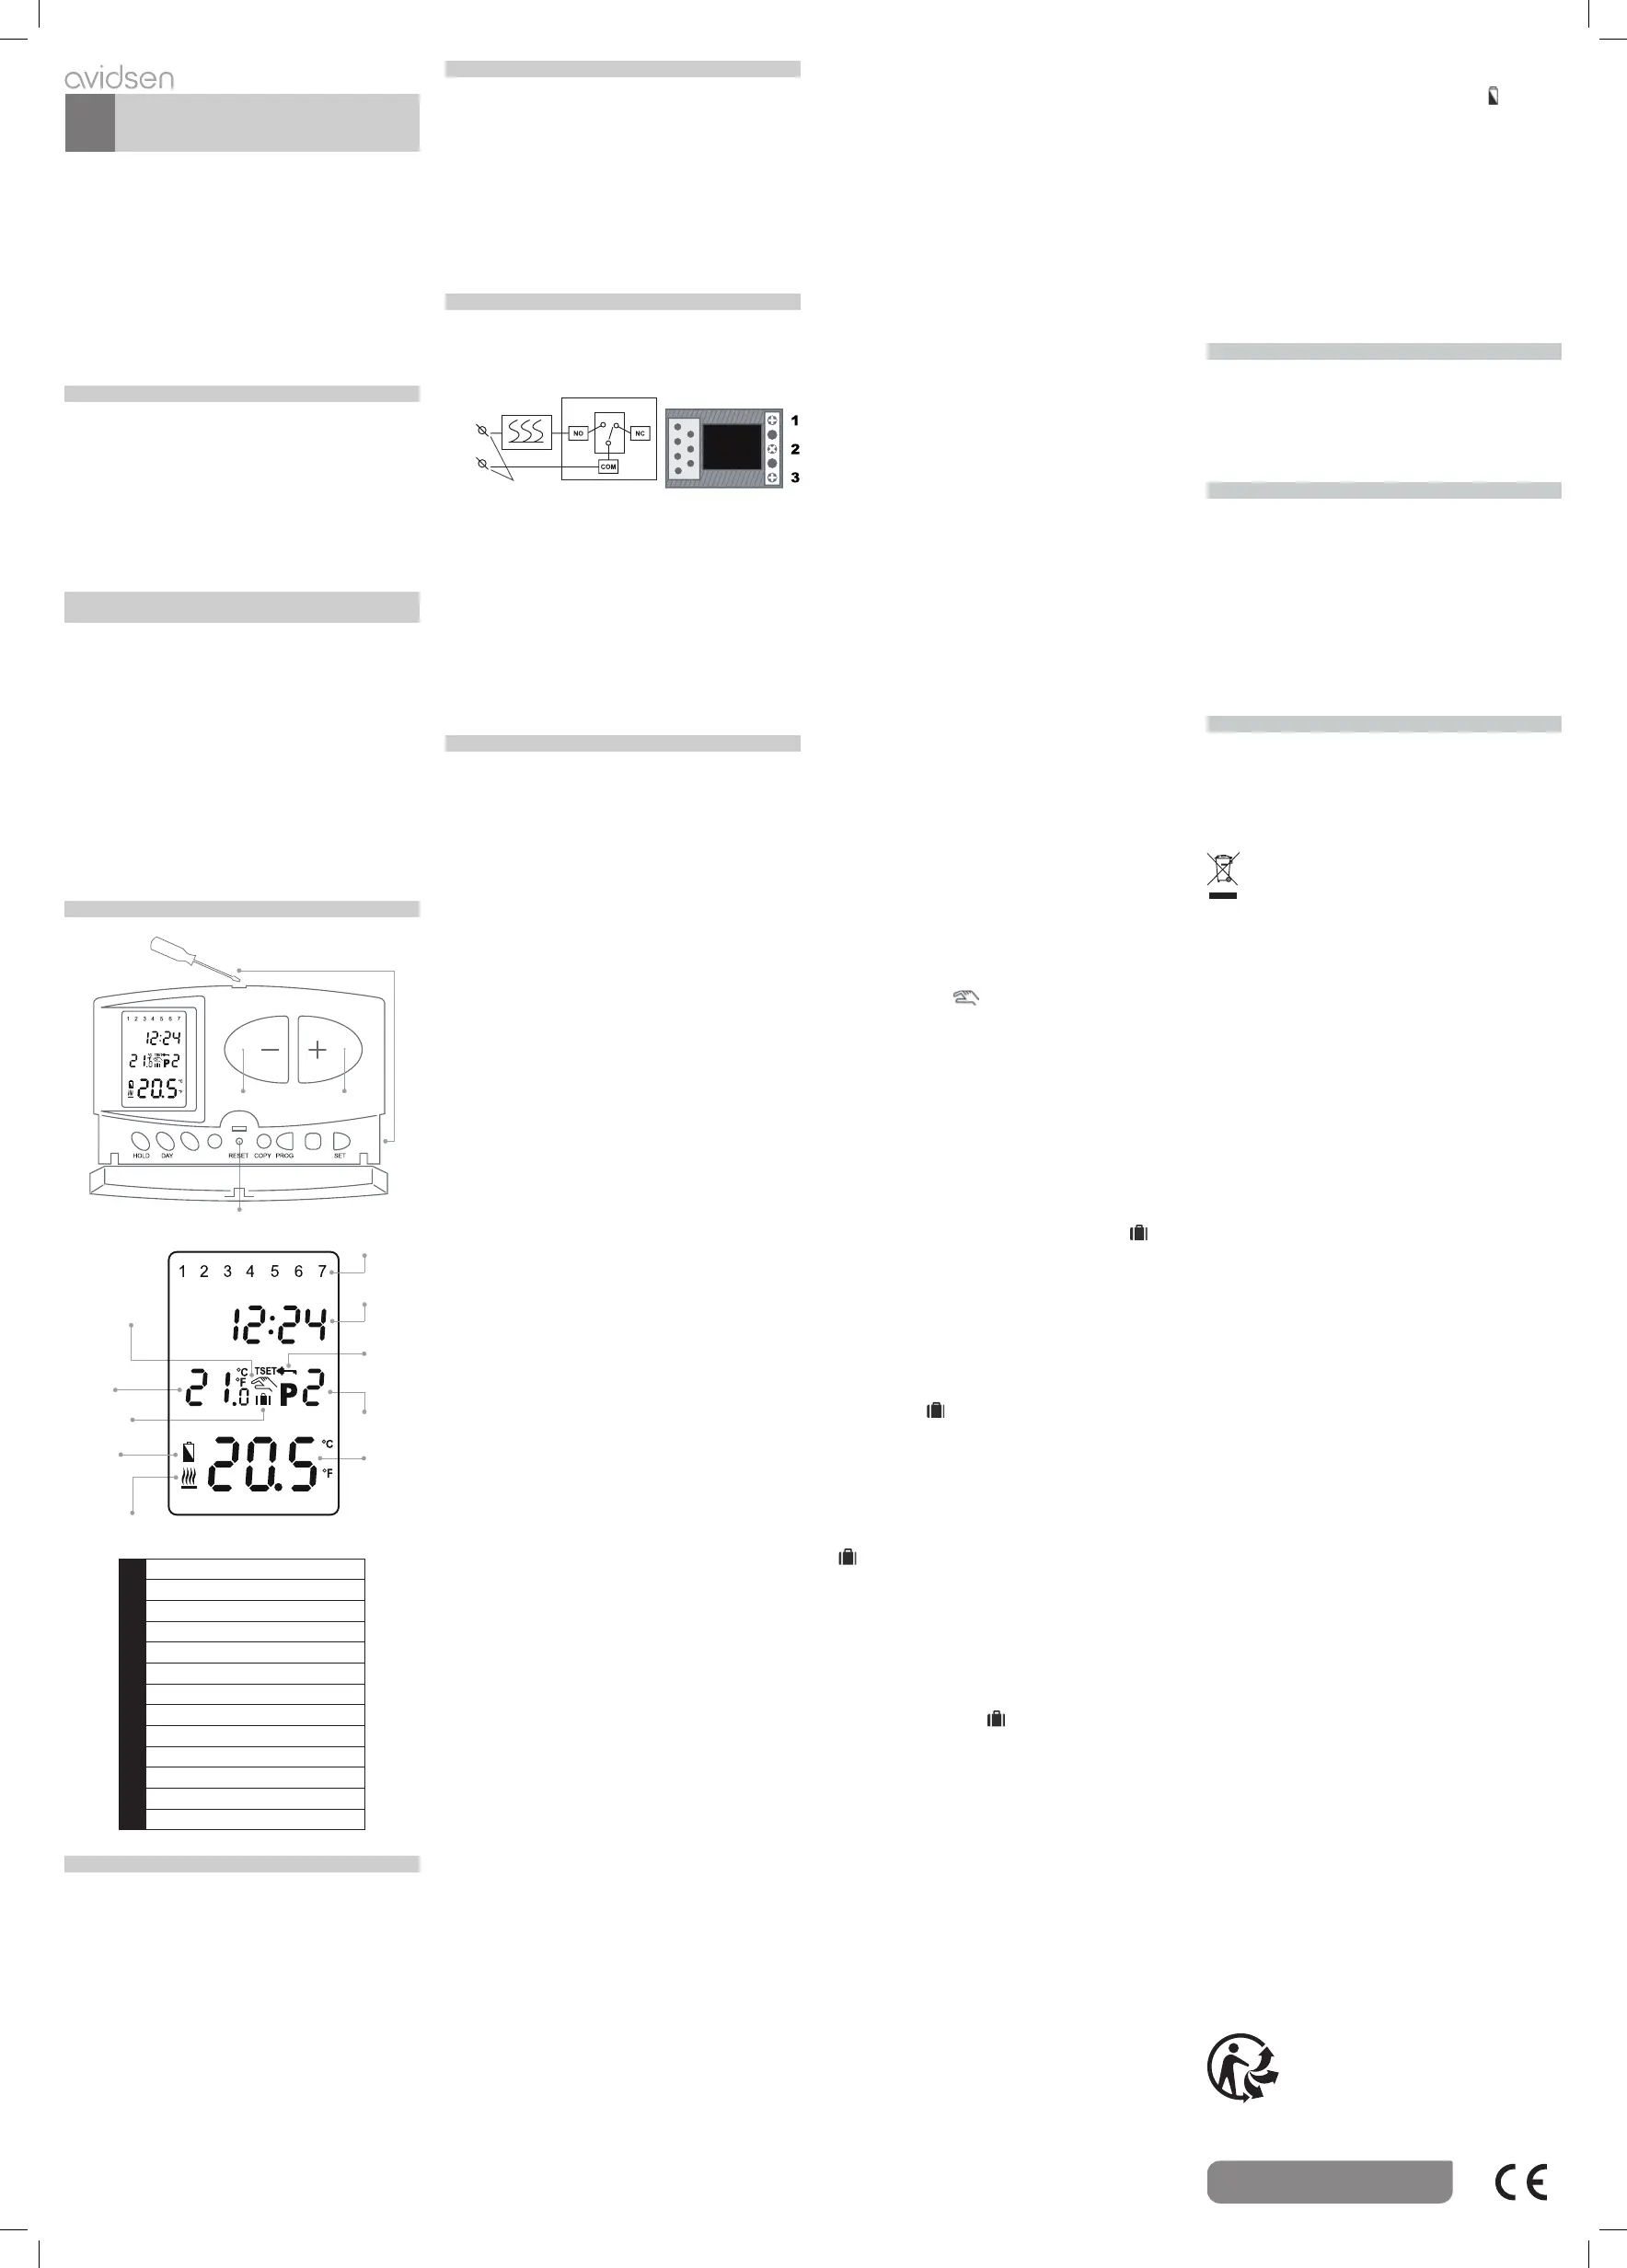
1-2
Increase/decrease button
3 Reset button
4 Weekday
5 Current time
6 Switching period
7 Selected temperature
8 Current temperature
9 Battery level indicator
10 Screen lock
11 Manual operating
12 HOLD mode
13 Holiday mode icon
14 Battery compartment
This programmable digital chronothermostat is ideal to
control the temperature of any room (bedroom, kitchen,
etc.) and is very easy to use. Allows for the operation
of heating/cooling equipment, when the temperature of
the environment to be monitored is lower/higher than a
user-preset reference temperature. You can also set a
different heating/cooling program for one day or for the
entire week and activate the screen lock function to prevent
unauthorised use. Very easy installation, thanks to the
step by step manual instructions. Mounting and connection
can be made either by a technician or any other person.
IMPORTANT: carefully read the manual of use before
the installation.
PRECAUTIONS ON BATTERY USE
• Use only batteries of indicated size and voltage.
• Make sure you plug the batteries observing the correct
polarity as indicated in the battery compartment. Bat-
tery connection with incorrect polarity may damage the
chronothermostat.
•
Do not mix different types of batteries such as an alkaline
and a zinc carbon, or old batteries with new batteries.
•
If you expect not to use the chronothermostat for a long
period, disconnect it from the equipment and remove
the batteries to prevent damage resulting from possible
battery leakage.
PRECAUTIONS ON INSTALLATION AND USE
OF THE CHRONOTHERMOSTAT
• The wireless digital thermostat is exclusively for indoor
use (closed rooms, garages, porches etc.). Do not install
outdoors or in locations directly exposed to rain.
• Do not install in places with high humidity.
• The thermostat can operate one device only. The con-
nection of several equipment in cascade or in series (for
example, a heater and a fan) does not guarantee the
correct functioning of the device.
• Cut off mains power before connecting any device.
• Use the utmost caution when making wirings for con-
necting with equipment and electricity mains: a wrong
connection or unreliable shielding of electrical cables may
cause damage to the device and jeopardize your safety.
Note: lthe company Avidsen waives any responsibility
for damage caused by improper installation or use of the
device other than described in this manual.
DESCRIPTION
PROGRAMMING AND USE
1) SETTING DATE AND TIME
As a first step, and you must set the day of the week and
the current time as follows:
• press “DAY”, the day number starts flashing, use the -
and + buttons to change the day.
• press the “DAY” button again, the time will flash, use
the - and + buttons to set the time, follow the same
procedure to set the minutes, confirm by pressing the
“SET” button. At this point, the correct data is recorded
and the device returns to the main screen (if you do
not press any buttons for 15 seconds the settings are
automatically confirmed and the device returns to the
main screen).
2) PROGRAMMING
The device can be programmed for a period of one week.
Its operation is automatic and will cyclically repeat the pro-
grams that have been entered into six separate switching
times. You can select the temperature at your discretion
for each day of the week and for each switching time.
The set temperature for a set period will remain valid until
the next change.
La temperatura impostata per un determinato periodo
rimarrà valido fino al momento dello cambio successivo.
Consequently, the thermostat will maintain the set tem-
perature for the switching time P1 to switching time P2.
After P2 has elapsed, the temperature selected for the
step P2 will be valid.
Note: The thermostat software is enabled to increase the
level of the periods to be set in accordance with the serial
number (P1, P2, etc.)
With the default factory settings, the device will perform
the following change of periods each day of the week
Periods and temperatures can be changed
P1 7:00 20°C
P2 9:00 17°C
P3 12:30 20°C
P4 15:00 19°C
P5 17:30 22°C
P6 23:00 17°C
2.1) How to set a program
a) Press the “SET” button to access the main screen.
b) Press and hold the “SET” button again and press “PROG”.
At this point the device enters the programming mode and
the numbers indicating the days of the week (1 2 3 4 5 6
7) flash on the display.
Select the day to be programmed or all days of the week
by repeatedly pressing the - or + buttons on the front
panel of the device. If you want to write the same pro-
gram for each day of the week, it is reasonable to select
all days of the week (1 2 3 4 5 6 7) simultaneously, so
it is not necessary to make a separate programming day.
If you want to write a different program for each day, the
programming must be performed separately for each day
of the week by selecting the days one by one. (If there
are days for which you want to create the same program
simply create the program only once because it can be
easily applied to any other day with the help of the button
“COPY” as described in 2.2) Press “PROG” again and then
set the start time of the period P1, the time will flash and
you can set it using the + and - buttons on the right of
the thermostat. Press the “PROG” button to set the de-
sired temperature, use the + and - buttons to increase or
decrease the value. To set multiple periods, (P2, P3, P4,
P5, P6), repeat the above operation.
2.2) How to copy a program
First, press the “SET” button to access the main screen.
Then press the “COPY” button for about 3 seconds to acti-
vate the “COPY” function. The word “COPY” appears in place
of time digits; the flashing number 1 indicates “Monday”
meaning that the system is ready to copy a program.
• Select the day you want to copy to another day by using
the buttons + e - on the front panel of the device.
• Press the “Copy” button to copy the selected day of the
program. Afterwards, the number indicating the day and
the word COPY stop flashing.
Repeat the same procedure for the other days you want
to use the same program.
Finally, press the “SET” button to save your changes (if
you do not press any buttons for 15 seconds, the changes
are saved automatically). Subsequently, the device returns
to the main screen.
WARNING! The “COPY” function is available only if the
days of the week have been programmed separately!
2.3) How to change a program
The previously set program can be modified at any time
by repeating the programming steps.
•
A period previously activated can be disabled by setting
the start time to -: - Using the “SET” button to enter
the programming screen and then pressing the “SET” +
“PROG” and select the day you want to disable
•
Press “PROG” to select the time you want to disable
the programming, then the button “DAY” after which
the symbol - : - appears on period in which you want
to disable programming.
• To reactivate, follow the same procedure until time and
temperature appears instead of -: -
• When all changes have been done, press “SET” to save
them. After about one minute, they are automatically
saved. Subsequently, the device returns to the main
screen.
• If you need a completely different program, then press
the “RESET” button to reset the device (which erases
both the program and the basic settings). To press the
button, do not use electrically conductive materials such
as a graphite pencil. Then, adjust the basic settings of
the thermostat and create a new program as described
in Sections 2.
3) TEMPORARY CHANGE OF THE CORRESPONDING
TEMPERATURE IN THE PROGRAM
If you want to use the device temporarily in a different
way from the program that has been set (eg on holidays
or winter holidays) you can choose between the options
described in sections 3.1-3.4. To simplify the manual
temperature changes with the factory default settings,
temperatures of 18°C and 22°C are assigned to the but-
tons - and + respectively.
When you change the temperature manually, by pressing
the - or + button the temperature will be immediately
equal to factory defaults.
For example, if the P3 period ensures a temperature of
19°C, it can be changed with a temperature of 22°C when
necessary by pressing the button only once without having
to press the button several times in increments of 0.5°C.
Then use the - and + buttons, to change the temperature in
increments of 0.5°C in accordance with your current needs.
The temperature economy and comfort values assigned
to the buttons can be modified as follows:
To set the economy temperature, press the “SET” button
and hold it down and press the button -. Then, with the
help of - and + buttons set the selected economy tem-
perature. After setting the temperature, press the “SET”
button to save the changes (after about 15 seconds, it is
automatically saved). Subsequently, the device returns
to the main screen.
To set the comfort temperature press the “SET” button
and hold it down and press the + button. Then, with
the help of - and + buttons set the comfort temperature
chosen. After setting the temperature, press the “SET”
button to save the changes (after about 15 seconds it is
automatically saved). Subsequently, the device returns
to the main screen.
3.1) Manual mode (HOLD)
Set the temperature using the buttons - e + on the front
panel of the device, then press “HOLD”. The unit monitors
the boiler according to set values, to resume the use of the
thermostat as scheduled, press the “SET” button”
3.2) Change temperature up to following program set
Set the desired temperature using the - and + buttons
on the front panel of the device. At this point the display
will show the icon indicating that the thermostat
is operated with a manual control.
The device will control the boiler according to the value set
up to the time of the next switch specified in the program.
During this temporary change, the segments indicate
the time on the display and alternately show the time
remaining in manual control (for example 1 H: 2 0, ie, 1
hour and 2 minutes). After this time, the icon disappears
and the device resumes the program that has been set.
If you want to return to the set program before reaching
the time of the next switch press “SET”.
3.3) How to change temperature for 1-9 hours (short
period program )
Set the desired temperature using the - and + buttons
on the front panel of the device and then press the “DAY”
button. At this point, the display shows the icon with
number 1 instead of the number that indicates the period
of the change duration in hours. Adjust this time to the
desired length (between 1 and 9) using the large - and +
buttons The program will start approximately 10 seconds
after the adjustment. Then, the device keeps the modified
temperature for a given period of time. The temperature
setting can be changed freely during the program without
exiting it. During this temporary change, the segments
indicating the time on the display alternately show the
hour and the remaining time in manual control (for ex-
ample H 3: 0 2, that is, 3 hours and 2 minutes). After this
time, the icon disappears and the device resumes
the program as it has been set. If you want to return to
the program set before the fixed time has elapsed, please
press the “SET” button.
3.4) Change temperature for 1-99 days (holiday
mode)
Set the desired temperature using the - and + buttons on
the front panel of the device and then press the “HOLD” but-
ton for 2 seconds. At this point, the display shows the icon
with d:01 which replaces the time, indicating the
duration of the change in days. Adjust this time to the
desired length (between 1 and 99) with the + and - keys (1
day means 24 hours). The holiday program begins approxi-
mately 10 seconds after the adjustment. Subsequently, the
device keeps the modified temperature for a given period
of time. The temperature setting can be changed freely
during the holiday program without exiting it. During this
temporary change the segments indicating the time on the
display alternately show the exact time and the other days
in the control manual (eg, d: 03, ie 3 days).
After this time, the icon disappears and the device
resumes the program that has been set. If you want to
return to the set program before the time set for the tem-
perature change, please press the button “SET”.
3.5) Set switching sensitivity (precision)
According to default factory settings, the switching sen-
sitivity is ± 0.2°C (the display indicates the setting with
the symbol “S: 1”) which can be changed to + 0 / -0.2 ° C
(the display indicates setting with the symbol “S:2”). The
desired switching sensitivity can be set by pressing the
“DAY”, “COPY” and - and + keys, press SET (after about
15 seconds, the settings are automatically recognized and
the device returns to the main screen). By pressing the
“RESET” button, the switching sensitivity is reset to the
factory default setting, that is, to ± 0.2°C (“S: 1”).
The switching sensitivity ± 0.2 ° C provided by factory
settings (the display shows the symbol “S: 1” for this set-
ting) applies mainly to thermal radiators with low thermal
inertia (plate radiators). Switching C sensitivity +0/-0.2
° (the display shows the symbol “S: 2” for this setting)
applies to heating systems with high thermal inertia (eg
floor heating).
3.6) Activating the pump protection function:
To turn it on or off, press the “SET” key to access the
main screen.
Then press the “DAY” and “PROG” buttons and then use the
- and + buttons to turn on “HP: ON” or to disable “HP: OF”
4) HOW TO REPLACE THE BATTERIES
The average battery life is 1 year. If the icon
indicating
low battery voltage appears on the display, the batteries
must be replaced, the date and time should be reset after
the batteries have been replaced, but the device saves the
program that was loaded without batteries so there is no
need to reprogram the device.
5) RESTORING THERMOSTAT TO FACTORY DEFAULT
Press “RESET”, the thermostat can be restored to factory
settings. This implies deleting day, exact time, basic settings
and program set. To press the “RESET” button, do not
use any electrically conductive material such as: graphite
pencil. After resetting the device, adjust again the basic
settings of the thermostat and create the new program
as described in Sections 2 and 3.
TECHNICAL CHARACTERISTICS
• Adjustable temperature range: 7°C - 35°C
(with 0.5°C increments)
• Temperature range on Display: 0°C - 35°C
(with 0.1°C increments)
• Load capacity : Max 8 (2) A, 230 V
• Batteries: DC 3V 2xAA (not provided)
• Accuracy: ±0,5 °C
• Discharged battery indicator
• Storage temperature: -10°C to +50°C
• Dimensions: 130 x 80 x 32 mm
INSTALLATION
Electrical connections:
A terminal for electrical connection is located on the
back of the thermostat cover.
1 (NO) 2 (COM) 3 (NC)
The thermostat output relay has three connection points
without potential, that is to say, no. 1 (NO); no. 2 (COM)
and no. 3 (NC), which are located under an internal cover
on the inside of the rear panel. To control the heating,
connect the two connecting conductors of the device to be
checked to terminals no. 1 (NO) and no. 2 (COM), that is to
say, to the normally open terminals of the relay, while the
two connecting conductors of the cooling equipment must
be connected to terminals no. 2 (COM) and no. 3 (NC),
that is to say, to the normally closed terminals of the relay.
IMPORTANT: You can only and connect a single appliance
(stove, fan, boiler). The connection of several equipment
in cascade or in series (for example, a heater and a fan)
does not guarantee the correct functioning of the device.
INSTALLATION
• Drill holes in the wall, making sure they match with the
holes on the thermostat cover.
• Insert anchors (provided) into the wall.
• Place the cover on the wall by aligning it with the holes.
•
Insert screws through the holes (supplied) on the cover
and secure them with a screwdriver.
ADDITIONAL INFORMATION
•
Always unplug the product from the mains before
carrying out any maintenance.
• Never use abrasive or corrosive substances to clean
the product.
• Use the product in a dry place
•
Do not remove the cover to avoid risks of electric shock.
WARRANTY AND SERVICE
This product is covered by 2-year legal warranty of
seller for conformity defects as provided for by articles
128 and subsequent of Legislative Decree no 206/2005
(ConsumerÆs Code). ATTENTION: The warranty is not
valid without receipt or proof of purchase.
The warranty does not cover damage caused by negligen-
ce, knocks or accidents. This product must not be opened
or repaired by any person not employed by Avidsen,
except to insert or replace the batteries. Any physical
intervention on the product will void the warranty.
Technical Assistance: Tel:
+ 33 (0)892 701 369
Monday to Friday, 9 AM to 12 PM and 2 PM to 6 PM
INFORMATION TO USERS
For the purpose and effect of art. 13 legislative decree
25 July 2005, no. 151 “Implementation of Directives
2002/95/CE and 2003/108/CE relative to the reduction
of the use of hazardous substances in electrical and
electronic appliances as well as the disposal of waste ”
The crossed bin symbol shown on the equipment
indicates that at the end of its working life the
product must be collected separately from other
waste. The user must therefore take the abo-
ve equipment to the appropriate differentiated
collection centres for electronic and electro technical
waste, or return it to the dealer when purchasing a new
appliance of equivalent type, in a ratio of one to one.
Appropriate differentiated waste collection for subse-
quent recycling, treatment and environment-friendly
disposal of the discarded equipment helps to prevent
possible negative environmental and health effects and
encourages recycling of the component materials of the
equipment. Illegal disposal of the product by the user
will be punished by application of the administrative fi nes
provided for by the legislative decree no. 22/1997 (article
50 and following of the legislative decree no. 22/1997).
will show the icon indicating that the thermostat
ton for 2 seconds. At this point, the display shows the icon
with d:01 which replaces the time, indicating the
in the control manual (eg, d: 03, ie 3 days).
After this time, the icon disappears and the device
on the front panel of the device and then press the “DAY”
button. At this point, the display shows the icon with
time, the icon disappears and the device resumes
Pour en savoir plus :
www.quefairedemesdechets.fr
8A 250VAC
Coil 3VDC
Neutral N
Phase L
To be connected to 230V - Supported Load 230V AC 8A Max
Thermostat
Controlled
equipment
1 (NO) 2 (COM) 3 (NC)
Bekijk gratis de handleiding van Avidsen 103954, stel vragen en lees de antwoorden op veelvoorkomende problemen, of gebruik onze assistent om sneller informatie in de handleiding te vinden of uitleg te krijgen over specifieke functies.
Productinformatie
| Merk | Avidsen |
| Model | 103954 |
| Categorie | Niet gecategoriseerd |
| Taal | Nederlands |
| Grootte | 4176 MB |

