Asus H610M-IM-A handleiding
Handleiding
Je bekijkt pagina 10 van 53
H610M-IM-A
2-2
I
2
C
PCIEX16(G5)
PCIEX4(G3)
PCI_2
PCI_1
ASM
1083
TPM
128Mb
BIOS
SPEAKER
CHASSIS
F_PANEL
AT_ATX_SEL
MPCIE
AAFP
COM1_SEL
COM2_SEL
ATX_PWR
CPU_FAN
CHA_FAN
RTL
8111H
WGI219V
Super
I/O
ALC
897
DIGI+
VRM
24.4cm(9.6in)
24.4cm(9.6in)
DDR4 DIMM_A (64bit, 288-pin module)
LGA1700
2280 2260 2242
M.2(SOCKET3)
M.2(SOCKET3)
PCIE SATA
3.0 X4 V
DDR4 DIMM_B (64bit, 288-pin module)
AUDIO
GPIO_CON
LAN2_U32G1_34
LAN1_U32G2_12
Intel
®
H610
EATX12V
COM4COM3 COM5 COM6
USB_56 USB_78
USB_9 SATA6G_3SATA6G_4
SATA6G_2 SATA6G_1
KBMS_CON
BATT_CON
CLRTC
HDMI2
DP_HDMI1
VGA
COM2
COM1
31 2 74 5 46
1
8 13 121619 15 14
3
1
8
1
9
1
11
1
10
17
18
21
20
22
23
24
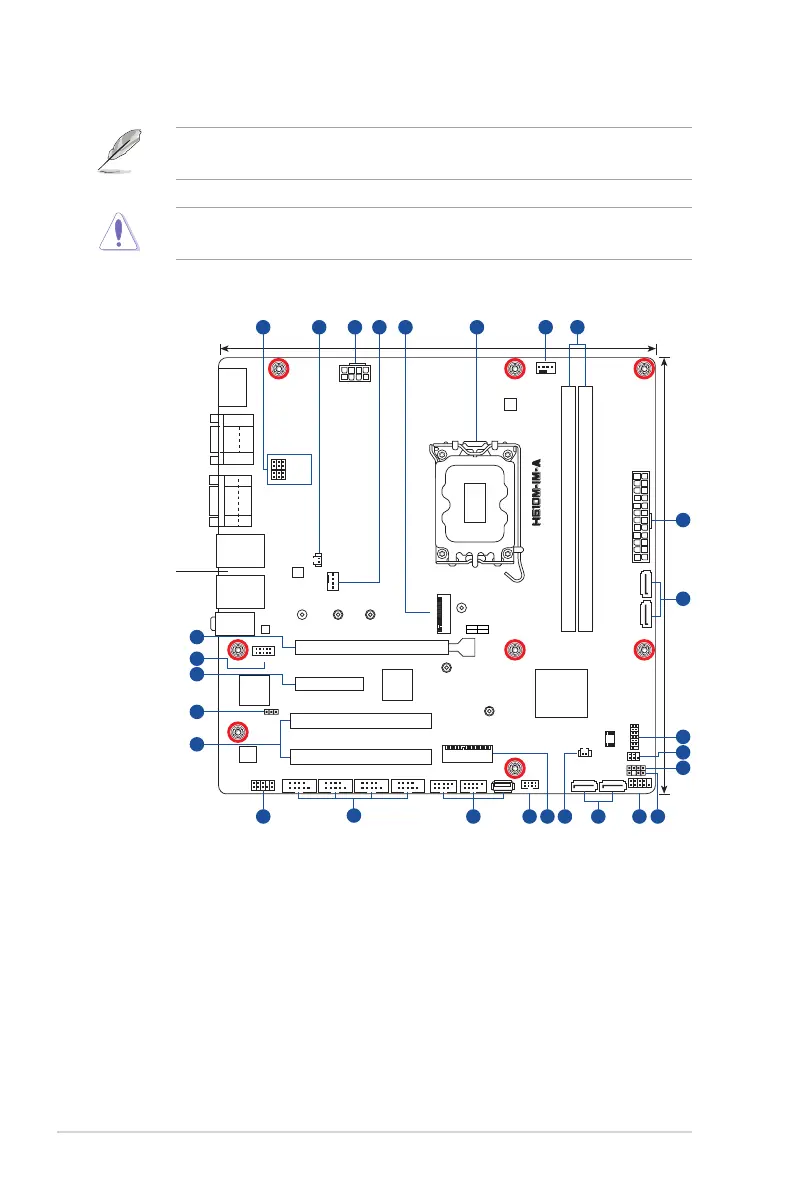
2.2 Motherboard layout
Place this side
towards the rear
of the chassis
NOTE: Place nine screws into the holes indicated by circles to secure the
motherboard to the chassis.
CAUTION! Do not overtighten the screws! Doing so can damage the
motherboard.
Bekijk gratis de handleiding van Asus H610M-IM-A, stel vragen en lees de antwoorden op veelvoorkomende problemen, of gebruik onze assistent om sneller informatie in de handleiding te vinden of uitleg te krijgen over specifieke functies.
Productinformatie
| Merk | Asus |
| Model | H610M-IM-A |
| Categorie | Niet gecategoriseerd |
| Taal | Nederlands |
| Grootte | 3956 MB |


